BM 2610022007 04-12_BM 2610022007 04-12.
BM 2610022007 04-12_BM 2610022007 04-12.qxp 4/17/12 1:26 PM Page 2 General Power Tool Safety Warnings Read all safety warnings and all instructions. Failure to follow the warnings ! WARNING and instructions may result in electric shock, fire and/or serious injury. SAVE ALL WARNINGS AND INSTRUCTIONS FOR FUTURE REFERENCE The term “power tool” in the warnings refers to your mains-operated (corded) power tool or battery-operated (cordless) power tool. Work area safety Keep work area clean and well lit.
BM 2610022007 04-12_BM 2610022007 04-12.qxp 4/17/12 1:26 PM Page 3 Battery tool use and care Disconnect the plug from the power source and/or the battery pack from the power tool before making any adjustments, changing accessories, or storing power tools. Such preventive safety measures reduce the risk of starting the power tool accidentally. Recharge only with the charger specified by the manufacturer.
BM 2610022007 04-12_BM 2610022007 04-12.qxp 4/17/12 1:26 PM Page 4 If the bit becomes bound in the workpiece, release the trigger immediately, reverse the direction of rotation and slowly squeeze the trigger to back out the bit. Be ready for a strong reaction torque. The drill body will tend to twist in the opposite direction as the drill bit is rotating. Do not use dull or damaged bits and accessories. Dull or damaged bits have a greater tendency to bind in the workpiece.
BM 2610022007 04-12_BM 2610022007 04-12.qxp 4/17/12 1:26 PM Page 5 Do not disassemble charger or operate the charger if it has received a sharp blow, been dropped or otherwise damaged in any way. Replace damaged cord or plugs immediately. Incorrect reassembly or damage may result in electric shock or fire. Battery leakage may occur under extreme usage or temperature conditions. Avoid contact with skin and eyes. The battery liquid is caustic and could cause chemical burns to tissues.
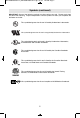
BM 2610022007 04-12_BM 2610022007 04-12.qxp 4/17/12 1:26 PM Page 6 Symbols IMPORTANT: Some of the following symbols may be used on your tool. Please study them and learn their meaning. Proper interpretation of these symbols will allow you to operate the tool better and safer.
BM 2610022007 04-12_BM 2610022007 04-12.qxp 4/17/12 1:26 PM Page 7 Symbols (continued) IMPORTANT: Some of the following symbols may be used on your tool. Please study them and learn their meaning. Proper interpretation of these symbols will allow you to operate the tool better and safer. This symbol designates that this tool is listed by Underwriters Laboratories. This symbol designates that this tool is recognized by Underwriters Laboratories.
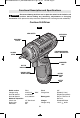
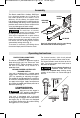
BM 2610022007 04-12_BM 2610022007 04-12.qxp 4/17/12 1:26 PM Page 8 Functional Description and Specifications Disconnect battery pack from tool or place the switch in the locked or off ! WARNING position before making any assembly, adjustments or changing accessories. Such preventive safety measures reduce the risk of starting the tool accidentally. Cordless Drill/Driver FIG.
BM 2610022007 04-12_BM 2610022007 04-12.qxp 4/17/12 1:26 PM Page 9 Assembly The Bosch model PS21 Cordless Drill/Driver has a chuck that accepts any 1/4" hex bit. The low RPM capability of this model is not a deficiency. On the contrary, low speed means high torque and high torque is a definite plus for efficient drilling and driving. The low speed also provides more control to prevent stripout of the screw and damage to the work surface. FIG.
BM 2610022007 04-12_BM 2610022007 04-12.qxp 4/17/12 1:26 PM Page 10 GEAR SHIFTING Your tool is equipped with two separate gear ranges, low gear and high gear. Low gear provides high-torque and slower drilling speeds for heavy duty work or for driving screws. High gear provides faster speeds for drilling lighter work. To change speeds slide switch, to the high or low position (Fig. 1).
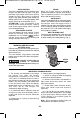
BM 2610022007 04-12_BM 2610022007 04-12.qxp 4/17/12 1:26 PM Page 11 CHARGER INDICATORS, SYMBOLS AND MEANING (Model BC430) If the indicator lights are “OFF”, the charger is not receiving power from power supply outlet. If the green indicator light is “ON”, the charger is plugged in but the battery pack is not inserted, or the battery pack is fully charged and is being trickle charged. If the green indicator light is “BLINKING”, the battery pack is being fast-charged.
BM 2610022007 04-12_BM 2610022007 04-12.qxp 4/17/12 1:26 PM Page 12 FCC Caution: The manufacturer is not responsible for radio interference caused by unauthorized modifications to this equipment. Such modifications could void the user’s authority to operate the equipment. This device complies with Part 15 of the FCC Rules.
BM 2610022007 04-12_BM 2610022007 04-12.qxp 4/17/12 1:26 PM Page 13 The purpose of the green light is to indicate that the battery pack is fast-charging. It does not indicate the exact point of full charge. The light will stop blinking in less time if the battery pack was not completely discharged. When the battery pack is fully charged, unplug the charger (unless you're charging another battery pack) and slip the battery pack back into the tool. FIG.
BM 2610022007 04-12_BM 2610022007 04-12.qxp 4/17/12 1:26 PM Page 14 First, clamp the pieces together and drill the first hole 2/3 the diameter of the screw. If the material is soft, drill only 2/3 the proper length. If it is hard, drill the entire length. Second, unclamp the pieces and drill the second hole the same diameter as the screw shank in the first or top piece of wood. Third, if flat head screw is used, countersink DRILL BITS Always inspect drill bits for excessive wear.
BM 2610022007 04-12_BM 2610022007 04-12.qxp 4/17/12 1:26 PM Page 15 Maintenance Service NO USER SERVICEABLE ! WARNING PARTS INSIDE. Preventive maintenance performed by unauthorized personnel may result in misplacing of internal wires and components which could cause serious hazard. We recommend that all tool service be performed by a Bosch Factory Service Center or Authorized Bosch Service Station. SERVICE MEN: Disconnect tool and/or charger from power source before servicing.
BM 2610022007 04-12_BM 2610022007 04-12.qxp 4/17/12 1:26 PM Page 16 Avertissements généraux concernant la sécurité des outils électroportatifs Veuillez lire tous les avertissements et toutes les consignes de sécurité. Si l'on ! AVERTISSEMENT n'observe pas ces avertissements et ces consignes de sécurité, il existe un risque de choc électrique, d'incendie et/ou de blessures corporelles graves. CONSERVEZ TOUS LES AVERTISSEMENTS ET TOUTES LES CONSIGNES DE SÉCURITÉ POUR RÉFÉRENCE FUTURE.
BM 2610022007 04-12_BM 2610022007 04-12.qxp 4/17/12 1:26 PM Page 17 Utilisation et entretien des outils électroportatifs Ne forcez pas sur l’outil électroportatif. Utilisez l’outil électroportatif qui convient à la tâche à effectuer. L’outil qui convient à la tâche fait un meilleur travail et est plus sûr à la vitesse pour lequel il a été conçu. Ne vous servez pas de l’outil électroportatif si son interrupteur ne parvient pas à le mettre en marche ou à l’arrêter.
BM 2610022007 04-12_BM 2610022007 04-12.qxp 4/17/12 1:26 PM Page 18 Débranchez le bloc-piles de l'outil ou placez l'interrupteur à la position de blocage ou d'arrêt avant d'effectuer tout assemblage ou réglage ou de changer les accessoires. Ces mesures de sécurité préventives réduisent le risque d'une mise en marche accidentelle de l'outil. Placez-vous de manière à éviter d'être pris entre l'outil ou la poignée latérale et les murs ou les montants.
BM 2610022007 04-12_BM 2610022007 04-12.qxp 4/17/12 1:26 PM Page 19 N'utilisez que le chargeur qui accompagnait votre produit ou remplacement direct, comme indiqué dans le catalogue ou ce manuel. Ne substituez aucun autre chargeur. N’utiliser que les chargeurs approuvés par Bosch avec votre produit. Voir Description fonctionnelle et Spécifications. Ne désassemblez pas le chargeur et ne l'utilisez pas s'il a reçu un choc violent, s'il est tombé ou s'il a été endommagé par ailleurs.
BM 2610022007 04-12_BM 2610022007 04-12.qxp 4/17/12 1:26 PM Page 20 Symboles IMPORTANT : Certains des symboles suivants peuvent être utilisés sur votre outil. Veuillez les étudier et apprendre leur signification. Une interprétation appropriée de ces symboles vous permettra d'utiliser l'outil de façon plus efficace et plus sûre.
BM 2610022007 04-12_BM 2610022007 04-12.qxp 4/17/12 1:26 PM Page 21 Symboles (suite) IMPORTANT : Certains des symboles suivants peuvent être utilisés sur votre outil. Veuillez les étudier et apprendre leur signification. Une interprétation appropriée de ces symboles vous permettra d'utiliser l'outil de façon plus efficace et plus sûre. Ce symbole signifie que cet outil est approuvé par Underwriters Laboratories. Ce symbole indique que cet outil est reconnu par Underwriters Laboratories.
BM 2610022007 04-12_BM 2610022007 04-12.qxp 4/17/12 1:26 PM Page 22 Description fonctionnelle et spécifications Débranchez le bloc-piles de l'outil ou placez l'interrupteur à la position de blocage ou d'arrêt avant d'effectuer tout assemblage ou réglage ou de changer les accessoires. Ces mesures de sécurité préventives réduisent le risque d'une mise en marche accidentelle de l'outil. ! AVERTISSEMENT Perceuse/visseuse sans fil FIG.
BM 2610022007 04-12_BM 2610022007 04-12.qxp 4/17/12 1:26 PM Page 23 Assemblage L’outil perceuse/tournevis sans cordon Bosch modèle PS21 possède une mandrin pouvant recevoir tout foret hexagonal de 1/4". La capacité bas régime de ce modèle ne constitue pas une lacune. Au contraire, le bas régime signifie un couple élevé et le couple élevé est un avantage très net pour percer et visser efficacement.
BM 2610022007 04-12_BM 2610022007 04-12.qxp 4/17/12 1:26 PM Page 24 CHANGEMENT DE VITESSES Votre outil comporte deux régimes distincts, le bas régime et le haut régime. Le bas régime produit un couple élevé et des vitesses de perçage plus lentes pour le travail à grand rendement ou pour enfoncer des vis. Le haut régime produit des vitesses plus rapides pour le perçage moins exigeant. Pour changer de vitesse, faites glisser le commutateur à la position haut ou bas régime (Fig. 1).
BM 2610022007 04-12_BM 2610022007 04-12.qxp 4/17/12 1:26 PM Page 25 TEMOINS DE CHARGE, SYMBOLES ET SIGNIFICATION (Modèle BC430) Si le témoin lumineux vert est éteint, ceci signifie que le chargeur ne reçoit pas de courant de la prise de courant. Si le voyant vert s’allume, le chargeur est branché mais le bloc-piles n’est pas en place ou le bloc-piles est pleinement chargé et ne reçoit qu’une charge de maintien. Si le voyant vert « CLIGNOTE » pendant la charge rapide du bloc-piles.
BM 2610022007 04-12_BM 2610022007 04-12.qxp 4/17/12 1:26 PM Page 26 Mise en garde de la FCC : Le fabricant n'est pas responsable des perturbations radioélectriques causées par des modifications non autorisées de ce matériel. De telles modifications pourraient annuler le droit de l'utilisateur de se servir de ce matériel. Cet appareil est conforme à la Partie 15 des Règles de la FCC.
BM 2610022007 04-12_BM 2610022007 04-12.qxp 4/17/12 1:26 PM Page 27 Le témoin vert a pour but d'indiquer que le bloc-piles est en charge rapide. Il n'indique pas le point exact de pleine charge. Le témoin cessera de clignoter en moins de temp si le bloc-piles n'était pas entièrement déchargé. Lorsque le bloc-piles est entièrement chargé, débranchez le chargeur (à moins que vous ne chargiez un autre bloc-piles) et insérez le bloc-piles dans l'outil. FIG.
BM 2610022007 04-12_BM 2610022007 04-12.qxp 4/17/12 1:26 PM Page 28 Fixez d’abord les pièces ensemble à l’aide d’une bride, et percez le premier trou aux 2/3 du diamètre de la vis. Si le matériau est tendre, percez uniquement les 2/3 de la longueur voulue. Si le matériau est dur, percez toute la longueur. Détachez ensuite les pièces et percez le deuxième trou du même diamètre que la tige de la vis dans la première pièce ou la pièce supérieure de bois.
BM 2610022007 04-12_BM 2610022007 04-12.qxp 4/17/12 1:26 PM Page 29 Entretien Service IL N’EXISTE À ! AVERTISSEMENT L’INTÉRIEUR AUCUNE PIÈCE SUSCEPTIBLE D’ÊTRE ENTRE TENUE PAR L’UTILISATEUR. L’entretien préventif exécuté par des personnes non autorisés peut entraîner un positionnement erroné des composants et des fils internes, ce qui peut présenter de graves dangers.
BM 2610022007 04-12_BM 2610022007 04-12.qxp 4/17/12 1:26 PM Page 30 Advertencias generales de seguridad para herramientas mecánicas ! ADVERTENCIA Lea todas las advertencias de seguridad y todas las instrucciones. Si no se siguen las advertencias e instrucciones, el resultado podría ser sacudidas eléctricas, incendio y/o lesiones graves.
BM 2610022007 04-12_BM 2610022007 04-12.qxp 4/17/12 1:26 PM Page 31 el trabajo mejor y con más seguridad a la capacidad nominal para la que fue diseñada. No use la herramienta mecánica si el interruptor no la enciende y apaga. Toda herramienta mecánica que no se pueda controlar con el interruptor es peligrosa y debe ser reparada.
BM 2610022007 04-12_BM 2610022007 04-12.qxp 4/17/12 1:26 PM Page 32 Desconecte el paquete de baterías de la herramienta o ponga el interruptor en la posición fijada o de apagado antes de hacer cualquier ensamblaje, ajustes o cambiar accesorios. Dichas medidas preventivas de seguridad reducen el riesgo de arrancar la herramienta accidentalmente. Sitúese de modo que evite ser atrapado entre la herramienta o el mango lateral y las paredes o los postes.
BM 2610022007 04-12_BM 2610022007 04-12.qxp 4/17/12 1:26 PM Page 33 Utilice solamente el cargador que acompañaba al el producto o un reemplazo directo según se indica en el catálogo o en este manual. No sustituirlo por ningún otro cargador. Utilice únicamente cargadores aprobados Bosch con su producto. Consulte Descripción funcional y especificaciones. No desarme el cargador ni lo haga funcionar si ha recibido un golpe brusco, se ha caído o se ha dañado de cualquier modo.
BM 2610022007 04-12_BM 2610022007 04-12.qxp 4/17/12 1:26 PM Page 34 Símbolos IMPORTANTE: Es posible que algunos de los símbolos siguientes se usen en su herramienta. Por favor, estúdielos y aprenda su significado. La interpretación adecuada de estos símbolos le permitirá utilizar la herramienta mejor y con más seguridad.
BM 2610022007 04-12_BM 2610022007 04-12.qxp 4/17/12 1:26 PM Page 35 Símbolos (continuación) IMPORTANTE: Es posible que algunos de los símbolos siguientes se usen en su herramienta. Por favor, estúdielos y aprenda su significado. La interpretación adecuada de estos símbolos le permitirá utilizar la herramienta mejor y con más seguridad. Este símbolo indica que esta herramienta está catalogada por UnderwritersLaboratories.
BM 2610022007 04-12_BM 2610022007 04-12.qxp 4/17/12 1:26 PM Page 36 Descripción funcional y especificaciones Desconecte el paquete de baterías de la herramienta o ponga el interruptor en la ! ADVERTENCIA posición fijada o de apagado antes de hacer cualquier ensamblaje, ajustes o cambiar accesorios. Dichas medidas preventivas de seguridad reducen el riesgo de arrancar la herramienta accidentalmente. Taladro/destornillador sin cordón FIG.
BM 2610022007 04-12_BM 2610022007 04-12.qxp 4/17/12 1:26 PM Page 37 Ensamblaje El taladro/destornillador sin cordón modelo PS21 de Bosch tiene un mandril que acepta cualquier broca hexagonal de 1/4". La capacidad de RPM baja de este modelo no es una deficiencia. Al contrario, velocidad baja significa par motor alto y el par motor alto es una ventaja adicional definitiva para taladrar y atornillar de modo efectivo.
BM 2610022007 04-12_BM 2610022007 04-12.qxp 4/17/12 1:26 PM Page 38 CAMBIO DE ENGRANAJES La herramienta está equipada con dos intervalos distintos de engranajes, engranaje de baja velocidad y engranaje de alta velocidad. El engranaje de baja velocidad proporciona un par motor alto y velocidades de taladrado más lentas para trabajo pesado o para apretar tornillos. El engranaje de alta velocidad proporciona velocidades más rápidas para taladrar cuando se trata de trabajo más ligero.
BM 2610022007 04-12_BM 2610022007 04-12.qxp 4/17/12 1:26 PM Page 39 INDICADORES Y SIMBOLOS DEL CARGADOR Y SU SIGNIFICADO (Modelo BC430) Si la luz indicadora verde está apagada, el cargador no está recibiendo energía del tomacorriente de alimentación. Si la luz indicadora verde está “ENCENDIDA”, el cargador está enchufado pero el paquete de baterías no está introducido o el paquete de baterías se encuentra totalmente cargado y está siendo cargado continua y lentamente.
BM 2610022007 04-12_BM 2610022007 04-12.qxp 4/17/12 1:26 PM Page 40 Aviso de precaución de la FCC: El fabricante no es responsable de la radiointerferencia causada por las modificaciones no autorizadas que se realicen en este equipo. Dichas modificaciones podrían anular la autoridad del usuario para utilizar el equipo. Este dispositivo cumple con la Parte 15 de las Reglas de la FCC.
BM 2610022007 04-12_BM 2610022007 04-12.qxp 4/17/12 1:26 PM Page 41 El propósito de la luz verde es indicar que el paquete de baterías se está cargando rápidamente. No indica el punto exacto de carga completa. La luz dejará de parpadear en menos mas tiempo hora si el paquete de baterías no estaba completamente descargado.
BM 2610022007 04-12_BM 2610022007 04-12.qxp 4/17/12 1:26 PM Page 42 Primero, fije las piezas una a otra y taladre el primer agujero con 2/3 del diámetro del tornillo. Si el material es blando, taladre únicamente 2/3 de la longitud correspondiente. Si es duro, taladre la longitud completa. superficie. Luego, simplemente ejerza una presión uniforme cuando apriete el tornillo.
BM 2610022007 04-12_BM 2610022007 04-12.qxp 4/17/12 1:26 PM Page 43 Mantenimiento Servicio NO HAY PIEZAS EN EL ! ADVERTENCIA INTERIOR QUE PUEDAN SER AJUSTADAS O REPARADAS POR EL USUARIO. El mantenimiento preventivo realizado por personal no autorizado pude dar lugar a la colocación incorrecta de cables y componentes internos que podría constituir un peligro serio.
BM 2610022007 04-12_BM 2610022007 04-12.qxp 4/17/12 1:26 PM Page 44 LIMITED WARRANTY OF BOSCH PORTABLE AND BENCHTOP POWER TOOLS Robert Bosch Tool Corporation (“Seller”) warrants to the original purchaser only, that all BOSCH portable and benchtop power tools will be free from defects in material or workmanship for a period of one year from date of purchase.