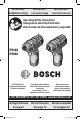
IMPORTANT: Read Before Using IMPORTANT : Lire avant usage IMPORTANTE: Leer antes de usar Operating/Safety Instructions Consignes de sécurité/d’utilisation Instrucciones de funcionamiento y seguridad PS42 PS82 Call Toll Free for Consumer Information & Service Locations Pour obtenir des informations et les adresses de nos centres de service après-vente, appelez ce numéro gratuit Llame gratis para obtener información para el consumidor y ubicaciones de servicio 1-877-BOSCH99 (1-877-267-2499) www.
General Power Tool Safety Warnings Read all safety warnings and all instructions. Failure to follow the warnings and instructions may result in electric shock, fire and/or serious injury. SAVE ALL WARNINGS AND INSTRUCTIONS FOR FUTURE REFERENCE The term “power tool” in the warnings refers to your mains-operated (corded) power tool or battery-operated (cordless) power tool. Work area safety er tool. Do not use a power tool while you are tired or under the influence of drugs, alcohol or medication.
Battery tool use and care Disconnect the plug from the power source and/or the battery pack from the power tool before making any adjustments, changing accessories, or storing power tools. Such preventive safety measures reduce the risk of starting the power tool accidentally. Store idle power tools out of the reach of children and do not allow persons unfamiliar with the power tool or these instructions to operate the power tool. Power tools are dangerous in the hands of untrained users.
“seating” or removing a fastener. The screwdriver housing may tend to twist in the opposite direction of bit rotation when “seating” or removing a fastener depending on the torque setting of the tool. Do not use dull or damaged bits and accessories. When installing an accessory, insert the shank of the bit well within the chuck. Be sure the chuck has locked onto the bit correctly. Do not run the tool while carrying it at your side. A spinning bit could become entangled with clothing and injury may result.
Symbols Important: Some of the following symbols may be used on your tool. Please study them and learn their meaning. Proper interpretation of these symbols will allow you to operate the tool better and safer. Symbol Name Designation/Explanation V Volts Voltage (potential) A Amperes Current Hz Hertz Frequency (cycles per second) W Watt Power kg Kilograms Weight min Minutes Time s Seconds Time ⌀ Diameter Size of drill bits, grinding wheels, etc.
Symbols (continued) Important: Some of the following symbols may be used on your tool. Please study them and learn their meaning. Proper interpretation of these symbols will allow you to operate the tool better and safer. This symbol designates that this tool is listed by Underwriters Laboratories. This symbol designates that this component is recognized by Underwriters Laboratories. This symbol designates that this tool is listed by Underwriters Laboratories, to United States and Canadian Standards.
Functional Description and Specifications Disconnect battery pack from tool before making any assembly, adjustments or changing accessories. Such preventive safety measures reduce the risk of starting the tool accidentally. Cordless Impact Driver Variable speed CONTROL INDICATOR Fig.
Functional Description and Specifications Disconnect battery pack from tool before making any assembly, adjustments or changing accessories. Such preventive safety measures reduce the risk of starting the tool accidentally. Cordless Impact Wrench Fig.
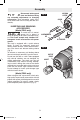
Assembly Disconnect battery pack from tool before making any assembly, adjustments or changing accessories. Such preventive safety measures reduce the risk of starting the tool accidentally. LOCKING SLEEVE Fig. 2 CHUCK INSERTING AND REMOVING ACCESSORIES (Model PS42 only) To avoid loss of control, ensure bit is locked in chuck by pulling on bit after it has been inserted. The chuck accepts only standard 1/4” hexagonal shank accessories with power groove. Your tool is equipped with a quick release chuck.
Operating Instructions Intended Use For forward rotation, (with chuck pointed away from you) move the lever to the far left. For reverse rotation move the lever to the far right. To activate trigger lock move lever to the center off position. Do not change direction of rotation until the tool comes to a complete stop. Shifting during rotation of the chuck can cause damage to the tool. This tool is intended for the fastening and loosening of bolts, nuts and various threaded fasteners.
battery charge STATUS Indicator LIGHTS DRIVING WITH VARIABLE SPEED The technique is to start slowly, increasing the speed as the screw runs down. Set the screw snugly by slowing to a stop. Prior to driving screws, pilot and clearance holes should be drilled. Always hold the machine straight on the bolt to be tightened. The best method to determine the right impacting/tightening duration is by means of a trial. For small screws, the right impacting/ tightening duration can be reached in less then 0.5 Sec.
FASTENING WITH SCREWS first hole 2/3 the diameter of the screw. If the material is soft, drill only 2/3 the proper length. If it is hard, drill the entire length. Second, unclamp the pieces and drill the second hole the same diameter as the screw shank in the first or top piece of wood. Third, if flat head screw is used, countersink the hole to make the screw flush with the surface. Then, simply apply even pressure when driving the screw.
Avertissements généraux concernant la sécurité des outils électroportatifs Veuillez lire tous les avertissements et toutes les consignes de sécurité. Si l’on n’observe pas ces avertissements et ces consignes de sécurité, il existe un risque de choc électrique, d’incendie et/ou de blessures corporelles graves. CONSERVEZ TOUS LES AVERTISSEMENTS ET TOUTES LES CONSIGNES DE SÉCURITÉ POUR RÉFÉRENCE FUTURE.
Utilisation et entretien des outils électroportatifs Utilisez l’outil électroportatif, les accessoires et les embouts d’outil, etc. conformément à ces instructions, en tenant compte des conditions de travail et des travaux à réaliser. L’emploi d’outils électroportatifs pour des tâches différentes de celles pour lesquelles ils ont été prévus peut résulter en une situation dangereuse. Ne forcez pas sur l’outil électroportatif. Utilisez l’outil électroportatif qui convient à la tâche à effectuer.
Ne faites pas fonctionner l’outil lorsque vous le portez sur le côté. Un embout tournant peut se prendre dans les vêtements et provoquer des blessures. Placez l’outil sur la visserie seulement lorsque la visseuse est arrêtée. Les visseuses tournantes peuvent glisser de la visserie. N’utilisez pas cet outil en tant que perceuse. Les outils équipés de débrayage ne sont pas conçus pour le perçage. Le débrayage peut se déclencher automatiquement et sans avertissement.
Symboles Important: Certains des symboles suivants peuvent être utilisés sur votre outil. Veuillez les étudier et apprendre leur signification. Une interprétation appropriée de ces symboles vous permettra d’utiliser l’outil de façon plus efficace et plus sûre.
Symboles (suite) Important: Certains des symboles suivants peuvent être utilisés sur votre outil. Veuillez les étudier et apprendre leur signification. Une interprétation appropriée de ces symboles vous permettra d’utiliser l’outil de façon plus efficace et plus sûre. Ce symbole signifie que cet outil est approuvé par Underwriters Laboratories. Ce symbole indique que ce composant est reconnu par Underwriters Laboratories.
Description fonctionnelle et spécifications Débranchez le bloc-piles de l’outil avant d’effectuer tout assemblage ou réglage, ou de changer des accessoires. Ces mesures de sécurité préventives réduisent le risque d’une mise en marche accidentelle de l’outil. Visseuses à percussion sans fil Fig.
Description fonctionnelle et spécifications Débranchez le bloc-piles de l’outil avant d’effectuer tout assemblage ou réglage, ou de changer des accessoires. Ces mesures de sécurité préventives réduisent le risque d’une mise en marche accidentelle de l’outil. Clés à chocs à percussion sans fil INDICATEUR DE LA COMMANDE DE VITESSE VARIABLE Fig.
Assemblage Débranchez le bloc-piles de l’outil avant d’effectuer tout assemblage ou réglage, ou de changer des accessoires. Ces mesures de sécurité préventives réduisent le risque d’une mise en marche accidentelle de l’outil. Fig. 2 BAGUE DE VERROUILLAGE MANDRIN INSERTION ET RETRAIT DES ACCESSOIRES (modèle PS42 seulement) Pour éviter de perdre le contrôle de l’embout, assurez-vous qu’il est bien verrouillé dans le mandrin en tirant dessus après l’avoir inséré.
Consignes de fonctionnement USAGE PRÉVU droite. Pour actionner le verrouillage de gâchette, déplacez le levier à la position centrale (arrêt). Ne changez pas le sens de rotation avant que l’outil ne se soit complètement immobilisé. Un changement durant la rotation du mandrin pourrait endommager l’outil. Cet outil est prévu pour le vissage et dévissage des vis, écrous et de la visserie filetée. Cet outil n’est pas prévu pour être utilisé comme une perceuse.
TÉMOINS D’ÉTAT DE CHARGE DES PILES ENFONCEMENT À VITESSE VARIABLE Votre outil est muni de témoins d’état de charge (Fig. 1). Les témoins montrent l’état de charge des piles pendant quelques secondes quand on appuie à moitié ou à fond sur la gâchette de marche/arrêt. La technique consiste à commencer lentement, puis à augmenter la vitesse à mesure que la vis s’enfonce. Posez la vis de manière à obtenir un ajustement doux en ralentissant jusqu’à l’arrêt.
Détachez ensuite les pièces et percez le deuxième trou du même diamètre que la tige de la vis dans la première pièce ou la pièce supérieure de bois. En troisième lieu, si une vis à tête plate est employée, fraisez le trou pour mettre la vis de niveau avec la surface. Puis, exercez tout simplement une pression uniforme en enfonçant la vis. Le trou de dégagement de la tige de la vis dans la première pièce permet à la tête de la vis de tirer les pièces fermement ensemble. FIXATION À L’AIDE DE VIS 2.
Advertencias generales de seguridad para herramientas mecánicas Lea todas las advertencias de seguridad y todas las instrucciones. Si no se siguen las advertencias e instrucciones, el resultado podría ser sacudidas eléctricas, incendio y/o lesiones graves.
No use la herramienta mecánica si el interruptor no la enciende y apaga. Toda herramienta mecánica que no se pueda controlar con el interruptor es peligrosa y debe ser reparada. Desconecte el enchufe de la fuente de energía y/o el paquete de batería de la herramienta mecánica antes de hacer cualquier ajuste, cambiar accesorios o almacenar herramientas mecánicas. Dichas medidas preventivas de seguridad reducen el riesgo de arrancar accidentalmente la herramienta mecánica.
cesorios. Puede producirse un arranque accidental debido a que los electrodomésticos accionados por baterías que tengan una batería introducida estén en la situación operativa. Esté preparado para un par de torsión de reacción cuando “asiente” o quite un elemento de sujeción. La carcasa del destornillador mecánico puede tender a torcerse en sentido contrario al de rotación de la broca cuando se esté “asentando” o quitando un elemento de sujeción, dependiendo del ajuste de par de torsión de la herramienta.
Símbolos Importante: Es posible que algunos de los símbolos siguientes se usen en su herramienta. Por favor, estúdielos y aprenda su significado. La interpretación adecuada de estos símbolos le permitirá utilizar la herramienta mejor y con más seguridad.
Símbolos (continuación) Importante: Es posible que algunos de los símbolos siguientes se usen en su herramienta. Por favor, estúdielos y aprenda su significado. La interpretación adecuada de estos símbolos le permitirá utilizar la herramienta mejor y con más seguridad. Este símbolo indica que esta herramienta está catalogada por UnderwritersLaboratories. Este símbolo indica que este componente está reconocido por Underwriters Laboratories.
Descripción funcional y especificaciones Desconecte el paquete de batería de la herramienta antes de realizar cualquier ensamblaje, ajuste o cambio de accesorios. Dichas medidas preventivas de seguridad reducen el riesgo de arrancar la herramienta accidentalmente. Atornilladores de percusión inalámbricos Fig.
Descripción funcional y especificaciones Desconecte el paquete de batería de la herramienta antes de realizar cualquier ensamblaje, ajuste o cambio de accesorios. Dichas medidas preventivas de seguridad reducen el riesgo de arrancar la herramienta accidentalmente. Aprietatuercas de percusión inalámbrico Fig.
Ensamblaje Desconecte el paquete de batería de la herramienta antes de realizar cualquier ensamblaje, ajuste o cambio de accesorios. Dichas medidas preventivas de seguridad reducen el riesgo de arrancar la herramienta accidentalmente. Fig. 2 MANGUITO DE FIJACIÓN MANDRIL INSERCIÓN Y REMOCIÓN DE ACCESORIOS (Modelo PS42 solamente) Para evitar la pérdida de control, asegúrese de que la broca esté fija en el mandril, tirando de ella después de haberla introducido.
Instrucciones de funcionamiento USO PREVISTO en sentido opuesto a usted), mueva la palanca comple tamente hacia la izquierda. Para la rotación inversa, mueva la palanca completamente hacia la derecha. Para activar el cierre del gatillo, mueva la palanca hasta la posición central “OFF”. Esta herramienta está diseñada para apretar y aflojar pernos, tuercas y diversos elementos de sujeción roscados. Esta herramienta no está diseñada para utilizarse como un taladro.
LUCES INDICADORAS DEL ESTADO DE CARGA DE LA BATERÍA APRIETE DE TORNILLOS CON VELOCIDAD VARIABLE Su herramienta está equipada con luces indicadoras del estado de carga (Fig. 1). Las luces indicadoras muestran el estado de carga de la batería durante unos segundos al presionar el gatillo de encendido y apagado hasta la mitad de su recorrido o al presionarlo completamente. La técnica consiste en empezar despacio, aumentando la velocidad a medida que el tornillo avanza.
respondiente. Si es duro, taladre la longitud completa. Segundo, suelte las piezas y taladre el segundo agujero con el mismo diámetro que el cuerpo del tornillo en la primera pieza, o pieza superior, de madera. SUJECION CON TORNILLOS Tercero, si se utiliza un tornillo de cabeza plana, avellane el agujero para hacer que el tornillo quede al ras con la superficie. Luego, simplemente ejerza una presión uniforme cuando apriete el tornillo.
Notes / Remarques / Notas 35 2610034966.
LIMITED WARRANTY OF bosch PORTABLE AND BENCHTOP POWER TOOLS Robert Bosch Tool Corporation (“Seller”) warrants to the original purchaser only, that all BOSCH portable and benchtop power tools will be free from defects in material or workmanship for a period of one year from date of purchase.