
Instructions
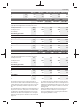
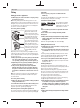
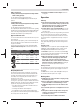
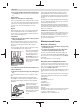

Table Of Contents
- Titelseite
- PWS 700 | 7000 | 7-115 | 700-115 | 700-125 | 750-115 | 750-125 | 7500 | 8000 | 8500 | 850 | 850-125 | 8500-125
- Sicherheitshinweise
- Allgemeine Sicherheitshinweise für Elektrowerkzeuge
- Sicherheitshinweise für Winkelschleifer
- Gemeinsame Sicherheitshinweise zum Schleifen, Sandpapierschleifen, Arbeiten mit Drahtbürsten und Trennschleifen
- Rückschlag und entsprechende Sicherheitshinweise
- Besondere Sicherheitshinweise zum Schleifen und Trennschleifen
- Weitere besondere Sicherheitshinweise zum Trennschleifen
- Besondere Sicherheitshinweise zum Sandpapierschleifen
- Besondere Sicherheitshinweise zum Arbeiten mit Drahtbürsten
- Zusätzliche Sicherheitshinweise
- Produkt- und Leistungsbeschreibung
- Montage
- Betrieb
- Wartung und Service
- Sicherheitshinweise
- PWS 700 | 7000 | 7-115 | 700-115 | 700-125 | 750-115 | 750-125 | 7500 | 8000 | 8500 | 850 | 850-125 | 8500-125
- Safety instructions
- General Power Tool Safety Warnings
- Safety information for the angle grinder
- Safety Warnings common for Grinding, Sanding, Wire Brushing or Abrasive Cutting Off operations
- Kickback and Related Warnings
- Safety Warnings specific for Grinding and Abrasive Cutting-Off operations
- Additional Safety Warnings specific for Abrasive Cutting Off operations
- Safety Warnings specific for Sanding operations
- Safety Warnings specific for Wire Brushing operations
- Additional safety information
- Product Description and Specifications
- Fitting
- Operation
- Maintenance and Service
- Safety instructions
- PWS 700 | 7000 | 7-115 | 700-115 | 700-125 | 750-115 | 750-125 | 7500 | 8000 | 8500 | 850 | 850-125 | 8500-125
- Consignes de sécurité
- Avertissements de sécurité généraux pour l’outil
- Instructions de sécurité pour meuleuses angulaires
- Avertissements de sécurité communs pour les opérations de meulage, de ponçage, de brossage métallique ou de tronçonnage par meule abrasive
- Rebonds et mises en garde correspondantes
- Mises en garde de sécurité spécifiques aux opérations de meulage et de tronçonnage abrasif
- Mises en garde de sécurité additionnelles spécifiques aux opérations de tronçonnage abrasif
- Mises en garde de sécurité spécifiques aux opérations de ponçage
- Mises en garde de sécurité spécifiques aux opérations de brossage métallique
- Consignes de sécurité additionnelles
- Description des prestations et du produit
- Montage
- Mise en marche
- Entretien et Service après‑vente
- Consignes de sécurité
- PWS 700 | 7000 | 7-115 | 700-115 | 700-125 | 750-115 | 750-125 | 7500 | 8000 | 8500 | 850 | 850-125 | 8500-125
- Indicaciones de seguridad
- Advertencias de peligro generales para herramientas eléctricas
- Indicaciones de seguridad para amoladoras angulares
- Indicaciones de seguridad generales para el amolado, el lijado con papel de lija y los trabajos con cepillos de alambre o el tronzado
- Contragolpes e indicaciones de seguridad al respecto
- Indicaciones de seguridad específicas para operaciones de amolado y tronzado
- Indicaciones de seguridad específicas adicionales para operaciones de tronzado
- Indicaciones de seguridad específicas para el lijado con papel de lija
- Indicaciones de seguridad específicas para el trabajo con cepillos de alambre
- Indicaciones de seguridad adicionales
- Descripción del producto y servicio
- Montaje
- Operación
- Mantenimiento y servicio
- Indicaciones de seguridad
- PWS 700 | 7000 | 7-115 | 700-115 | 700-125 | 750-115 | 750-125 | 7500 | 8000 | 8500 | 850 | 850-125 | 8500-125
- Instruções de segurança
- Indicações gerais de advertência para ferramentas eléctricas
- Instruções de segurança para rebarbadoras
- Indicações de segurança comuns para operações de desbaste, de lixamento, de escovagem com arame ou de corte abrasivo
- Efeito de coice e indicações relacionadas
- Instruções de segurança específicas para operações de desbaste e de corte abrasivo
- Indicações de segurança adicionais, específicas para operações de corte abrasivo
- Indicações de segurança específicas para operações de lixamento
- Indicações de segurança específicas para operações de escovagem com arame
- Instruções de segurança adicionais
- Descrição do produto e do serviço
- Montagem
- Funcionamento
- Manutenção e assistência técnica
- Instruções de segurança
- PWS 700 | 7000 | 7-115 | 700-115 | 700-125 | 750-115 | 750-125 | 7500 | 8000 | 8500 | 850 | 850-125 | 8500-125
- Avvertenze di sicurezza
- Avvertenze generali di sicurezza per elettroutensili
- Avvertenze di sicurezza per smerigliatrici angolari
- Avvertenze di sicurezza valide per operazioni di smerigliatura, levigatura, spazzolatura o taglio ad abrasione
- Contraccolpi e relative avvertenze
- Avvertenze di pericolo specifiche per operazioni di smerigliatura e di taglio ad abrasione
- Avvertenze di sicurezza supplementari specifiche per operazioni di taglio con abrasivi
- Avvertenze di sicurezza specifiche per operazioni di levigatura
- Avvertenze di sicurezza specifiche per operazioni di spazzolatura
- Avvertenze di sicurezza supplementari
- Descrizione del prodotto e dei servizi forniti
- Montaggio
- Uso
- Manutenzione ed assistenza
- Avvertenze di sicurezza
- PWS 700 | 7000 | 7-115 | 700-115 | 700-125 | 750-115 | 750-125 | 7500 | 8000 | 8500 | 850 | 850-125 | 8500-125
- Veiligheidsaanwijzingen
- Algemene waarschuwingen voor elektrische gereedschappen
- Veiligheidsaanwijzingen voor haakse slijpmachines
- Algemene veiligheidsaanwijzingen voor slijpen, schuren, borstelen of doorslijpen
- Terugslag en daarmee verwante waarschuwingen
- Bijzondere waarschuwingen voor (door)slijpen
- Extra waarschuwingen speciaal voor doorslijpen
- Bijzondere waarschuwingen voor schuren
- Bijzondere waarschuwingen voor werken met draadborstels
- Aanvullende veiligheidsaanwijzingen
- Beschrijving van product en werking
- Montage
- Gebruik
- Onderhoud en service
- Veiligheidsaanwijzingen
- PWS 700 | 7000 | 7-115 | 700-115 | 700-125 | 750-115 | 750-125 | 7500 | 8000 | 8500 | 850 | 850-125 | 8500-125
- Sikkerhedsinstrukser
- Generelle sikkerhedsinstrukser til el‑værktøj
- Sikkerhedsinstrukser til vinkelslibere
- Fælles sikkerhedsadvarsler for arbejdsopgaver, der omfatter slibning, pudsning, stålbørstning eller slibende skæring
- Advarsler vedrørende tilbageslag og lignende
- Sikkerhedsadvarsler specifikt for slibe- og skærearbejde
- Yderligere sikkerhedsadvarsler specifikt for slibende skærearbejde
- Sikkerhedsadvarsler specifikt for pudsearbejde
- Sikkerhedsadvarsler specifikt for stålbørstningsarbejde
- Ekstra sikkerhedsanvisninger
- Produkt- og ydelsesbeskrivelse
- Montering
- Brug
- Vedligeholdelse og service
- Sikkerhedsinstrukser
- PWS 700 | 7000 | 7-115 | 700-115 | 700-125 | 750-115 | 750-125 | 7500 | 8000 | 8500 | 850 | 850-125 | 8500-125
- Säkerhetsanvisningar
- Allmänna säkerhetsanvisningar för elverktyg
- Säkerhetsanvisningar för vinkelslipar
- Säkerhetsvarningar som är gemensamma för slipning, stålborstning eller materialnedtagning
- Kast och relaterade varningar
- Säkerhetsvarningar som är specifika för slipning och slipande kapningarbeten
- Ytterligare säkerhetsvarningar som är specifika för slip- och skärarbete
- Säkerhetsvarningar som är specifika för slipningen
- Säkerhetsvarningar som är specifika för trådborstningen
- Ytterligare säkerhetsanvisningar
- Produkt- och prestandabeskrivning
- Montage
- Drift
- Underhåll och service
- Säkerhetsanvisningar
- PWS 700 | 7000 | 7-115 | 700-115 | 700-125 | 750-115 | 750-125 | 7500 | 8000 | 8500 | 850 | 850-125 | 8500-125
- Sikkerhetsanvisninger
- Generelle advarsler om elektroverktøy
- Sikkerhetsinformasjoner for vinkelsliper
- Sikkerhetsanvisninger for sliping, pussing, stålbørsting og kappesliping
- Tilbakeslag og tilknyttede advarsler
- Spesielle sikkerhetsregler ved slipe- og kappearbeid
- Spesielle sikkerhetsregler for kappearbeid
- Spesielle sikkerhetsregler for slipearbeid
- Spesielle sikkerhetsregler for metallbørsting
- Ekstra sikkerhetsanvisninger
- Produktbeskrivelse og ytelsesspesifikasjoner
- Montering
- Bruk
- Service og vedlikehold
- Sikkerhetsanvisninger
- PWS 700 | 7000 | 7-115 | 700-115 | 700-125 | 750-115 | 750-125 | 7500 | 8000 | 8500 | 850 | 850-125 | 8500-125
- Turvallisuusohjeet
- Sähkötyökalujen yleiset turvallisuusohjeet
- Kulmahiomakoneen turvallisuusohjeet
- Laikkahiontaa, hiomakarahiontaa, teräsharjausta ja katkaisuleikkausta koskevat yleiset turvallisuusohjeet
- Takapotku ja siihen liittyvät varoitukset
- Laikkahionta- ja katkaisutöitä koskevat erityiset turvallisuusohjeet
- Katkaisutöitä koskevat lisäturvallisuusohjeet
- Hiomatöitä koskevat turvallisuusohjeet
- Teräsharjausta koskevat turvallisuusohjeet
- Lisäturvallisuusohjeet
- Tuotteen ja ominaisuuksien kuvaus
- Asennus
- Käyttö
- Hoito ja huolto
- Turvallisuusohjeet
- PWS 700 | 7000 | 7-115 | 700-115 | 700-125 | 750-115 | 750-125 | 7500 | 8000 | 8500 | 850 | 850-125 | 8500-125
- Υποδείξεις ασφαλείας
- Γενικές υποδείξεις ασφάλειας για ηλεκτρικά εργαλεία
- Υποδείξεις ασφαλείας για γωνιακούς λειαντήρες
- Κοινές προειδοποιήσεις ασφάλειας για εργασίες λείανσης, τριψίματος, χρήσης συρματόβουρτσας ή κοπής
- Ανάκρουση και σχετικές προειδοποιήσεις
- Προειδοποιήσεις ασφαλείας ειδικά για εργασίες λείανσης και κοπής
- Πρόσθετες προειδοποιήσεις ασφάλειας ειδικά για εργασίες κοπής
- Προειδοποιήσεις ασφάλειας ειδικά για εργασίες τριψίματος
- Προειδοποιήσεις ασφάλειας ειδικά για εργασίες με χρήση συρματόβουρτσας
- Πρόσθετες υποδείξεις ασφάλειας
- Περιγραφή προϊόντος και ισχύος
- Συναρμολόγηση
- Λειτουργία
- Συντήρηση και σέρβις
- Υποδείξεις ασφαλείας
- PWS 700 | 7000 | 7-115 | 700-115 | 700-125 | 750-115 | 750-125 | 7500 | 8000 | 8500 | 850 | 850-125 | 8500-125
- Güvenlik talimatı
- Elektrikli El Aletleri İçin Genel Güvenlik Uyarıları
- Taşlama makineleri için güvenlik talimatı
- Taşlama, zımparalama, telli fırçalama ve aşındırıcı kesme işlemleri için ortak güvenlik uyarıları
- Geri Tepme ve İlgili Uyarılar
- Taşlama ve Aşındırıcı Kesme işlemleri için Güvenlik Uyarıları
- Aşındırıcı kesme işlemleri için özel ek güvenlik uyarıları
- Zımparalama işlemlerine özel güvenlik uyarıları
- Telli fırçalama işlemlerine özel güvenlik uyarıları
- Ek güvenlik talimatı
- Ürün ve performans açıklaması
- Montaj
- İşletim
- Bakım ve servis
- Güvenlik talimatı
- PWS 700 | 7000 | 7-115 | 700-115 | 700-125 | 750-115 | 750-125 | 7500 | 8000 | 8500 | 850 | 850-125 | 8500-125
- إرشادات الأمان
- تحذيرات أمان عامة للعدد الكهربائية
- تعليمات الأمان للجلاخات الزاوية
- تحذيرات الأمان المشتركة لعمليات الجلخ أو السنفرة أو التنظيف بالفرشات السلكية أو القطع السحجي
- الصدمة الارتدادية والتحذيرات المتعلقة بها
- تحذيرات الأمان الخاصة بعمليات التجليخ والقطع السحجي
- تحذيرات الأمان الخاصة بعمليات القطع السحجي
- تحذيرات الأمان الخاصة بأعمال الصنفرة
- تحذيرات الأمان الخاصة بأعمال الصقل بالفرشات السلكية
- إرشادات الأمان الإضافية
- وصف المنتج والأداء
- التركيب
- التشغيل
- الصيانة والخدمة
- إرشادات الأمان

22 | English
Fitting
Fitting protective equipment
u Pull the plug out of the socket before carrying out any
work on the power tool.
Note: If the grinding disc breaks during operation or the
holding fixtures on the protective guard/power tool become
damaged, the power tool must be sent to the after-sales ser-
vice immediately; see the "After-Sales Service and Applica-
tion Service" section for addresses.
Protective guard for grinding
Place the protective guard
(6) onto the holder on the
power tool until the coding
cams of the protective guard
are aligned with the holder.
When doing so, press and
hold the unlocking lever (1).
Press the protective guard
(6) onto the spindle collar un-
til the shoulder of the pro-
tective guard is sitting on the
flange of the power tool and
rotate the protective guard
until it audibly clicks into
place.
Adjust the position of the protective guard (6) to meet the
requirements of the operation. To do this, push the unlock-
ing lever (1) upward and rotate the protective guard (6) into
the required position.
u Always position the protective guard(6) such that the
two cams on the unlocking lever(1) engage in the
corresponding openings on the protective guard(6).
u Adjust the protective guard (6) such that sparking in
the direction of the operator is prevented.
u The protective guard (6) must only be adjustable
while the unlocking lever (1) is actuated. Otherwise,
the power tool must not be used any more under any
circumstances and must be sent to the after-sales ser-
vice.
Note: The coding cams on the protective guard (6) ensure
that only a protective guard that is suitable for the power
tool can be fitted.
Protective guard for cutting
u Always use the protective guard for cutting (10) when
cutting bonded abrasives.
u Provide sufficient dust extraction when cutting stone.
The protective guard for cutting (10) is fitted in the same
way as the protective guard for grinding (6).
Extraction guard for cutting with a guide block
The extraction guard for cutting with a guide block (17) is fit-
ted in the same way as the protective guard for grinding (6).
Side handle
u Do not operate your power tool without the side
handle (4).
Screw the side handle (4) on the left or right of the machine
head depending on how your are working.
Low-vibration auxiliary handle
The low-vibration auxiliary
handle reduces vibration,
enabling the tool to be used
safely and more comfort-
ably.
u Do not make any alterations of any kind to the auxili-
ary handle.
Do not continue to use a damaged auxiliary handle.
Hand guard
u Always fit the hand guard (12) when working with the
rubber sanding plate (13) or with the cup brush/disc
brush/flap disc.
Attach the hand guard (12) to the side handle (4).
Fitting the abrasive tools
u Pull the plug out of the socket before carrying out any
work on the power tool.
u Do not touch grinding and cutting discs until they have
cooled down. The discs can become very hot while work-
ing.
Clean the grinding spindle (5) and all the parts to be fitted.
Lock the grinding spindle with the spindle lock button (2)
before clamping and releasing the abrasive tools.
u Do not press the spindle lock button while the grind-
ing spindle is moving. The power tool may become dam-
aged if you do this.
Grinding/Cutting Disc
Pay attention to the dimensions of the grinding tools. The
mounting hole diameter must fit the mounting flange without
play. Do not use reducers or adapters.
When using diamond cutting discs, pay attention that the
direction-of-rotation arrow on the diamond cutting disc and
the direction of rotation of the machine (see direction-of-ro-
tation arrow on the machine head) agree.
See graphics page for the mounting sequence.
To fasten the grinding/cutting disc, screw on the clamping
nut (9) and tighten with the two-hole spanner.
u After fitting the abrasive tool, check that the abrasive
tool is fitted correctly and can turn freely before
switching on the power tool. Make sure that the abras-
ive tool does not brush against the protective guard or
other parts.
Flap disc
u Always fit the hand guard (12) when working with the
flap disc.
1 609 92A 6AC | (15.01.2021) Bosch Power Tools