60992A1RU.
160992A1RU.qxp_RH1255VC 8/27/15 10:22 AM Page 2 ! WARNING General Power Tool Safety Warnings Read all safety warnings and all instructions. Failure to follow the warnings and instructions may result in electric shock, fire and/or serious injury. SAVE ALL WARNINGS AND INSTRUCTIONS FOR FUTURE REFERENCE The term “power tool” in the warnings refers to your mains-operated (corded) power tool or battery-operated (cordless) power tool. Work area safety power tool.
160992A1RU.qxp_RH1255VC 8/27/15 10:22 AM Page 3 Disconnect the plug from the power source and/or the battery pack from the power tool before making any adjustments, changing accessories, or storing power tools. Such preventive safety measures reduce the risk of starting the power tool accidentally. Keep cutting tools sharp and clean. Properly maintained cutting tools with sharp cutting edges are less likely to bind and are easier to control. Use the power tool, accessories and tool bits etc.
160992A1RU.qxp_RH1255VC 8/27/15 10:22 AM Page 4 or posts. Should the bit become bound or jammed in the work, the reaction torque of the tool could crush your hand or leg. Do not use dull or damaged bits and accessories. Dull or damaged bits have a greater tendency to bind in the workpiece. Never place the tool down until the bit or accessory has come to a complete stop. Do not run the tool while carrying it at your side. A spinning bit could become entangled with clothing and injury may result.
160992A1RU.qxp_RH1255VC 8/27/15 10:22 AM Page 5 Symbols IMPORTANT: Some of the following symbols may be used on your tool. Please study them and learn their meaning. Proper interpretation of these symbols will allow you to operate the tool better and safer. Symbol V A Hz W kg min s n0 n .../min 0 1, 2, 3, ...
160992A1RU.qxp_RH1255VC 8/27/15 10:23 AM Page 6 Symbols (continued) IMPORTANT: Some of the following symbols may be used on your tool. Please study them and learn their meaning. Proper interpretation of these symbols will allow you to operate the tool better and safer. Symbol Designation / Explanation Alerts user to read manual Alerts user to wear eye protection This symbol designates that this tool is listed by Underwriters Laboratories.
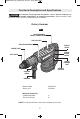
160992A1RU.qxp_RH1255VC 8/27/15 10:23 AM Page 7 Functional Description and Specifications Disconnect the plug from the power source before making any ! WARNING assembly, adjustments or changing accessories. Such preventive safety measures reduce the risk of starting the tool accidentally. Rotary Hammer FIG.
160992A1RU.qxp_RH1255VC 8/27/15 10:23 AM Page 8 Assembly INSTALLING ACCESSORIES Clean the insert shank end of the accessory to remove any debris, then lightly grease with a light oil or lubricant. FIG. 2 Insert accessory into the tool holder through the dust shield, while twisting and pushing inward until it locks automatically into place. Pull outward on the accessory to be certain it is locked into the tool holder (Fig. 2).
160992A1RU.qxp_RH1255VC 8/27/15 10:23 AM Page 9 Operating Instructions DUAL FUNCTION TRIGGER SWITCH To turn the tool “ON” in the Drilling/ Hammering mode, squeeze and hold the trigger switch. To turn the tool “OFF”, release the trigger switch, which is spring loaded and will return to the “OFF” position automatically (Fig. 1). Your tool is also equipped with a "Lock-ON" feature when the selector dial is in the Hammering Only mode which allows continuous operation without holding the trigger (Fig. 1).
160992A1RU.qxp_RH1255VC 8/27/15 10:23 AM Page 10 Turn the selector lever, to the “vario-lock” setting. Next, rotate the locking sleeve, along with the accessory, to the desired position. Then turn the selector lever to the “hammer only” setting and slightly turn the locking sleeve to have it automatically lock into a definite position. FIG.
160992A1RU.qxp_RH1255VC 8/27/15 10:23 AM Page 11 Service Maintenance Preventive maintenance ! WARNING performed by unauthorized personnel may result in misplacing of internal wires and components which could cause serious hazard. We recommend that all tool service be performed by a Bosch Factory Service Center or Authorized Bosch Service Station.
160992A1RU.qxp_RH1255VC 8/27/15 10:23 AM Page 12 Avertissements généraux concernant la sécurité des outils électroportatifs ! AVERTISSEMENT n'observe pas ces avertissements et ces consignes de sécurité, il existe un risque de Veuillez lire tous les avertissements et toutes les consignes de sécurité. Si l'on choc électrique, d'incendie et/ou de blessures corporelles graves. CONSERVEZ TOUS LES AVERTISSEMENTS ET TOUTES LES CONSIGNES DE SÉCURITÉ POUR RÉFÉRENCE FUTURE.
160992A1RU.qxp_RH1255VC 8/27/15 10:23 AM Page 13 Utilisation et entretien des outils électroportatifs Ne forcez pas sur l’outil électroportatif. Utilisez l’outil électroportatif qui convient à la tâche à effectuer. L’outil qui convient à la tâche fait un meilleur travail et est plus sûr à la vitesse pour lequel il a été conçu. Ne vous servez pas de l’outil électroportatif si son interrupteur ne parvient pas à le mettre en marche ou à l’arrêter.
160992A1RU.qxp_RH1255VC 8/27/15 10:23 AM Page 14 La poussière générée ou les gaz libérés par le matériau que vous travaillez (par ex. tuyaux à isolation amiante, radon) peuvent causer des difficultés respiratoires. Utilisez des gants rembourrés épais et limitez le temps d'exposition en prenant des pauses fréquentes. Les vibrations causées par l'action du marteau-perceuse peuvent être nocives pour vos mains et vos bras. Placez le cordon à l'écart du foret en rotation.
160992A1RU.qxp_RH1255VC 8/27/15 10:23 AM Page 15 Symboles IMPORTANT : Certains des symboles suivants peuvent être utilisés sur votre outil. Veuillez les étudier et apprendre leur signification. Une interprétation appropriée de ces symboles vous permettra d'utiliser l'outil de façon plus efficace et plus sûre.
0992A1RU.qxp_RH1255VC 8/27/15 10:23 AM Page 16 Symboles (suite) IMPORTANT : Certains des symboles suivants peuvent être utilisés sur votre outil. Veuillez les étudier et apprendre leur signification. Une interprétation appropriée de ces symboles vous permettra d'utiliser l'outil de façon plus efficace et plus sûre.
160992A1RU.qxp_RH1255VC 8/27/15 10:23 AM Page 17 Description fonctionnelle et spécifications ! AVERTISSEMENT ou réglage que ce soit ou de changer les accessoires. Ces mesures de sécurité Débranchez la fiche de la prise de courant avant d'effectuer quelque assemblage préventive réduisent le risque d'une mise en marche accidentelle de l'outil. Marteau rotatif FIG.
160992A1RU.qxp_RH1255VC 8/27/15 10:23 AM Page 18 Assemblage POSE DE L’EQUIPEMENT ACCESSOIRE Nettoyez la tige de l’embout pour en enlever toute saleté, puis enduisez-la modérément d’une huile ou graisse légère. FIG. 2 Au pare-poussière, introduisez l’embout dans la douille de retenue tout en le tordant et l’enfonçant jusqu’à ce qu’il se verrouille automatiquement en place. Tirez sur l’embout pour vous assurer qu’il est bien engagé dans la douille (Fig. 2).
160992A1RU.qxp_RH1255VC 8/27/15 10:23 AM Page 19 Consignes de fonctionnement INTERRUPTEUR À GÂCHETTE À DOUBLE FONCTION Pour mettre l'outil en marche en mode de perçage/percussion, appuyez sur la gâchette et tenezla. Pour mettre l'outil à l'arrêt, relâchez la gâchette qui est à ressort et reviendra automatiquement à la position d'arrêt (Fig 1).
160992A1RU.qxp_RH1255VC 8/27/15 10:23 AM Page 20 Tournez le levier sélecteur à la position Vario-Lock. Ensuite, tournez à la position désirée le manchon de verrouillage ainsi que l’accessoire. Réglez ensuite le levier sélecteur à « martelage seulement » et tournez légèrement le manchon de verrouillage de sorte qu’il assume automatiquement une position définitive. FIG.
160992A1RU.qxp_RH1255VC 8/27/15 10:23 AM Page 21 Entretien Tout entretien préventif ! AVERTISSEMENT effectué par des personnels non autorisés peut résulter en mauvais placement de fils internes ou de pièces, ce qui peut présenter un danger grave. Nous vous conseillons de faire faire tout l’entretien par un centre de service d’usine Bosch ou une station service agréée Bosch.
160992A1RU.qxp_RH1255VC 8/27/15 10:23 AM Page 22 Advertencias generales de seguridad para herramientas mecánicas ! ADVERTENCIA Lea todas las advertencias de seguridad y todas las instrucciones. Si no se siguen las advertencias e instrucciones, el resultado podría ser sacudidas eléctricas, incendio y/o lesiones graves.
160992A1RU.qxp_RH1255VC 8/27/15 10:23 AM Page 23 Uso y cuidado de las herramientas mecánicas No fuerce la herramienta mecánica. Use la herramienta mecánica correcta para la aplicación que desee realizar. La herramienta mecánica correcta hará el trabajo mejor y con más seguridad a la capacidad nominal para la que fue diseñada. No use la herramienta mecánica si el interruptor no la enciende y apaga. Toda herramienta mecánica que no se pueda controlar con el interruptor es peligrosa y debe ser reparada.
160992A1RU.qxp_RH1255VC 8/27/15 10:23 AM Page 24 Use guantes con almohadillado grueso y limite el tiempo de exposición tomando frecuentes períodos de descanso. La vibración causada por la acción de percusión y taladrado puede ser perjudicial para las manos y los brazos. broca atascada o enganchada. Se podrían soltar fragmentos de metal de la broca y golpearle a usted o golpear a las personas que se encuentren presentes. Posicione el cordón de modo que esté alejado de la broca que gira.
160992A1RU.qxp_RH1255VC 8/27/15 10:23 AM Page 25 Símbolos IMPORTANTE: Es posible que algunos de los símbolos siguientes se usen en su herramienta. Por favor, estúdielos y aprenda su significado. La interpretación adecuada de estos símbolos le permitirá utilizar la herramienta mejor y con más seguridad.
160992A1RU.qxp_RH1255VC 8/27/15 10:23 AM Page 26 Símbolos (continuación) IMPORTANTE: Es posible que algunos de los símbolos siguientes se usen en su herramienta. Por favor, estúdielos y aprenda su significado. La interpretación adecuada de estos símbolos le permitirá utilizar la herramienta mejor y con más seguridad. Símbolo Désignación / Explicación Alerta al usuario para que lea el manual. Alerta al usuario para que use protección de los ojos.
160992A1RU.qxp_RH1255VC 8/27/15 10:23 AM Page 27 Descripción funcional y especificaciones ! ADVERTENCIA o ajuste, o cambiar accesorios. Estas medidas de seguridad preventivas reducen el Desconecte el enchufe de la fuente de energía antes de realizar cualquier ensamblaje riesgo de arrancar la herramienta accidentalmente. Martillo giratorio FIG.
160992A1RU.qxp_RH1255VC 8/27/15 10:23 AM Page 28 Ensamblaje INSTALACION DE ACCESORIOS Limpie el extremo de inserción del cuerpo del accesorio para quitar los residuos que éste pueda tener y luego engráselo ligeramente con un aceite o lubricante ligero. FIG. 2 Introduzca el accesorio en el portaherramienta a través del protector antipolvo a la vez que lo hace girar y lo empuja hacia adentro hasta que quede fijo en su sitio automáticamente.
160992A1RU.qxp_RH1255VC 8/27/15 10:23 AM Page 29 Instrucciones de funcionamiento INTERRUPTOR GATILLO DE DOBLE FUNCION Para encender la herramienta en el modo de taladrado/percusión, apriete el interruptor gatillo y manténgalo oprimido. Para apagar la herramienta, suelte el interruptor gatillo, que está accionado por resorte, y volverá a la posición de apagado automáticamente (Fig. 1).
160992A1RU.qxp_RH1255VC 8/27/15 10:23 AM Page 30 Gire la palanca del selector hasta la posición de fijación variable. A continuación, gire el manguito de fijación, junto con el accesorio, hasta la posición deseada. Luego, gire la palanca selectora hasta la posición de “martilleo únicamente” y gire ligeramente el manguito de fijación para hacer que éste quede fijo automáticamente en una posición determinada. FIG.
160992A1RU.qxp_RH1255VC 8/27/15 10:23 AM Page 31 Mantenimiento El mantenimiento preventivo ! ADVERTENCIA rea lizado por personal no autorizado pude dar lugar a la colocación incorrecta de cables y com ponentes internos que podría constituir un peligro serio. Recomendamos que todo el servicio de las herramientas sea realizado por un Centro de servicio de fábrica Bosch o por una Estación de servicio Bosch autorizada.
160992A1RU.qxp_RH1255VC 8/27/15 10:23 AM Page 32 LIMITED WARRANTY OF BOSCH PORTABLE AND BENCHTOP POWER TOOLS Robert Bosch Tool Corporation (“Seller”) warrants to the original purchaser only, that all BOSCH portable and benchtop power tools will be free from defects in material or workmanship for a period of one year from date of purchase.