
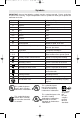
Specifications


-9-
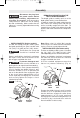
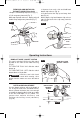
REMOVING AND INSTALLING
THE SOFT HANDLE (New Style)
1 Depress and hold top clip release (Fig. 7).
2 Pull strap away from tool (Fig. 7).
While top clip hook release is depressed, pull
handle strap straight away from tool (Fig. 7).
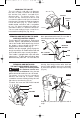
3 Squeeze from each side and hold both
bottom clip releases (Fig. 8).
4 Lift the back of the clip up and away from
tool (Fig. 8).
While depressing both bottom clip release
tabs, lift the back of the clip away from the
tool (Fig.8).
FIG. 7
TOP CLIP
FIG. 8
BOTTOM
CLIP
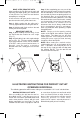
DEPTH GUIDE ADJUSTMENT
Use the depth guide to adjust the depth of
cut. Using the end of the standard wrench,
loosen (counter clockwise) the screw enough
to enable the depth guide to slide up or down
to the desired depth of cut
(about 1/8"
greater than material thickness) and
retighten the locking screw (clockwise)
(Fig. 10).
1/8"
DEPTH GUIDE
LOCKING
SCREW
FIG. 10
Operating Instructions
BUMP-OFF SLIDE "ON/OFF" SWITCH
This tool is switched "ON" by the slide switch
located on the front of the motor housing
(Fig. 9).
TO TURN THE TOOL "ON" slide the switch
button up.
TO TURN THE TOOL "OFF" slide the switch
button down or "0" position.
Hold the tool with both
hands while starting, since
torque from the motor can cause the tool to
twist.
!
WARNING
0
1
BUMP-OFF SLIDE
"ON/OFF" SWITCH
FIG. 9
RZ 2610938267 02-07 3/1/07 8:52 AM Page 9