aus Index Safety instructions . . . . . . . Delivery . . . . . . . . . . . . . . . . . . . . Installation . . . . . . . . . . . . . . . . . In daily use . . . . . . . . . . . . . . . . . Children in the household . . . . Childproof lock (door lock) . . . . Damage . . . . . . . . . . . . . . . . . . . Disposal . . . . . . . . . . . . . . . . . . . Getting to know your appliance Control panel . . . . . . . . . . . . . . . Appliance interior . . . . . . . . . . . . Selecting language . . . . . . . . . .
aus Safety instructions Delivery Check the packaging and dishwasher immediately for damage caused in transit. Do not switch on a damaged appliance, but contact your supplier. Please dispose of the packaging material in an environmentally friendly manner. Do not let children play with packaging and its parts. There is a risk of suffocation from collapsible boxes and film. Installation Read the “Installation” chapter to learn how to install and connect the appliance correctly.
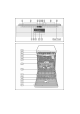
aus Warning Children could become locked in the appliance (risk of suffocation) or find themselves in other dangerous situations. Therefore: Pull out the mains plug, sever and dispose of the power cord. Destroy the door lock so that the door can no longer be closed. Getting to know your appliance Diagrams of the control panel and the interior of the appliance can be found in the envelope at the front. Individual positions are referred to in the text.
aus Selecting language The language in the display window 11 can be set from to . “Deutsch” is the factory setting. Language Setting Deutsch L:01 English L:02 Français L:03 Nederlands L:04 Italiano L:05 ÅËËÇÍÉÊÁ L:06 Español L:07 Português L:08 Svenska L:09 Norsk L:10 Suomi L:11 Dansk L:12 Türkçe L:13 PYCCÅ L:14 Polski L:15 Èe. L:16 Magyar L:17 Croatian L:18 Slovenian L:19 To change the language: Open the door. Switch on ON/OFF switch 1 .
aus Setting amount of rinse-aid The amount of rinse-aid dispensed can be set from to . The factory setting . is Do not change the amount of rinse-aid unless streaks (select lower setting) or water stains (select higher setting) are left on the utensils. Open the door. Switch on ON/OFF switch 1 . Hold down programme button A and press START button 9 until on . the digital display is indicated Release both buttons. Press programme button A until the is indicated on factory set value the digital display 3 .
aus Loading the dishwasher Pans Remove large food remnants. It is not necessary to prerinse utensils under running water. Place the utensils so that D they are secure and cannot tip over. D all utensils with their openings face down. D parts with curves or indentations are at an angle, thereby allowing water to drain. D does not obstruct rotation of the two spray arms 23 and 25 . Very small utensils should not be washed in the machine, as they may fall out of the baskets.
aus Cutlery drawer Arrange the cutlery in the cutlery drawer 21 as illustrated. Separately arranged utensils are easier to remove after washing. The drawer can be taken out. Adjusting the height of the basket The height of the upper utensils basket can be adjusted in 3 stages to create more space either in the upper or lower basket. Appliance height 81.5 cm Top basket Bottom basket Setting1 max. ∅ 16 cm 30 cm Setting2 max. ∅ 18.5 cm 27.5 cm Setting3 max. ∅ 21 cm 25 cm Appliance height 86.
aus Pull out the top basket 22 . To lower the basket, press in the left and then the right lever on the outside of the basket. In doing so, hold the sides of the basket along the upper edge to prevent it from suddenly dropping. To raise the basket, hold the basket on the sides of the upper edge and lift it up. Before re-inserting the basket again, ensure that it is at the same height on both sides.
aus Adding detergent Pour detergent into the dispenser 29 (insert tablet flat, not on its edge). Dosage: see manufacturer’s instructions on the packaging. Close the cover on the detergent dispenser by sliding it up until the lock engages without difficulty. The detergent dispenser opens automatically at the optimum time depending on the programme. The powder or liquid detergent is distributed in the appliance and is dissolved, the tablet falls into the tablet collecting tray where it dissolves in doses.
aus Overview of programmes The max. possible number of programmes is illustrated in this overview. The corresponding programmes for your appliance can be found on the fascia. The programme data are values measured in the laboratory in compliance with Standard AS/NSZ 2007.
aus Programme selection You can select a suitable programme according to the type of utensils and degree of soiling. Information about comparability tests The conditions for running comparability tests can be found on the supplementary sheet “Information for comparability tests”. Additional options * depending on model Additional options 8 can be set with the buttons. Express Wash (VarioSpeed) * The >>Save time<< function can reduce the running time by approx.
aus Washing the dishes Aqua sensor * * depending on model The Aqua sensor is an optical measuring device (light barrier) which measures the turbidity of the rinsing water. The Aqua sensor is used according to the programme. If the Aqua sensor is active, “clean” rinsing water can be transferred to the next rinse bath and water consumption can be reduced by 3–6 litres. If the turbidity is greater, the water is drained and is replaced with fresh water.
aus End of programme Switching off the appliance The programme has ended when the value is indicated on the numerical display 3 . The end of the programme is also indicated by an acoustic signal. This function can be changed as follows: Open the door. Switch on ON/OFF switch 1 . Hold down programme button A and press START button 9 until on the digital display is indicated. Release both buttons. Press programme button A until the factory set value is indicated on the digital display .
aus Changing the programme When the START button 9 has been pressed, the programme cannot be changed. The only way a programme can be changed is by Cancel programme (reset). Intensive drying The final rinse uses a higher temperature which improves the drying result. The running time may increase slightly. (Caution if utensils are delicate!) Open the door. Switch on ON/OFF switch 1 . Hold down programme button A and press START button 9 until on the digital display is indicated. Release both buttons.
aus Filters Spray arms The filters 26 keep large foreign objects in the rinsing water away from the pump. These foreign objects may occasionally block the filters. The filter system consists of a coarse filter, a flat fine filter and a microfilter. After each washing cycle check the filters for residue. Unscrew filter cylinder as illustrated and take out filter system. Limescale and contaminants in the rinsing water may block nozzles and bearings on the spray arms 23 and 25 .
aus Waste water pump Large food remnants in the rinsing water not retained by the filters may block the waste water pump. The rinsing water is then not pumped out and covers the filter. In this case: First disconnect the appliance from the power supply. Remove the filters 26 . Scoop out water, use a sponge if required. Using a spoon, prise off pump cover (as illustrated) until it clicks, then grip the cover by the lug and first pull it upwards until it resists and then pull it out forwards.
aus Door cannot be closed. Door lock has been activated. To reset, close the door with greater force. ... changing settings A setting cannot be changed, a programme starts. Wrong programme button pressed. Terminate the programme (see chapter entitled “Terminating the programme (Reset)”) and start all over again. You did not wait until programme ended. Cover on the detergent dispenser cannot be closed. Detergent dispenser overfilled or mechanism blocked by sticky detergent residue.
aus ... on the utensils Food residue on the utensils. Utensils placed too closely together, utensils basket overfilled. Too little detergent. Rinse programme too weak. Spray arm rotation obstructed. Spray arm nozzles blocked. Filters blocked. Filters incorrectly inserted. Waste water pump blocked. Top basket on right and left not set to same height. Tea or lipstick residue is not completely removed. Detergent has inadequate bleaching effect. Too low rinsing temperature.
aus Installation The dishwasher must be connected correctly, otherwise it will not function properly. The specifications for the inlet and outlet as well as the electrical connected loads must correspond with the required criteria as specified in the following paragraphs or in the installation instructions.
aus Delivery Fresh-water connection Your dishwasher has been checked thoroughly in the factory to ensure that it is in working order. This may cause small water stains. These will disappear after the first wash cycle. Connect the fresh-water connection to the tap according to the installation instructions with the enclosed parts. Ensure that the fresh-water connection is not kinked, crushed or twisted. When replacing the appliance, always use a new water supply hose. Water pressure: at least 0.05 MPa (0.
aus Removing the appliance Protection against frost Also observe the sequence of worksteps here. Disconnect the appliance from the power supply. Turn off the water supply. Disconnect the waste water and fresh water connections. Loosen the fastening screws under the worktop. If fitted, remove the base panel. Pull out the appliance, carefully pulling the hose behind. If the appliance is in a room where there is a risk of frost (e.g. holiday home), empty the appliance completely (see Transportation).
aus Waste disposal Both the packaging of new appliances and the old appliances themselves contain valuable raw materials and recyclable materials. Please dispose of the individual parts separated according to type. Please ask your dealer or inquire at your local authority about current means of disposal. Packaging All plastic parts of the appliance are identified with internationally standardised abbreviations (e.g. >PS< polystyrene).
Child-proof lock * 40 41 42 Switch on the child-proof lock Open the door with child-proof lock switched on Switch off the child-proof lock Always close the appliance door completely before leaving the appliance. Only in this way can you protect your children from potential hazards. Baking sheet spray head * Large sheets or grilles and plates which have a diameter greater than 30 cm (gourmet plates, pasta plates, dinner plates) can be cleaned with the aid of the spray head.
(& * ( % "' *!. )*/ ++'4 /* ++'% ) !. 2%/$*0/ ,0 5 /*+ ) %/%*) /* 2 -- )/4 ' %(. # %)./ /$! .!''!- .! *) /$! +0- $ .! *)/- / ) %) %/%*) /* *0- ++'% ) ! 2 -- )/4 2! 2%'' + 4 ( #!. 0) !- /$! "*''*2%)# *) %/%*). " *0- ,0 5 /*+ .4./!( %. !"! /%1! ) 0.!. 2 /!- ( #! 2! 2%'' ( &! #** /$! ( #! "*- +-%1 /! 0.!-. To ensure water damage protection, the appliance must be connected to the power supply. $%. '% %'%/4 #0 - )/!! %. 1 '% "*- /$! .