
Installation Guide


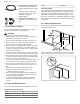

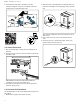
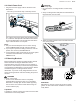
Table Of Contents
- Dishwasher
- en-us
- fr-ca
- Table des matières
- 1 IMPORTANTES CONSIGNES DE SÉCURITÉ
- 2 Avant de commencer
- 3 Préparation avant l’installation
- 4 Procédure d’installation
- 5 Raccordement du lave-vaisselle
- 6 Service à la clientèle
- es-mx
- Tabla de contenidos
- 1 INSTRUCCIONES DE SEGURIDAD IMPORTANTES
- 2 Antes de empezar
- 3 Preparación para la instalación
- 4 Procedimiento de instalación
- 5 Conexión del lavavajillas
- 6 Servicio de atención al cliente

Installation Preparation en-us
7
Installation Preparation
3 Installation Preparation
Installation Preparation
After locating the proper place for your dishwasher, create
an opening to allow for water, drain and electrical lines on
the appropriate side.
1. Cut a hole within the 7 x 2.5" area shown.
7"
(17.8 cm)
2 ½"
(6.3 cm)
ø 2 ½"
(6.3 cm)
or
If the opening is made through wood, sand it smooth.
If the opening is made through metal, use the Edge
Protector with Power Cord clips Kit SMZEPCC1UC.
2. Remove the drain hose from inside the dishwasher.
3. Remove the toe panel fleece from the back of the
dishwasher.
Installation Procedure
4 Installation Procedure
Installation Procedure
Follow these instructions to install the dishwasher.
4.1 Attach Water Inlet Hose
NOTICE:
Avoid cross-threading
▶ Cross-threading will cause leaks.
Teflon tape
▶ Do not use Teflon tape; it could cause leaks and
damage floors or cabinetry.
1. Carefully flip the unit over onto its back side with the
door facing up.
2. Remove the toe panel from the front of the unit (set
aside for later) and loosen the feet slightly.
3. Attach the elbow to the water inlet valve on the front of
the dishwasher.