
Manual


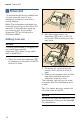


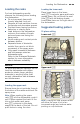
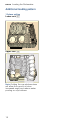
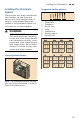

Table Of Contents
- Table of contents
- en-us Operating instructions
- ( Safety Definitions 5
- ( IMPORTANT SAFETY INSTRUCTIONS 6
- ƒ Causes of Damage 9
- * Getting Started 10
- , Rinse Aid 14
- - Loading the Dishwasher 16
- . Detergent 22
- / Dishwasher Cycles 24
- 0 Dishwasher Cycle Options 25
- 1 Operating the Dishwasher 28
- 2 Care and Maintenance 32
- 3 Troubleshooting 36
- 4 Customer Service 41
- ‡ Statement of Limited Product Warranty 42
- ( Safety Definitions
- en-us Operating instructions
- ( IMPORTANT SAFETY INSTRUCTIONS
- IMPORTANT SAFETY INSTRUCTIONS
- READ AND SAVE THESE INSTRUCTIONS
- To reduce the risk of fire, electrical shock, or serious injury, observe the following:
- 9 WARNING
- 9 WARNING
- 9 WARNING
- 9 WARNING
- 9 WARNING
- 9 CAUTION
- ƒ Causes of Damage
- * Getting Started
- , Rinse Aid
- Rinse Aid
- Note:
- Adding rinse aid
- NOTICE
- 1. Open the rinse aid dispenser 1b by pressing on the latch of the lid and pull it open.
- 2. Add liquid rinse aid to the dispenser 1b until it is full. Do not overfill. Avoid spilling into air vent hole.
- 3. Close the lid. Lid must be fully closed until it clicks in order to seal.
- 4. Wipe up any excess rinse aid that may have puddled when the dispenser reservoir is full.
- Tip:
- NOTICE
- Setting the amount of rinse aid used
- Setting
- Amount
- 1. Press the On/Off button (.
- 2. Hold down the function key # and press the Start button P until the display 8 indicates •:‹x (x can be any number). Release both buttons.
- 3. Press the function key # until the display 8 shows §:‹†.
- 4. Press the function key 3 to select the desired setting.
- 5. Press the Start button P to save the setting.
- Turning off rinse aid indicator
- - Loading the Dishwasher
- . Detergent
- / Dishwasher Cycles
- The Energy Guide label was based on the Normal soil sensing cycle as follows: The unit was tested without any rinse aid (liquid) in the rinse aid dispenser 1b. A single dose of detergent was inserted into the detergent dispenser 1j, with no detergent...
- Only sanitizing cycles have been designed to meet the requirements of Section 6 of the NSF/ANSI Standard for Residential Equipment for soil removal and sanitization efficacy. There is no intention, either directly or indirectly, to imply that all cyc...
- 1 Operating the Dishwasher
- Operating the Dishwasher
- 9 WARNING
- Protection against unintentional operation
- AquaSensor
- Switching the appliance on
- Time display
- Delay start
- Wash cycle end
- Auto power off
- To change the setting:
- 1. Press the On/Off button (.
- 2. Hold down the function key # and press the Start button P until the display 8 indicates •:‹x (x can be any number).
- 3. Release both buttons.
- 4. Press the function key # until the display 8 indicates ˜:‹x.
- 5. Press the function key 3 until the display corresponds with your requirements.
- 6. Press the Start button P.
- To change the setting:
- Switching off the appliance
- Interrupting the wash cycle
- 9 CAUTION
- Terminating the wash cycle (Reset)
- Changing the wash cycle
- Child Lock (panel lock)
- Intensive drying
- 1. Press the On/Off button (.
- 2. Hold down function key # and press Start button P until the display 8 indicates •:x (x can be any number).
- 3. Release both buttons.
- 4. Press function key # until the display 8 indicates the factory set value š:‹‹.
- 5. Press function key 3 to switch the intensive drying feature on š:‹‚ or off š:‹‹.
- 6. Press Start button P to save setting.
- 2 Care and Maintenance
- 3 Troubleshooting
- --------
- 4 Customer Service
- ‡ Statement of Limited Product Warranty
- 1 Operating the Dishwasher
- Table des matières
- fr-ca Notice d'utilisation
- ( Indications de sécurité 49
- ( CONSIGNES DE SÉCURITÉ IMPORTANTES 50
- ƒ Causes de pannes 55
- * Mise en marche 56
- , Produit de rinçage 60
- - Chargement du lave-vaisselle 62
- . Détergent 68
- / Cycles du lave-vaisselle 70
- 0 Options de cycles du lave-vaisselle 71
- 1 Mise en marche du lave-vaisselle 74
- 2 Entretien et maintenance 78
- 3 Dépannage 83
- 4 Service à la clientèle 89
- ‡ Déclaration de la garantie limitée du produit 90
- ( Indications de sécurité
- fr-ca Notice d'utilisation
- ( CONSIGNES DE SÉCURITÉ IMPORTANTES
- CONSIGNES DE SÉCURITÉ IMPORTANTES
- LISEZ ET CONSERVEZ CES INSTRUCTIONS
- Pour réduire le risque d'incendie, de choc électrique, ou de blessures graves, respectez les consignes suivantes :
- 9 AVERTISSEMENT
- 9 AVERTISSEMENT
- 9 AVERTISSEMENT
- 9 AVERTISSEMENT
- 9 AVERTISSEMENT
- 9 ATTENTION
- ƒ Causes de pannes
- * Mise en marche
- , Produit de rinçage
- Produit de rinçage
- Remarque :
- Ajout de produit de rinçage
- AVIS
- 1. Ouvrez le distributeur de liquide de rinçage 1b en appuyant sur le loquet du couvercle et en tirant celui-ci.
- 2. Ajoutez le produit de rinçage liquide au distributeur 1b à pleine capacité.Ne le remplissez pas outre mesure. Évitez tout déversement dans le trou d'aération.
- 3. Fermez le couvercle. Le couvercle doit être hermétiquement fermé jusqu'à l'encliquetage du loquet, pour garantir son étanchéité.
- 4. Essuyez tout excédent de produit de rinçage déversé lorsque le réservoir est plein.
- Conseil :
- AVIS
- Réglage de la quantité de produit de rinçage utilisé
- Paramètre
- Quantité
- 1. Appuyez sur le bouton On/Off (Marche/Arrêt) (.
- 2. Maintenez la touche enfoncée # et appuyez sur le bouton Start (Démarrer) P jusqu'à ce que l'afficheur 8 indique •:‹x (x peut être un nombre quelconque). Relâchez les deux boutons.
- 3. Appuyez sur la touche de fonction # jusqu'à ce que l'afficheur 8 indique §:‹†.
- 4. Appuyez sur la touche de fonction 3 pour sélectionner la valeur désirée.
- 5. Appuyez sur le bouton Start (Démarrer) P pour enregistrer le paramètre.
- Désactivation de l'indicateur de produit de rinçage
- - Chargement du lave-vaisselle
- . Détergent
- Détergent
- AVIS
- Cycle de nettoyage
- Eau dure/ Souillure importante
- Eau à dureté moyenne/ Souillure moyenne
- Eau douce/ Souillure légère/
- Ajout de détergent
- / Cycles du lave-vaisselle
- L'étiquetage Energy Guide se base sur le cycle de détection du niveau de saleté Normal comme suit : l'unité a été testée avec un distributeur de produit de rinçage (liquide) vide 1b. Une seule dose de détergent a été introduite dans le dis...
- Seuls les cycles de désinfection ont été conçus de manière à respecter les exigences de la Section 6 de la norme NSF/ANSI relative aux Équipements à usage résidentiel destinés à l'élimination de salissures et à la désinfection efficace....
- 1 Mise en marche du lave-vaisselle
- Mise en marche du lave-vaisselle
- 9 AVERTISSEMENT
- Protection contre une opération involontaire
- AquaSensor
- Mise sous tension de l'appareil
- Affichage de l'heure
- Démarrage retardé
- Fin du cycle de nettoyage
- Auto power off (Arrêt automatique)
- Pour changer le réglage :
- 1. Appuyez sur le bouton On/Off (Marche/Arrêt) (.
- 2. Maintenez la touche # enfoncée et appuyez sur le bouton Start (Démarrer) P jusqu'à ce que l'afficheur 8 indique •:‹x (x peut être un nombre quelconque).
- 3. Relâchez les deux boutons.
- 4. Appuyez sur la touche de fonction # jusqu'à ce que l'afficheur 8 indique ˜:‹x.
- 5. Appuyez sur la touche de fonction 3 jusqu'à ce que l'afficheur corresponde à vos besoins.
- 6. Appuyez sur le bouton Start (Démarrer) P.
- Pour changer le réglage :
- Mise hors tension de l'appareil
- Interruption du cycle de nettoyage
- 9 ATTENTION
- Arrêt du cycle de nettoyage (réinitialisation)
- Changement du cycle de lavage
- Verrouillage automatique du panneau/à l'épreuve des enfants
- Séchage intensif
- 1. Appuyez sur le bouton On/Off (Marche/Arrêt) (.
- 2. Maintenez la touche # enfoncée et appuyez sur le bouton Start (Démarrer) P jusqu'à ce que l'afficheur8 indique •:x (x peut être un nombre quelconque).
- 3. Relâchez les deux boutons.
- 4. Appuyez sur la touche de fonction # jusqu'à ce que l'afficheur 8 indique la valeur réglée à l'usine š :‹‹.
- 5. Appuyez sur la touche de fonction 3 pour mettre la fonction Extra sec sur On (activée) š:‹‚ ou sur Off (désactivée) š:‹‹.
- 6. Appuyez sur le bouton Start (Démarrer) P pour enregistrer le réglage.
- 2 Entretien et maintenance
- Entretien et maintenance
- Nettoyer le filtre du lave-vaisselle
- Filtres
- Bras gicleurs
- Pompe pour eaux résiduaires
- Rangement de l'appareil en cas d'inactivité
- Préparation de l'appareil pour l'hiver
- 3 Dépannage
- --------
- 4 Service à la clientèle
- ‡ Déclaration de la garantie limitée du produit
- 1 Mise en marche du lave-vaisselle

Loading the Dishwasher en-us
17
Loading the racks
For best dishwashing results,
observe the following when loading
the dishwasher:
■ Do not pre-wash items with
loosely attached food soil.
■ Remove all food particles, bones,
toothpicks and excessive grease.
■ Pre-treat items having burned-on,
baked-on or starchy soils.
■ Load dishes in the dishwasher
racks so the insides of bowls,
pots and pans are facing the
spray arms.
■ Avoid nesting and contact points
between dishes.
■ Separate items of dissimilar
metals. Use care to not block
movement of the spray arms.
■ Only wash household dishware
and kitchenware rated as
dishwasher-safe.
Refer to the Dishware Materials
section for more information
about dishware suitability.
NOTICE
To avoid dishwasher damage, do not
load the dishwasher with paper
products, plastic bags, packing
materials or anything other than
normal, dishwasher safe dishware
and kitchenware.
Loading the upper rack
Ensure items do not protrude through
the bottom of the racks and block the
spray arms.
Note: When pushing the upper
rack 1" into the dishwasher, push it
until it stops against the back of the
tub so the upper rack spray
arm 1* connects to the water
supply at the back of the tub. Do not
push racks in using the door.
Loading the lower rack
Place large items in the lower
rack 1Z. Load pots, pans and bowls
upside down. Do not block the vent
hole 1: with tall baking sheets.
Load these items on the right side of
the dishwasher.
Suggested loading pattern
10 place setting
Lower rack 1Z
Upper rack 1"
Note: Folding the cup shelves down
will allow the cups to sit at an
increased angle and reduce water
pooling on cup bottoms.