
Interactive User Manual

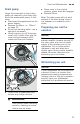

Table Of Contents
- Table of contents
- en-us Operating instructions
- ( Safety Definitions 5
- ( IMPORTANT SAFETY INSTRUCTIONS 6
- ƒ Causes of Damage 9
- * Getting Started 10
- , Rinse Aid 13
- - Loading the Dishwasher 15
- . Detergent 25
- / Dishwasher Cycles 27
- 0 Dishwasher Cycle Options 28
- 1 Operating the Dishwasher 30
- 2 Care and Maintenance 34
- 3 Troubleshooting 38
- 4 Customer Service 43
- ‡ Statement of Limited Product Warranty 44
- ( Safety Definitions
- en-us Operating instructions
- ( IMPORTANT SAFETY INSTRUCTIONS
- IMPORTANT SAFETY INSTRUCTIONS
- READ AND SAVE THESE INSTRUCTIONS
- To reduce the risk of fire, electrical shock, or serious injury, observe the following:
- 9 WARNING
- 9 WARNING
- 9 WARNING
- 9 WARNING
- 9 WARNING
- 9 WARNING
- 9 CAUTION
- ƒ Causes of Damage
- * Getting Started
- , Rinse Aid
- Rinse Aid
- Note:
- Adding rinse aid
- NOTICE
- 1. Open the rinse aid dispenser 9* by pressing on the latch of the lid and pull it open.
- 2. Add liquid rinse aid to the dispenser 9* until it is full. Do not overfill. Avoid spilling into air vent hole.
- 3. Close the lid. Lid must be fully closed until it clicks in order to seal.
- 4. Wipe up any excess rinse aid that may have puddled when the dispenser reservoir is full.
- Tip:
- NOTICE
- Setting the amount of rinse aid used
- Setting
- Amount
- 1. Press the On/Off button (.
- 2. Hold down the function key # and press the Start button P until the display 8 indicates •:‹x or š:‹x (x can be any number). Release both buttons.
- 3. Press the function key # until the display 8 shows §:‹†.
- 4. Press the function key 3 to select the desired setting.
- 5. Press the Start button P to save the setting.
- Turning off rinse aid indicator
- - Loading the Dishwasher
- 9.4 in (24 cm)
- 12.6 in (32 cm)
- 10.4 in (26.5 cm)
- 11.8 in (30 cm)
- 11.4 in (29 cm)
- 10.6 in (27 cm)
- 7 in (18 cm)
- 12.6 in (32 cm)
- 8 in (20.5 cm)
- 11.8 in (30 cm)
- 9 in (23 cm)
- 10.6 in (27 cm)
- RackMatic®
- Rack accessories
- Removing/Installing third rack
- Removing third rack 1*
- Installing third rack 1*
- 1. Pull out third rack rails all the way (1).
- 2. Insert third rack at an angle. Make sure that the stopper hooks of both rails slide in between the holding hooks and the lower rollers of the third rack (2).
- 3. Slide third rack in and lift the upper rollers over the front stopper hooks of both rails (3).
- 4. Push in third rack (4).
- Removing/Installing upper rack with Rackmatic®
- Removing upper rack 12
- Installing upper rack 12
- 1. Pull out upper rack rails all the way (1).
- 2. Insert upper rack at an angle. Make sure that the stopper hooks of both rails slide in between the upper and lower rollers on the rear side of the rack (2).
- 3. Slide upper rack in and lift the upper rollers over the front stopper hooks of both rails (3).
- 4. Push in upper rack (4).
- . Detergent
- / Dishwasher Cycles
- The Energy Guide label was based on the Normal soil sensing cycle as follows: The unit was tested without any rinse aid (liquid) in the rinse aid dispenser 9*. A single dose of detergent was inserted into the detergent dispenser 92, with no detergent...
- Only sanitizing cycles have been designed to meet the requirements of Section 6 of the NSF/ANSI Standard for Residential Equipment for soil removal and sanitization efficacy. There is no intention, either directly or indirectly, to imply that all cyc...
- 1 Operating the Dishwasher
- Operating the Dishwasher
- 9 WARNING
- Protection against unintentional operation
- AquaSensor
- Switching the appliance on
- Time display
- Delay start
- Wash cycle end
- Auto power off
- To change the setting:
- 1. Press the On/Off button (.
- 2. Hold down the function key # and press the Start button P until the display 8 indicates š:‹x (x can be any number).
- 3. Release both buttons.
- 4. Press the function key # until the display 8 indicates ˜:‹x.
- 5. Press the function key 3 until the display corresponds with your requirements.
- 6. Press the Start button P.
- To change the setting:
- Switching off the appliance
- Interrupting the wash cycle
- 9 CAUTION
- Terminating the wash cycle (Reset)
- Changing the wash cycle
- Child Lock (panel lock)*
- Intensive drying
- 1. Press the On/Off button (.
- 2. Hold down function key # and press Start button P until the display 8 indicates š:x (x can be any number).
- 3. Release both buttons.
- 4. Press function key # until the display 8 indicates the factory set value š:‹‹.
- 5. Press function key 3 to switch the intensive drying feature on š:‹‚ or off š:‹‹.
- 6. Press Start button P to save setting.
- 2 Care and Maintenance
- 3 Troubleshooting
- --------
- 1 Operating the Dishwasher

en-us Care and Maintenance
36
To check or clean the filter system:
1.
Unscrew the Large Object Trap as
illustrated and remove the entire
filter system.
2.
Remove the microfilter from the
fine filter for easier cleaning.
3.
Rinse the filters under running
water and use a soft brush to
clean.
Note: do not use abrasive
brushes or steel wool, etc., as
they may damage the filter.
4.
Reinstall the filter system in
reverse sequence and lock into
place by screwing the Large
Object Trap until the marking
arrows align.
Spray arms
Check spray arms 1:, 1R for
grease and limescale deposits. If you
find such deposits:
■ Fill detergent dispenser 92 with
detergent and start the appliance
without utensils in the cycle with
the highest rinsing temperature.
~ "Wash Cycle Information"
on page 29
■ Clean the appliance with
detergents/appliance cleaners
which are particularly suitable for
use with dishwashers.
■ Unscrew the upper spray arm
1: and pull off the lower spray
1R arm as shown. Inspect for
deposits.