
Use and Care Manual
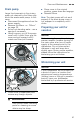
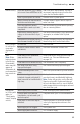
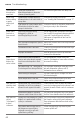
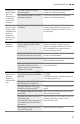
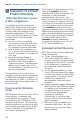
Table Of Contents
- Table of contents
- en-us Operating instructions
- ( Safety Definitions 5
- ( IMPORTANT SAFETY INSTRUCTIONS 6
- ƒ Causes of Damage 11
- * Getting Started 12
- , Rinse Aid 15
- - Loading the Dishwasher 17
- . Detergent 28
- / Dishwasher Cycles 30
- 0 Dishwasher Cycle Options 31
- 1 Operating the Dishwasher 34
- 2 Care and Maintenance 38
- 3 Troubleshooting 42
- 4 Customer Service 49
- ‡ Statement of Limited Product Warranty 50
- ( Safety Definitions
- en-us Operating instructions
- ( IMPORTANT SAFETY INSTRUCTIONS
- IMPORTANT SAFETY INSTRUCTIONS
- READ AND SAVE THESE INSTRUCTIONS
- To reduce the risk of fire, electrical shock, or serious injury, observe the following:
- 9 WARNING
- 9 WARNING
- 9 WARNING
- 9 WARNING
- 9 WARNING
- 9 WARNING
- 9 CAUTION
- ƒ Causes of Damage
- * Getting Started
- , Rinse Aid
- Rinse Aid
- Note:
- Adding rinse aid
- NOTICE
- 1. Open the rinse aid dispenser 92 by pressing on the latch of the lid and pull it open.
- 2. Add liquid rinse aid to the dispenser 92 until it is full. Do not overfill. Avoid spilling into air vent hole.
- 3. Close the lid. Lid must be fully closed until it clicks in order to seal.
- 4. Wipe up any excess rinse aid that may have puddled when the dispenser reservoir is full.
- Tip:
- NOTICE
- Setting the amount of rinse aid used
- Setting
- Amount
- 1. Press the On/Off button (.
- 2. Hold down the function key # and press the Start button P until the display 8 indicates •:‹x or š:‹x (x can be any number). Release both buttons.
- 3. Press the function key # until the display 8 shows §:‹†.
- 4. Press the function key 3 to select the desired setting.
- 5. Press the Start button P to save the setting.
- Turning off rinse aid indicator
- - Loading the Dishwasher
- 9.4 in (24 cm)
- 12.6 in (32 cm)
- 10.4 in (26.5 cm)
- 11.8 in (30 cm)
- 11.4 in (29 cm)
- 10.6 in (27 cm)
- 7 in (18 cm)
- 12.6 in (32 cm)
- 8 in (20.5 cm)
- 11.8 in (30 cm)
- 9 in (23 cm)
- 10.6 in (27 cm)
- RackMatic®
- Rack accessories
- Removing/Installing third rack
- Removing third rack 1*
- Installing third rack 1*
- 1. Pull out third rack rails all the way (1).
- 2. Insert third rack at an angle. Make sure that the stopper hooks of both rails slide in between the holding hooks and the lower rollers of the third rack (2).
- 3. Slide third rack in and lift the upper rollers over the front stopper hooks of both rails (3).
- 4. Push in third rack (4).
- Removing/Installing upper rack with Rackmatic®
- Removing upper rack 12
- Installing upper rack 12
- 1. Pull out upper rack rails all the way (1).
- 2. Insert upper rack at an angle. Make sure that the stopper hooks of both rails slide in between the upper and lower rollers on the rear side of the rack (2).
- 3. Slide upper rack in and lift the upper rollers over the front stopper hooks of both rails (3).
- 4. Push in upper rack (4).
- . Detergent
- / Dishwasher Cycles
- The Energy Guide label was based on the Normal soil sensing cycle as follows: The unit was tested without any rinse aid (liquid) in the rinse aid dispenser 92. A single dose of detergent was inserted into the detergent dispenser 9:, with no detergent...
- Only sanitizing cycles have been designed to meet the requirements of Section 6 of the NSF/ANSI Standard for Residential Equipment for soil removal and sanitization efficacy. There is no intention, either directly or indirectly, to imply that all cyc...
- 1 Operating the Dishwasher
- Operating the Dishwasher
- 9 WARNING
- Protection against unintentional operation
- Operating the touch buttons
- AquaSensor
- Switching the appliance on
- Time display
- Delay start
- Wash cycle end
- Auto power off
- To change the setting:
- 1. Press the On/Off button (.
- 2. Hold down the function key # and press the Start button P until the display 8 indicates š:‹x (x can be any number).
- 3. Release both buttons.
- 4. Press the function key # until the display 8 indicates ˜:‹x.
- 5. Press the function key 3 until the display corresponds with your requirements.
- 6. Press the Start button P.
- To change the setting:
- Switching off the appliance
- Interrupting the wash cycle
- 9 CAUTION
- Terminating the wash cycle (Reset)
- Changing the wash cycle
- Child Lock (panel lock)
- Intensive drying
- 1. Press the On/Off button (.
- 2. Hold down function key # and press Start button P until the display 8 indicates š:x (x can be any number).
- 3. Release both buttons.
- 4. Press function key # until the display 8 indicates the factory set value š:‹‹.
- 5. Press function key 3 to switch the intensive drying feature on š:‹‚ or off š:‹‹.
- 6. Press Start button P to save setting.
- 2 Care and Maintenance
- 3 Troubleshooting
- --------
- 4 Customer Service
- ‡ Statement of Limited Product Warranty
- 1 Operating the Dishwasher

en-us Troubleshooting
44
Dishwasher
runs a long
time.
Incoming water is not warm
enough.
Before starting a cycle, run hot water faucet
at the sink closest to the dishwasher.
Cycle time depends on wash cycle
chosen and amount of soil on
dishes (dishwasher sensors
increase cycle times to ensure
dishes are clean when heavy soil is
detected).
Scrape food off of dishes and use less
intensive wash cycles.
Rinse aid dispenser 92 is empty,
or rinse aid setting = 0. Without
rinse aid, wash cycle defaults to
longest time with most number of
washes and rinses.
Add rinse aid and change rinse aid setting
depending on water hardness.
Dishwasher is connected to cold
water supply.
Connect dishwasher to hot water supply.
Dishes aren’t
clean enough
Spray arms are blocked or
misaligned where they cannot
rotate freely.
Make sure spray arms 1:, 1Z can
rotate freely.
Little or no water spray due to
clogged spray arm nozzle.
Clean out spray arm nozzles and filters of all
debris and obstructions. ~ "Spray arms"
on page 40
Little or no water spray due to
clogged or misaligned filters 1j.
Clean filters and make sure they’re installed
correctly. ~ "Filter components"
on page 39
Dishes are nested or placed too
closely together and racks are
overfilled.
Space dishes apart so spray jets can reach
the surface of the dishes and dishes don’t
contact each other. ~ "Loading the
Dishwasher" on page 17
Improper or ineffective wash cycle
or detergent used.
Choose a more intensive wash cycle and
use appropriate dishwasher detergents.
~ "Wash Cycle Information" on page 32
Detergent is made less effective
due to hard water.
Install a water softener and choose a more
intensive wash cycle.
Removable
spots or
streaks on
glasses and
silverware.
Too much rinse aid causes streaks
and too little rinse aid can cause
spots.
Add rinse aid and check rinse aid setting
(recommended setting 4-5). ~ "Rinse Aid"
on page 15
Mineral deposits from hard water. Install a water softener.
Water from top (3rd) or upper rack
dripped on racks below.
Unload lower rack 1st, upper rack 2nd and
top (3rd) rack last.