
Installation Guide

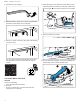
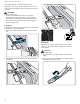
Table Of Contents
- Dishwasher
- en-us
- Table of contents
- 1 IMPORTANT SAFETY INSTRUCTIONS
- 2 Before you begin
- 3 Installation Preparation
- 4 Installation Procedure
- 4.1 Attach Vapor Barrier
- 4.2 Attach Water Inlet Hose
- 4.3 Visual Leak Check
- 4.4 Pre-level the Dishwasher
- 4.5 Attach Power Cord
- 4.6 Mounting Brackets
- 4.7 Prepare Hoses and Power Cord
- 4.8 Install Dishwasher in Cabinet Space
- 4.9 Level the Dishwasher
- 4.10 Outer Door Assembly
- 4.11 Secure the Dishwasher
- 4.12 Attach the Standard Toe Panel
- 4.13 Attach Plastic Toe Panel
- 5 Dishwasher Connection
- 6 Customer Service
- fr-ca
- Table des matières
- 1 IMPORTANTES CONSIGNES DE SÉCURITÉ
- 2 Avant de commencer
- 3 Préparation avant l’installation
- 4 Procédure d’installation
- 4.1 Attacher le pare-vapeur
- 4.2 Fixer le flexible d’arrivée d’eau
- 4.3 Contrôle visuel des fuites
- 4.4 Mise à niveau préalable du lave-vaisselle
- 4.5 Fixer le cordon d’alimentation
- 4.6 Équerres de fixation
- 4.7 Préparer les tuyaux et le cordon d’alimentation
- 4.8 Installer un lave-vaisselle dans un meuble
- 4.9 Mise à niveau du lave-vaisselle
- 4.10 Assemblage de la porte extérieure
- 4.11 Fixer le lave-vaisselle
- 4.12 Fixer la plinthe standard
- 4.13 Fixer la plinthe en plastique
- 5 Raccordement du lave-vaisselle
- 6 Service à la clientèle
- es-mx
- Tabla de contenidos
- 1 INSTRUCCIONES DE SEGURIDAD IMPORTANTES
- 2 Antes de empezar
- 3 Preparación para la instalación
- 4 Procedimiento de instalación
- 4.1 Acoplar barrera de vapor
- 4.2 Acoplar la manguera de entrada de agua
- 4.3 Comprobación visual de fugas
- 4.4 Nivelar provisionalmente el lavavajillas
- 4.5 Acoplar el cable de alimentación
- 4.6 Soportes de montaje
- 4.7 Preparar las mangueras y el cable de alimentación
- 4.8 Instalar el lavavajillas en el espacio del gabinete
- 4.9 Nivelar el lavavajillas
- 4.10 Montaje de la puerta exterior
- 4.11 Fijar el lavavajillas
- 4.12 Acoplar la placa protectora del zócalo estándar
- 4.13 Acoplar la placa protectora del zócalo de plástico
- 5 Conexión del lavavajillas
- 6 Servicio de atención al cliente

en-us Installation Procedure
8
3. Peel off half of the backing.
4. Stick the barrier in place. Do not leave a gap between
the barrier and the edge of the countertop.
5. After it is in place, remove the other half of the backing
and attach firmly.
For any under-counter wood details that do not allow
the vapor barrier to lie flat, ensure that the wood is
sealed.
4.2 Attach Water Inlet Hose
NOTICE:
Avoid cross-threading
▶ Cross-threading will cause leaks.
Teflon tape
▶ Do not use Teflon tape; it could cause leaks and
damage floors or cabinetry.
1. Attach elbow joint to the water inlet valve with the open
end facing towards the direction of the sink, either to the
left or the right. . Turn by hand and do not over tighten
.
2. Attach hot water line to elbow.
3. Use two wrenches to tighten, using one to stabilize and
avoid putting stress on the water inlet valve.