
Installation Guide
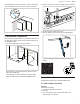
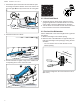
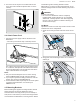
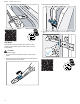
Table Of Contents
- Dishwasher
- en-us
- Table of contents
- 1 IMPORTANT SAFETY INSTRUCTIONS
- 2 Before you begin
- 3 Installation Preparation
- 4 Installation Procedure
- 4.1 Attach Water Inlet Hose
- 4.2 Visual Leak Check
- 4.3 Pre-level the Dishwasher
- 4.4 Attach Power Cord
- 4.5 Mounting Brackets
- 4.6 Prepare Hoses and Power Cord
- 4.7 Install Dishwasher in Cabinet Space
- 4.8 Level the Dishwasher
- 4.9 Outer Door Assembly
- 4.10 Secure the Dishwasher
- 4.11 Attach the Standard Toe Panel
- 4.12 Attach Plastic Toe Panel
- 5 Dishwasher Connection
- 6 Customer Service
- fr-ca
- Table des matières
- 1 IMPORTANTES CONSIGNES DE SÉCURITÉ
- 2 Avant de commencer
- 3 Préparation avant l’installation
- 4 Procédure d’installation
- 4.1 Fixer le flexible d’arrivée d’eau
- 4.2 Contrôle visuel des fuites
- 4.3 Mise à niveau préalable du lave-vaisselle
- 4.4 Fixer le cordon d’alimentation
- 4.5 Équerres de fixation
- 4.6 Préparer les tuyaux et le cordon d’alimentation
- 4.7 Installer un lave-vaisselle dans un meuble
- 4.8 Mise à niveau du lave-vaisselle
- 4.9 Assemblage de la porte extérieure
- 4.10 Fixer le lave-vaisselle
- 4.11 Fixer la plinthe standard
- 4.12 Fixer la plinthe en plastique
- 5 Raccordement du lave-vaisselle
- 6 Service à la clientèle
- es-mx
- Tabla de contenidos
- 1 INSTRUCCIONES DE SEGURIDAD IMPORTANTES
- 2 Antes de empezar
- 3 Preparación para la instalación
- 4 Procedimiento de instalación
- 4.1 Acoplar la manguera de entrada de agua
- 4.2 Comprobación visual de fugas
- 4.3 Nivelar provisionalmente el lavavajillas
- 4.4 Acoplar el cable de alimentación
- 4.5 Soportes de montaje
- 4.6 Preparar las mangueras y el cable de alimentación
- 4.7 Instalar el lavavajillas en el espacio del gabinete
- 4.8 Nivelar el lavavajillas
- 4.9 Montaje de la puerta exterior
- 4.10 Fijar el lavavajillas
- 4.11 Acoplar la placa protectora del zócalo estándar
- 4.12 Acoplar la placa protectora del zócalo de plástico
- 5 Conexión del lavavajillas
- 6 Servicio de atención al cliente

Installation Procedure en-us
9
3. Use a level on the top front to see that both feet are
even. (The back foot will be adjusted after it is in the
cabinet.)
4.4 Attach Power Cord
▶ Plug the end of the supply cord into the back of the
dishwasher.
‒ Be sure to push it all the way in until fully seated.
The outlet for the power supply cord should be located
in a cabinet or wall adjacent to the dishwasher cabinet.
Do not plug dishwasher into the wall outlet until all the
steps of the installation are complete.
Notes
¡ Only use the included power cord. If cord is missing
order kit SMZPC002UC through Customer Service.
¡ If you require a permanent wiring connection, order kit
junction box accessory kit SMZPCJB1UC.
¡ If local electrical codes require clips to secure the power
cord wire to the dishwasher, use accessory kit
SMZEPCC1UC.
4.5 Mounting Brackets
Before installing the supplied mounting brackets, decide
which method of securing the dishwasher into its
enclosure will be used, top (wood or porous material) or
side (stone or solid surface). Once the mounting brackets
are installed on the dishwasher, removing them is difficult
and will damage the mounting brackets and the
dishwasher. If you have a Fully Integrated Panel, do not
attach mounting brackets until after attaching the panel to
the door.
WARNING
Avoid tip over hazard
▶ Do not use the dishwasher until it is completely
installed. When opening the door on an uninstalled
dishwasher, carefully open the door while supporting
the rear of the unit. Failure to follow this warning can
result in serious injury.
Top Mount
Top Mount is used for counter tops made of wood or other
materials that can be easily drilled.
1. Orient the mounting brackets and insert in the correct
slot.
2. Using pliers, bend side flanges down. Do not attach to
cabinet yet.