Dishwasher SHPM65W55N SHPM65W52N SHPM65W56N SHXM65W55N en-us Operating instructions fr-ca Notice d'utilisation
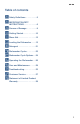
en-us Table of contents en-us gn i t arepO s no i t c u r t s n i ( Safety Definitions. . . . . . . . . . .5 ( IMPORTANT SAFETY INSTRUCTIONS . . . . . . . . . . . .6 ƒ Causes of Damage . . . . . . . . . .9 * Getting Started . . . . . . . . . . . .10 , Rinse Aid. . . . . . . . . . . . . . . . .12 - Loading the Dishwasher . . . .13 . Detergent . . . . . . . . . . . . . . . .21 / Dishwasher Cycles . . . . . . . .23 0 Dishwasher Cycle Options . .24 1 Operating the Dishwasher. . .26 2 Care and Maintenance .
en-us 'HDU 9DOXHG &XVWRPHU 7KDQN \RX IRU VHOHFWLQJ D %RVFK GLVKZDVKHU
Safety Definitions en-us ( Safety Definitions sno i t i n i f eD y t e f aS 9 WARNING This indicates that death or serious injuries may occur as a result of non-observance of this warning. 9 CAUTION This indicates that minor or moderate injuries may occur as a result of non-observance of this warning. NOTICE This indicates that damage to the appliance or property may occur as a result of non-compliance with this advisory. Note: This alerts you to important information and/or tips.
9 IMPORTANT SAFETY INSTRUCTIONS READ AND SAVE THESE INSTRUCTIONS ( SNOITCURTSNI YTEFAS TNATROPMREAD I AND SAVE THESE IMPORTANT INSTRUCTIONS SAFETY INSTRUCTIONS This dishwasher is provided with Installation Instructions and this Use and Care Manual. Read and understand all instructions before using the dishwasher. This dishwasher is intended for use up to a maximum altitude of 13,000 ft (4,000 meters) above sea level.
9 IMPORTANT SAFETY INSTRUCTIONS READ AND SAVE THESE INSTRUCTIONS GROUNDING INSTRUCTIONS This appliance must be grounded to a metal, permanent wiring system or an equipment grounding conductor must be run with the circuit conductors and connected to the equipment grounding terminal or lead on the dishwasher. See the Installation Instructions included with this dishwasher for more information on electrical requirements. 9 WARNING RISK OF ELECTRIC SHOCK! This appliance must be grounded.
9 IMPORTANT SAFETY INSTRUCTIONS READ AND SAVE THESE INSTRUCTIONS Child Safety To reduce risk of injury, do not allow children to play in or on the dishwasher. When children become old enough to operate the appliance, it is the responsibility of the parents/legal guardians to ensure the children are instructed in safe practices by qualified persons.
Causes of Damage en-us ƒ Causes of Damage NOTICES egamD f o sesuaC ■ ■ ■ ■ Never use steam cleaning products to clean your dishwasher. The manufacturer will not be liable for the possible damages or consequences. Bleach-based wipes can cause stainless-steel doors and tubs to rust. Using harsh chemicals (e.g. bleach), abrasive cleaners, scouring pads (metal or plastic), or abrasive cloths/paper towels can damage your dishwasher’s exterior door panel, fascia panel and buttons.
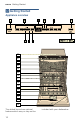
en-us Getting Started * Getting Started Appliance overview de t ra tS gn i t eG The dotted lines show optional features which may or may not be 10 included with your dishwasher.
Getting Started en-us The numbers stated below refer to the overview images on the previous page of this manual. 92 Detergent dispenser 9: Lock for detergent dispenser 9B Rating plate Operating panel * optional feature which may or may not be included with your dishwasher.
en-us Rinse Aid , Rinse Aid To achieve proper drying, always use a liquid rinse aid, even if your detergent contains a rinse aid or drying additive. 2. Add liquid rinse aid to the dispenser 9* until it is full. Do not overfill. d i A esn i R Note: The dishwasher indicates low rinse aid by turning on the Rinse Aid indicator on the display 8. If this indicator lights up, you need to refill the rinse aid dispenser 9* by following the directions below.
Loading the Dishwasher en-us Setting Amount §:‹„ medium setting §:‹… medium/high setting §:‹† high setting §:‹‡ highest setting 1. Press the On/Off button (. 2. Hold down the function key # and press the Start button P until the display 8 indicates š:‹x (x can be any number). Release both buttons. 3. Press the function key # until the display 8 shows §:‹†. 4. Press the function key 3 to select the desired setting. 5. Press the Start button P to save the setting.
en-us Loading the Dishwasher Not Recommended Acrylic Crazing or small cracks throughout the acrylic, may occur. AdhesiveJoined Pieces Adhesives that join materials such as plastic, wood, bone, steel, copper, tin, etc. may loosen. Bone-Handled Utensils Handles may separate. Iron Iron will rust. Hand wash and dry immediately. Non-Dishware Items Your dishwasher is intended for use in cleaning ONLY standard household dishware and kitchenware. Pewter, Brass, Bronze These items will tarnish.
Loading the Dishwasher en-us Recommended loading pattern Third rack 1* For daily, regular or typical use 12 place setting Lower rack 9" Additional loading pattern 10 place setting Lower rack 9" Upper rack 12 Upper rack 12 Note: Folding the cup shelves down will allow the cups to sit at an increased angle and reduce water pooling on cup bottoms. Note: Folding the cup shelves down will allow the cups to sit at an increased angle and reduce water pooling on cup bottoms.
en-us Loading the Dishwasher Third rack 1* Loading the silverware basket Place knives and sharp utensils with their handles up and forks and spoons with their handles down. If large or oddly-shaped items are loaded in the silverware basket, be sure they do not nest together. This dishwasher is equipped with a silverware drawer that should accommodate most silverware loading needs.
Loading the Dishwasher en-us Adjusting the height of the rack If required, the height of the upper rack 12 can be adjusted to create more space for taller utensils either in the upper or lower rack. With silverware basket Upper rack Lower rack Setting 1 max. ø 9.4 in (24 cm) 13.4 in (34 cm) Setting 2 max. ø 10.4 in (26.5 cm) 12 in (30.5 cm) Setting 3 max. ø 11.
en-us Loading the Dishwasher Rack accessories Flip tines The upper and lower rack are fitted with flip tines that can be folded down depending on what you may need to load in the rack. Lower rack flip tines: To fold down, pull flip tine gently forward and release it from the notch. Push the flip tine downward. To fold up, push flip tines into an upright position until the holder engages in the notch.
Loading the Dishwasher en-us Cup shelves The cup shelves and the space underneath them can be used for small cups or for larger serving utensils. &/,&. Removing/Installing third rack Installing third rack 1* 1. Pull out third rack rails all the way (1). 2. Insert third rack at an angle. Make sure that the stopper hooks of both rails slide in between the holding hooks and the lower rollers of the third rack (2). 3.
en-us Loading the Dishwasher Removing/Installing upper rack with Rackmatic® Installing upper rack 12 1. Pull out upper rack rails all the way (1). 2. Insert upper rack at an angle. Make sure that the stopper hooks of both rails slide in between the upper and lower rollers on the rear side of the rack (2). 3. Slide upper rack in and lift the upper rollers over the front stopper hooks of both rails (3). 4. Push in upper rack (4). Removing upper rack 12 1. Pull out upper rack all the way (1). 2.
Detergent en-us . Detergent Use only detergent specifically designed for dishwashers. For best results, use fresh powdered dishwashing detergent or detergent tabs. t negre t eD NOTICE To avoid dishwasher damage: ■ Do not use hand dishwashing products in your dishwasher. ■ Do not use too much detergent if your water is soft. Using too much detergent with soft water may cause etching in glassware and fine china. This dishwasher uses less water than most, therefore, less detergent is required.
en-us Detergent Adding detergent 1. If the detergent dispenser 92 is still closed, actuate the locking bar 9: to open it. Note: Do not place detergent tabs or utensils in the detergent tab tray 1B. Place tabs or other detergent forms directly in the detergent dispenser 92. Note: Make sure the detergent dispenser is dry and clear of detergent residue. 2. Pour detergent into the dry detergent dispenser 92 only. Add detergent. Do not overfill the detergent dispenser.
Dishwasher Cycles en-us / Dishwasher Cycles se l cyC rehsawhs iD Wash cycle Recommended use Possible wash cycle option Heavy Best for cleaning items with baked-on food or grease. These dishes would normally require soaking or hand scouring. all Auto Smartest cycle, with most flexible soil all sensing, which is ideal for mixed dishware and food soils.
en-us Dishwasher Cycle Options 0 Dishwasher Cycle Options Delay sno i t pO e l cyC rehsawhs iD Allows you to delay the start time of your dishwasher up to 24 hours. Half Load Can reduce water consumption when washing small, lightly soiled loads that fill approximately half of the dishwasher’s capacity. Delicate This option’s reduced time and temperature are best for lightly soiled items with easy to remove food soils. The option also reduces the likelihood of cloudy glasses.
Dishwasher Cycle Options en-us Heavy Rinse temp. °F/°C Auto Normal Rinse Speed60® 162/ 72 153-162/ 67-72 156/ 69 158/ 70 incoming Cycle time min. 114 90-105 90-99 N/A N/A Water usage gal/L 4.7/ 17.9 2.7-4.4/ 10.2-16.5 2.8-3.7/ 10.8-13.9 N/A N/A Rinse temp. °F/°C 162/ 72 131-151 55-60 162/ 72 N/A N/A Cycle time min. 105 - 130 90 - 105 110 - 120 N/A N/A Water usage gal/L 4.9-6.4/ 18.6-24.2 3.5-6.5/ 13.1-24.5 2.3-5.5/ 8.8-21.0 N/A N/A Rinse temp.
en-us Operating the Dishwasher 1 Operating the Dishwasher Note: With hidden controls, the door rehsawhs iD eh t gn i t arepO must be opened before changing settings and closed after changing settings. 9 WARNING RISK OF INJURY! To avoid risk of injury, always use caution when opening the door during or following a wash cycle as hot water or steam may escape. Do not fully open the door until water noises have stopped and steam has subsided.
Operating the Dishwasher en-us Delay Start You can delay the start of the cycle in one hour increments up to 24 hours. œ:‹‚ 1 hour delay œ:ƒ… 24 hours delay To set Delay start: 1. Open the door and press the On/Off button (. Select a cycle. 2. Press the Delay button from the wash cycle options H until the displayed time corresponds with your requirements. 3. Press the Start button P to activate Delay start. To cancel Delay start: 1.
en-us Operating the Dishwasher Switching off the appliance Short time after the end of the wash cycle: 1. Open the door. 2. Switch off On/Off button (. 3. Turn off water supply. 4. Remove the utensils when they have cooled down. 9 WARNING RISK OF INJURY! To avoid risk of injury, always use caution when opening the door during or following a wash cycle as hot water or steam may escape. Do not fully open the door until water noises have stopped and steam has subsided.
Care and Maintenance en-us To change the setting: 1. Open the door. 2. Press the On/Off button (. 3. Hold down function key # and press Start button P until the display 8 indicates š:‹x (x can be any number). Release both buttons. 4. Press function key # until the display shows ‚:‹‚. 5. Press the function key 3 to switch the InfoLight® feature on ‚:‹‚ or off ‚:‹‹. 6. Press Start button P to save the setting. Intensive drying The final rinse uses a higher temperature which improves the drying result.
en-us Care and Maintenance B 9 WARNING Use caution when removing parts for cleaning as some debris may be sharp. C Filters The Bosch® filter system 1b is designed to prevent the need to pre-rinse normally attached food soils from your dishes. Simply scrape leftover food soils off of dishware before loading. This process will conserve time, water and the energy require to heat your household water supply.
Care and Maintenance en-us To check or clean the filter system: Spray arms 1. Unscrew the Large Object Trap as illustrated and remove the entire filter system. Check spray arms 1:, 1R for grease and limescale deposits. If you find such deposits: ■ Fill detergent dispenser 92 with detergent and start the appliance without utensils in the cycle with the highest rinsing temperature.
en-us Care and Maintenance Drain pump ■ Large food remnants in the rinsing water not retained by the filters may block the waste water pump. In this case: ■ Disconnect the appliance from the power supply. ■ Remove the filters. ~ "Filters" on page 30 ■ Scoop out standing water - use a sponge if necessary. ■ Using a spoon, pry off the pump cover until it clicks, then grip the cover and pull upward until it resists and then pull forward. ■ Place cover in the original position, press down and engage.
Troubleshooting en-us 3 Troubleshooting Dishwashers may occasionally exhibit problems that are unrelated to a malfunction of the dishwasher itself. gn i t o h s e l buo r T The following information may help you with a dishwasher problem without involving a repair professional. Problem Cause Action Dishwasher does not start Door may not be properly latched. Shut the door completely until you hear a click. Dishwasher may not be turned on. Press the main power switch ( to turn dishwasher on.
en-us Troubleshooting Incoming water is not warm Dishwasher seems to run a enough. long time Cycle time can vary due to soil and water conditions. Before starting a cycle, run hot water faucet at the sink closest to the dishwasher. Sensors in the dishwasher automatically increase the cycle time to ensure a good wash when heavy soil is detected. Rinse aid dispenser 9* is empty, Add rinse aid, or change rinse aid setting. or rinse aid setting has been set to “0”.
Troubleshooting en-us Odor Note: Water testing is done in the factory. Occasionally water may still appear in dishwasher at purchase which may create an odor. Food debris is present at the bottom of the dishwasher. Dishwasher not filling with water or “Check water supply” display lights up Remove the filters and clean them. ~ "Care and Maintenance" on page 29 Food particles are present near the ~ "Care and Maintenance" on page 29 door seal. Residual water is present at the bottom of the dishwasher.
en-us Troubleshooting Tub stains Stains on the dishwasher interior are due to water hardness. Concentrated lemon juice can reduce the build-up of hard water stains. Run Normal/Regular cycle until it flushes and interrupt the cycle and then place an 8 oz. cup of the concentrated lemon solution on the upper rack and finish the cycle. This can be done periodically to avoid build-up. Silverware in contact with tub. Ensure that silverware does not make contact with the tub while running a cycle.
Customer Service en-us 4 Customer Service Your Bosch® dishwasher requires no special care other than that described in the Care and Maintenance section of this manual. If you are having a problem with your dishwasher, before calling for service please refer to the Troubleshooting Guide section of the manual. If service is necessary, contact your dealer or installer or an authorized service center. Do not attempt to repair the appliance yourself.
en-us Statement of Limited Product Warranty ‡ Statement of Limited Product Warranty What this Warranty Covers & Who it Applies to: y t nar aW t cudorP de t imi L f o t nem t a tS The limited warranty provided by BSH Home Appliances Corporation (BSH) in this Statement of Limited Product Warranty applies only to Bosch® dishwashers (“Product”) sold to you, the first using purchaser, provided that the Product was purchased: ■ for your normal, household (non-commercial) use, and has in fact at all times only
Statement of Limited Product Warranty en-us Repair/Replace as Your Exclusive Remedy During this warranty period, BSH or one of its authorized service providers will repair your Product without charge to you (subject to certain limitations stated herein) if your Product proves to have been manufactured with a defect in materials or workmanship.
en-us Statement of Limited Product Warranty ■ ■ ■ ■ ■ Any party’s willful misconduct, negligence, misuse, abuse, accidents, neglect, improper operation, failure to maintain, improper or negligent installation, tampering, failure to follow operating instructions, mishandling, unauthorized service (including self-performed “fixing” or exploration of the appliance’s internal workings); Adjustment, alteration or modification of any kind; A failure to comply with any applicable state, local, city, or county
Statement of Limited Product Warranty en-us shall be effective unless authorized in writing by an officer of BSH Home Appliances Corporation.
#4) SFTFSWFT UIF SJHIU UP DIBOHF TQFDJGJDBUJPOT PS EFTJHO XJUIPVU OPUJDF 4PNF NPEFMT BSF DFSUJGJFE GPS VTF JO $BOBEB #4) JT OPU SFTQPOTJCMF GPS QSPEVDUT XIJDI BSF USBOTQPSUFE GSPN UIF 6OJUFE 4UBUFT GPS VTF JO $BOBEB $IFDL XJUI ZPVS MPDBM $BOBEJBO EJTUSJCVUPS PS EFBMFS #4) TF SÎTFSWF MF ESPJU EF NPEJGJFS MFT EPOOÎFT UFDIOJRVFT PV MF EFTJHO TBOT QSÎBWJT $FSUBJOT NPEÑMFT TPOU DFSUJGJÎT QPVS VOF VUJMJTBUJPO BV $BOBEB #4) O FTU QBT SFTQPOTBCMF QPVS MFT QSPEVJUT USBOTQPSUÎT EFT ±UBUT 6OJT QPVS VOF V