%JTIXBTIFS FO 0QFSBUJOH JOTUSVDUJPOT
5HVHW VHF K K K 6WDUW K K K
en Table of contents Safety instructions . . . . . . . . . . . . . . . . . 4 Before you switch ON the appliance . . 4 Delivery . . . . . . . . . . . . . . . . . . . . . . . . 4 Installation . . . . . . . . . . . . . . . . . . . . . . 4 In daily use . . . . . . . . . . . . . . . . . . . . . 4 Children in the household . . . . . . . . . . 4 Door lock . . . . . . . . . . . . . . . . . . . . . . 4 Damage . . . . . . . . . . . . . . . . . . . . . . . 5 Disposal . . . . . . . . . . . . . . . . . . . . . . .
en Safety instructions Before you switch ON the appliance Please read the operating and installation instructions carefully. They contain important information on how to install, use and maintain the appliance. Retain all documents for subsequent use or for the next owner. Delivery – Check the packaging and dishwasher immediately for damage caused in transit. Do not switch on a damaged appliance, but contact your supplier. – Please dispose of the packaging material in an environmentally friendly manner.
en Damage – The appliance may be repaired and opened up by a technician only. To do this, disconnect the appliance from the power supply. Pull out the mains plug or switch off the fuse. Turn off the tap. Disposal – Make redundant appliances unusable to prevent subsequent accidents. – Dispose of the appliance in an environmentally friendly manner. m Warning Children could become locked in the appliance (risk of suffocation) or find themselves in other dangerous situations.
en Setting Water softening system To ensure good washing results, the dishwasher requires soft water, i.e. containing low amounts of lime, otherwise white limescale will be deposited on the utensils and inner container. Tap water above a specific degree of water hardness must be softened, i.e. descaled, for use in a dishwasher. Water is softened with special salt in the water softening system of the dishwasher.
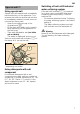
en Special salt $ Using special salt Always refill with special salt immediately before switching on the appliance. This ensures that overrun special salt solution is immediately washed out and does not corrode the rinsing tank. – Open the screw-type cap of the compartment 12. – Fill the tank with water (only required when switching on the appliance for the first time). – Then add dishwasher salt (not table salt or tablets). The water is displaced and runs out.
en Setting amount of rinse aid Rinse aid % As soon as the rinse-aid refill indicator P is lit on the fascia, there is still a rinse-aid reserve of 1 – 2 rinsing processes. Refill with rinse aid. The rinse aid is required for stain-free utensils and clear glasses. Use only rinse aid for domestic dishwashers. Combined detergents with rinse-aid component may be used up to a water hardness of 21° dH (37° fH, 26° Clarke, 3.7 mmol/l) only. If the water hardness is over 21° dH, rinse aid must be used.
en Utensils Not suitable – Cutlery and utensils made of wood. – Delicate decorative glasses, craft and antique utensils. These decors are not dishwasher-proof. – Plastic parts not resistant to heat. – Copper and tin utensils. – Utensils which are soiled with ash, wax, lubricating grease or ink. Aluminium and silver parts have a tendency to discolour and fade during the wash cycle. Even some types of glass (e.g. crystal glass objects) may turn cloudy after many wash cycles.
en Cutlery basket You should always place cutlery unsorted with the points downwards. To prevent injuries, place long, pointed implements and knives on the knife shelf. Folding spikes * kespnigdFol * depending on model The spikes can be folded down to improve arrangement of pans, bowls and glasses. Detergent You can use tablets as well as powder or liquid detergents for dishwashers, but never use washing up liquid.
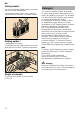
en Adding detergent Combination detergent – If the detergent dispenser 1R is still closed, press the lock 1Z to open the detergent dispenser. Pour detergent into the dry detergent dispenser 1R only (insert tablet flat, not on its edge). Dosage: see manufacturer’s instructions on the packaging. The graduated detergent dispenser 1R helps you add the correct amount of powder or liquid detergent. Apart from conventional detergents (Solo), a number of products are offered with additional functions.
en Overview of programmes The max. possible number of programmes is illustrated in this overview. The corresponding programmes for your appliance can be found on the fascia.
en Additional options * depending on model Additional options can be set with the buttons H. Ÿ Express Wash/ Speed Perfect/ oSVpiWEe(ardxs)ctPhf/ (VarioSpeed) * This function can reduce the running time by approx. 20% to 50% depending on the selected rinse programme. To obtain optimum cleaning and drying results at a reduced running time, water and energy consumption are increased. · Hygiene * Henygi The temperature is increased during the cleaning process. This increases the hygiene status.
en – To delete the preselected starting time, keep pressing the Preselected starting time button @ until none of the displays 3h, 6h or 9h is lit. You can change your programme selection at any time until the programme starts. End of programme The programme has ended when neither of the two displays h or )" is lit. Note To save energy, the dishwasher automatically switches off after the end of the programme.
en Maintenance and care A regular inspection and maintenance of your machine will help to prevent faults. This saves time and prevents problems. Overall condition of the machine – Check spray arm for grease and limescale deposits. If you find such deposits: – Fill detergent dispenser with detergent. Start the appliance without utensils in the programme with the highest rinsing temperature. Clean the appliance with detergents/ appliance cleaners which are particularly suitable for use with dishwashers.
en Spray arm Limescale and dirt from the rinsing water may block nozzles and the bearing assemblies of the spray arm 1". – Check outlet nozzles on the spray arm for blockages. – Remove the spray arm upwards. Troubleshooting The majority of faults which could occur in daily operation can be rectified by the user. This ensures that the appliance is quickly available for use again. The following overview will help you locating the causes and gives helpful advise to eliminate them.
en Waste water pump Large food remnants in the rinsing water not retained by the filters may block the waste water pump. The rinsing water is then not pumped out and covers the filter. In this case: – First disconnect the appliance from the power supply. – Remove the filters 1*. – Scoop out water, use a sponge if required. – Loosen screws on the pump cover (Torx T 20) and pull off. ... when the appliance is switched on The appliance does not start. – The mains fuse has tripped.
en – Water is left in the appliance at the end of the programme. – Waste water hose is blocked or kinked. – Waste water pump blocked, cover on the waste water pump is not locked in position (see Waste water pump). – Filters blocked. – The programme has not yet ended. Wait until programme ends or implement “Reset” function. The “Check water supply” display ` flashes rapidly. – Water in the safety system. – Switch off the appliance and pull out the mains plug. – Turn off the tap. – Call customer service.
en Rust spots on the cutlery. – Cutlery not rust-resistant. – Salt content in the rinsing water too high, as salt dispenser lock not fastened firmly or salt was spilled while being refilled. Utensils not dry. – Appliance door opened too early and utensils taken out too early. – Programme selected without drying. – Too little/unsuitable rinse aid. – Activate intensive drying. – The combined detergent used has a poor drying performance. Use rinse aid (see Rinse aid chapter for setting).
en Installation The dishwasher must be connected correctly, otherwise it will not function properly. The specifications for the inlet and outlet as well as the electrical connected loads must correspond with the required criteria as specified in the following paragraphs or in the installation instructions.
en Waste-water connection Electrical connection – The required work sequence can be found in the installation instructions. If required, fit a siphon with an drainage connection. – Connect the waste-water hose to the drainage connection of the siphon with the enclosed parts.
en Transportation Empty the dishwasher and secure loose parts. Drain the appliance according to the following steps: – Turn on the tap. – Close the door. – Switch on ON/OFF switch (. – Select programme with the highest temperature. – Press START button 8. Programme sequence starts. – After approx. 4 minutes press the START button 8 until all displays go out. After approx. 1 min. the appliance is completely drained. – Turn off the tap. Transport appliance upright only.
&KLOGSURRI ORFN GRRU ORFN â 7R RSHQ WKH GRRU PRYH OHYHU WR ULJKW DQG SXOO GRRU KDQGOH $OZD\V FORVH WKH DSSOLDQFH GRRU FRPSOHWHO\ ZKHQ \RX OHDYH WKH DSSOLDQFH 7KLV LV WKH RQO\ ZD\ \RX FDQ SURWHFW \RXU FKLOGUHQ IURP SRWHQWLDO GDQJHUV
EPFT OPU BQQMZ UP BQQMJBODFT XJUIPVU "RVB4UPQ $TXD6WRS JXDUDQWHH *O BEEJUJPO UP XBSSBOUZ DMBJNT BHBJOTU UIF TFMMFS CBTFE PO UIF QVSDIBTF DPOUSBDU BOE JO BEEJUJPO UP PVS BQQMJBODF XBSSBOUZ XF XJMM QBZ EBNBHFT VOEFS UIF GPMMPXJOH DPOEJUJPOT *G PVS "RVB4UPQ TZTUFN JT EFGFDUJWF BOE DBVTFT XBUFS EBNBHF XF XJMM NBLF HPPE UIF EBNBHF GPS QSJWBUF VTFST 5P FOTVSF XBUFS EBNBHF QSPUFDUJPO UIF BQQMJBODF NVTU CF DPOOFDUFE UP UIF QPXFS TVQQMZ 5IJT MJBCJMJUZ HVBSBOUFF JT WBMJE GPS UIF TFSWJDF MJGF PG UIF