
User Manual


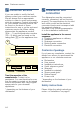

Table Of Contents
- Table of contents
- en Instruction manual
- 8 Intended use 5
- ( Safety instructions 5
- 7 Environmental protection 10
- * Getting to know your appliance 10
- , Rinse aid 15
- - Utensils 16
- . Detergent 23
- / Overview of programmes 25
- 0 Additional functions 27
- 1 Operating the appliance 28
- 2 Cleaning and maintenance 32
- 3 Fault, what to do? 34
- 4 Customer service 44
- 5 Installation and connection 44
- 8 Intended use 5
- 8 Intended use
- Intended use
- ( Safety instructions
- Safety instructions
- Before you switch ON the appliance
- Delivery
- 1. Check the packaging and dishwasher immediately for damage caused in transit. Do not switch on a damaged appliance, but contact your supplier.
- 2. Please dispose of the packaging material in an environmentally friendly manner.
- 3. Do not let children play with packaging and its parts. There is a risk of suffocation from collapsible boxes and film.
- Installation
- In daily use
- Damage
- Disposal
- Childproof lock (door lock) *
- 7 Environmental protection
- * Getting to know your appliance
- Getting to know your appliance
- Control panel
- Appliance interior
- Info button {
- Time setting
- Time setting
- Set the time as follows:
- 1. Open the door.
- 2. Switch on ON/OFF switch (.
- 3. Press Info button { 8 for 3 seconds until the following text is indicated on the display window at the top @:
- 4. Keep pressing button > )" until the time setting is indicated on the display window at the top @.
- 5. Make the setting with setting buttons + - P. If the selection buttons + - P are held down, the set values are changed in 10-minute steps.
- 6. Press and hold the Info button { 8 for 3 seconds.
- Note:
- Switching on the appliance for the first time
- Settings
- Change the setting as follows:
- 1. Open the door.
- 2. Switch on ON/OFF switch (.
- 3. Press Info button { 8 for 3 seconds until the following text is indicated on the display window at the top @:
- 4. Keep pressing button > )" until the required setting is displayed.
- 5. Make the setting with setting buttons + - P.
- 6. Press and hold the Info button { 8 for 3 seconds.
- Note:
- Setting
- Factory setting
- Infotext by pressing Info button {
- --------
- , Rinse aid
- Rinse aid
- Top up the rinse-aid as follows:
- Setting amount of rinse aid
- Set the amount of rinse aid as follows:
- 1. Open the door.
- 2. Switch on ON/OFF switch (.
- 3. Press Info button { 8 for 3 seconds until the following text is indicated on the display window at the top @:
- 4. Keep pressing button > )" until the rinse aid dispenser is indicated on the display window at the top @.
- 5. Make the setting with setting buttons + - P.
- 6. Press and hold the Info button { 8 for 3 seconds.
- Set the amount of rinse aid as follows:
- Switching off rinse aid refill indicator
- - Utensils
- 22 cm
- 31 cm
- 24.5 cm
- 27.5 cm
- 27 cm
- 25 cm
- 16 cm
- 31 cm
- 18.5 cm
- 27.5 cm
- 21 cm
- 25 cm
- 24 cm
- 34 cm
- 26.5 cm
- 30.5 cm
- 29 cm
- 28 cm
- 18 cm
- 34 cm
- 20.5 cm
- 30.5 cm
- 23 cm
- 28 cm
- Upper basket with side levers
- 1. Pull out upper basket 12.
- 2. Hold the sides of the basket along the upper edge.
- 3. To lower the upper basket; press in both levers on the left and right on the outside of the basket. The upper basket lowers.
- 4. To lift the upper basket; grip the sides of the upper basket along the upper edge and lift.
- 5. Ensure that both sides of the upper basket are at the same height.
- 6. Push in upper basket.
- Upper basket with upper and lower pairs of rollers
- . Detergent
- Detergent
- Note:
- : Warning
- Adding detergent
- 1. If the detergent dispenser 9" is still closed, actuate locking bar 9* to open it.
- 2. Pour detergent into the dry detergent dispenser 9" only (insert tablet flat, not on its edge).
- 3. Dosage: see manufacturer’s instructions on the packaging. Use graduated detergent dispenser.
- 4. Close cover on the detergent dispenser. Cover “clicks” into position.
- Tip:
- Notes
- Upper basket with side levers
- , Rinse aid
- Change the setting as follows:
- en Instruction manual
- / Overview of programmes
- Overview of programmes
- The max. possible number of programmes is illustrated in this overview. The corresponding programmes for your appliance can be found on the fascia. The programme data has been measured in the laboratory according to AS/NSZ 2007.
- Type of utensils and soiling
- Programme
- Programme data
- 1.) Duration: hs/mins
- 2.) Energy consumption in kWh
- 3.) Water consumption in litres
- 4.) With Aquasensor
- Possible additional options
- Programme sequence
- --------
- Programme selection
- Information for test institutes
- 0 Additional functions
- 1 Operating the appliance
- Operating the appliance
- Changing the settings
- Change the setting as follows:
- 1. Open the door.
- 2. Switch on ON/OFF switch (.
- 3. Press Info button { 8 for 3 seconds until the following text is indicated on the display window at the top @:
- 4. Keep pressing button > )" until the required setting is indicated on the display window at the top @.
- 5. Make the setting with setting buttons + - P.
- 6. Press and hold the Info button { 8 for 3 seconds.
- Tip:
- Change the setting as follows:
- AquaSensor *
- Time display
- Sensor setting
- extraDry
- Eco forecast
- AutoPowerOff (Switching off automatically after the end of the programme)
- emotionLight (interior light) *
- Front display *
- TimeLight (Optical display while the programme is running) *
- Infolight *
- Changing start programme *
- Tone volume
- Button volume
- Child-proof lock *
- Greeting
- Factory setting
- Switching the appliance on
- Time preselection
- 1. Open the door.
- 2. Switch on ON/OFF switch (.
- 3. Selects programme 0.
- 4. Press time preselection button X.
- 5. Keep pressing the setting buttons + - P until the displayed time corresponds with your requirements.
- 6. Press START button h, timer programming is activated.
- 7. To delete the time preselection, press START button h for approx. 3 seconds.
- 8. Close the door.
- Programme end
- Switching off the appliance
- Interrupting the programme
- Terminating the programme (Reset)
- Changing the programme
- 2 Cleaning and maintenance
- Cleaning and maintenance
- Overall condition of the machine
- Rinse aid
- Filters
- 1. After each washing cycle check the filters for residue.
- 2. Unscrew filter cylinder as illustrated and take out filter system.
- 3. Remove any residue and clean filters under running water.
- 4. Re-install filter system in reverse sequence and ensure that the arrow marks are opposite each other after closing the filter system.
- Spray arms
- 3 Fault, what to do?
- Fault, what to do?
- Note:
- : Warning
- Error message
- Waste water pump
- : Warning
- Danger of cutting!
- Clean the waste water pump as follows:
- 1. Disconnect the dishwasher from the power supply.
- 2. Take out top basket 12 and bottom basket 1b.
- 3. Remove the filters 1R.
- 4. Scoop out water, use a sponge if required.
- 5. Prise off the pump cover (as shown) using a spoon. Grip the pump cover by the crosspiece and lift diagonally inwards (1). Remove cover completely.
- 6. Check impeller wheel and remove any foreign objects.
- 7. Place pump cover in the original position (2) and press down until it engages (3).
- 8. Install filters.
- 9. Re-insert baskets.
- : Warning
- Fault table
- Fault
- Cause
- Remedial action
- --------
- 4 Customer service
- 5 Installation and connection
- Installation and connection
- Install the appliance in the correct sequence:
- Contents of package
- Safety instructions
- Delivery
- Technical specifications
- Installation
- Drainage connection
- Drinking water connection
- Warm water connection *
- Warm water connection
- To change the setting:
- 1. Open the door.
- 2. Switch on ON/OFF switch (.
- 3. Press Info button { 8 for 3 seconds until the following text is indicated on the display window at the top @:
- 4. Keep pressing the button > )" until water connection appears of the display window at the top @.
- 5. Make the setting with setting buttons + - P.
- 6. Press and hold the Info button { 8 for 3 seconds.
- Electrical connection
- Removal
- Transporting
- Drain the appliance according to the following steps:
- 1. Turn on the tap.
- 2. Open the door.
- 3. Switch on ON/OFF switch (.
- 4. Select programme with the highest temperature.
- 5. Press START button h.
- 6. Close the door.
- 7. Open the door after approx. 4 minutes.
- 8. Press START button h until “Program was terminated”/“Ready in one minute.” is indicated at the top of the display window @.
- 9. Close the door.
- 10. Open the door after approx. 1 minute.
- 11. Switch off ON/OFF switch (.
- 12. Turn off the tap, disconnect supply hose and drain water.
- Note:
- Drain the appliance according to the following steps:
- Protection against frost
aus Installation and connection
46
Drinking water connection
1. Fasten the drinking water connection
to the tap according
to the installation instructions using
the enclosed parts.
Ensure that the drinking water
connection is not kinked, crushed
or twisted.
2. When replacing the appliance,
always use a new water supply
hose.
Water pressure:
at least 0.05 MPa (0.5 bar), maximum 1
MPa (10 bar).
At a higher water pressure:
connect pressure-reducing valve ahead.
Inlet rate:
minimum 10 litres/minute
Water temperature:
cold water.
Hot water:
Maximum temperature 60 °C.
Warm water connection *
Warm water connection
* depending on the features of your
dishwasher
The dishwasher can be connected
to cold or hot water up to max. 60 °C.
Connection to hot water is
recommended if the hot water can be
supplied by energetically favourable
means and from a suitable installation,
e.g. solar heating system with
circulation line. This will save energy
and time. The “Hot water” setting allows
you to adjust your dishwasher optimally
to operation with hot water. It is
recommended to have a water
temperature (temperature of the
incoming water) of at least 40 °C and
no more than 60 °C. It is not
recommended to connect the appliance
to hot water if the water is supplied from
an electric boiler.
To change the setting:
1. Open the door.
2. Switch on ON/OFF switch (.
3. Press Info button {8 for 3
seconds until the following text is
indicated on the display window at
the top @:
Scroll with < >
Set with - +
Leave with Setup 3 sec.
4. Keep pressing the button > )" until
water connection appears of the
display window at the top @.
5. Make the setting with setting buttons
+ -P.
6. Press and hold the Info button {
8 for 3 seconds.
The chosen setting has now been
stored.