9000 461 551 (8909) Dishwasher en Operating instructions Downloaded from DishWasher-Manual.
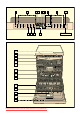
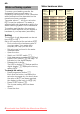
1 2 34 56 7 8 9 h h : min. h A B C 10 11 20 21 22 23 24 25 26 27 28 29 30 31 32 Downloaded from DishWasher-Manual.com Manuals Start Reset 3 sec.
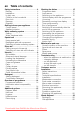
en Table of contents Safety instructions . . . . . . . . . . . . . . . . . 4 Delivery . . . . . . . . . . . . . . . . . . . . . . . . 4 Installation . . . . . . . . . . . . . . . . . . . . . . 4 In daily use . . . . . . . . . . . . . . . . . . . . . 4 Children in the household . . . . . . . . . . 4 Door lock . . . . . . . . . . . . . . . . . . . . . . 4 Damage . . . . . . . . . . . . . . . . . . . . . . . 5 Disposal . . . . . . . . . . . . . . . . . . . . . . . 5 Getting to know your appliance . . . . . .
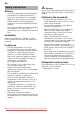
en Safety instructions Delivery – Check the packaging and dishwasher immediately for damage caused in transit. Do not switch on a damaged appliance, but contact your supplier. – Please dispose of the packaging material in an environmentally friendly manner. – Do not let children play with packaging and its parts. There is a risk of suffocation from collapsible boxes and film. Installation Read the “Installation” chapter to learn how to install and connect the appliance correctly.
en Damage – The appliance may be repaired and opened up by a technician only. To do this, disconnect the appliance from the power supply. Pull out the mains plug or switch off the fuse. Turn off the tap. Disposal – Make redundant appliances unusable to prevent subsequent accidents. – Dispose of the appliance in an environmentally friendly manner. ã=Warning Children could become locked in the appliance (risk of suffocation) or find themselves in other dangerous situations.
en Water softening system To ensure good washing results, the dishwasher requires soft water, i.e. containing low amounts of lime, otherwise white limescale will be deposited on the utensils and inner container. Tap water above 7° dH (from set value •:‹‚) must be softened. The water is softened with salt (regeneration salt) in the water softening system of the dishwasher. The setting and therefore the required amount of salt depends on the degree of hardness of your tap water (see table).
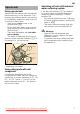
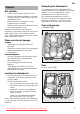
en Switching off salt refill indicator/ water softening system Special salt Using special salt Always refill with special salt immediately before switching on the appliance. This ensures that overrun special salt solution is immediately washed out and does not corrode the rinsing tank. – Open the screw-type cap of the compartment 1R. – Fill the tank with water (only required when switching on the appliance for the first time). – Then add dishwasher salt (not table salt or tablets).
en Setting amount of rinse aid Rinse aid As soon as the rinse-aid refill indicator P is lit on the fascia, there is still a rinse-aid reserve of 1 – 2 rinsing processes. Refill with rinse aid. The rinse aid is required for stain-free utensils and clear glasses. Use only rinse aid for domestic dishwashers. Combined detergents with rinse-aid component may be used up to a water hardness of 21° dH (37° fH, 26° Clarke, 3.7 mmol/l) only. If the water hardness is over 21° dH, rinse aid must be used.
en Utensils Not suitable – Cutlery and utensils made of wood. – Delicate decorative glasses, craft and antique utensils. These decors are not dishwasher-proof. – Plastic parts not resistant to heat. – Copper and tin utensils. – Utensils which are soiled with ash, wax, lubricating grease or ink. Aluminium and silver parts have a tendency to discolour and fade during the wash cycle. Even some types of glass (e.g. crystal glass objects) may turn cloudy after many wash cycles.
en Tip Heavily soiled utensils (pans) should be placed in the bottom basket. The more powerful spray jet provides a better dishwashing result. Tip Other examples, such as the best way of loading your dishwasher, can be found on our homepage as a free download. The corresponding Internet address can be found on the back page of these instructions for use. Cup support clip * * depending on model When washing cups, the cup support clip can be folded up.
en Adjusting the height of the basket The height of the upper utensils basket 12 can be adjusted in 3 stages to create more space either in the upper or lower basket. Appliance height 81.5 cm Top basket Setting 1 max. ø Setting 2 max. ø Setting 3 max. ø 16 cm 18.5 cm 21 cm Bottom basket 30 cm 27.5 cm 25 cm Appliance height 86.5 cm Top basket Setting 1 max. ø Setting 2 max. ø Setting 3 max. ø 18 cm 20.5 cm 23 cm Bottom basket 33 cm 30.5 cm 28 cm – Pull out the top basket 12 out.
en Detergent You can use tablets as well as powder or liquid detergents for dishwashers, but never use washing up liquid. The dosage can be individually adjusted with powder or a liquid detergent according to the degree of soiling. Tablets contain an adequately large amount of active ingredients for all cleaning tasks. Modern, powerful detergents predominantly use a low-alkaline formulation with phosphate and enzymes. Phosphates bond the lime in the water. Enzymes break down starch and remove protein.
en Tip If the utensils are only lightly soiled, slightly less than the indicated amount of detergent is usually adequate. Suitable detergents and care products can be purchased online via our website or via customer service (see back page). Combination detergent Apart from conventional detergents (Solo), a number of products are offered with additional functions.
en Overview of programmes The max. possible number of programmes is illustrated in this overview. The corresponding programmes for your appliance can be found on the fascia. Type of utensils pots and pans, non-sensitive utensils and cutlery Type of soiling Programme Possible additional Programme sequence options ¹ very adhesive burnedin or dried-on food remnants containing Auto 65° – 75° starch or protein Is optimised according to the soiling with the aid of sensors.
en Additional options * depending on model Additional options can be set with the buttons h. Ÿ Express Wash * The >>Express Wash<< function can reduce the running time by approx. 20% to 50% depending on the selected rinse programme. The change in the running time is indicated on the digital display 8. To obtain optimum cleaning results at a reduced running time, water and energy consumption are increased. § Half load * If you have only a few items to wash (e.g.
en Optical display while the programme is running * * depending on model While the programme is running, a light spot shines on the floor under the appliance door. Do not open the dishwasher door until the light point is no longer visible on the floor. If the appliance is installed at eye-level, with flush furniture front, the light point is not visible. This function can be changed as follows: – Open the door. – Switch on ON/OFF switch (. – Hold down programme button # and press START button )" until •:‹..
en Switching off automatically after the end of the programme To save energy, the dishwasher is switched off 1 minute after the programme ends (factory setting). Automatic disconnection can be adjusted from ˜:‹‹ to ˜:‹ƒ. ˜:‹‹ Appliance does not switch off automatically ˜:‹‚ Off after 1 min ˜:‹ƒ Off after 120 min – Open the door. – Switch on ON/OFF switch (. – Hold down programme button # and press START button )" until •:‹... is indicated on the digital display. – Release both buttons.
en Intensive drying The final rinse uses a higher temperature which improves the drying result. The running time may increase slightly. (Caution if utensils are delicate!) – Open the door. – Switch on ON/OFF switch (. – Hold down programme button # and press START button )" until •:‹.... is indicated on the digital display. – Release both buttons. The LED for button # flashes and the digital display 8 displays the factory setting •:‹….
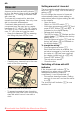
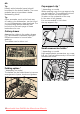
en Filters Spray arms The filters 1Z keep large foreign objects in the rinsing water away from the pump. These foreign objects may occasionally block the filters. The filter system consists of a coarse filter, a flat fine filter and a microfilter. – After each washing cycle check the filters for residue. – Unscrew filter cylinder as illustrated and take out filter system. Limescale and contaminants in the rinsing water may block nozzles and bearings on the spray arms 1: and 1J.
en Waste water pump Large food remnants in the rinsing water not retained by the filters may block the waste water pump. The rinsing water is then not pumped out and covers the filter. In this case: – First disconnect the appliance from the power supply. – Remove the filters 1Z. – Scoop out water, use a sponge if required. – Using a spoon, prise off pump cover (as illustrated) until it clicks, then grip the cover by the lug and first pull it upwards until it resists and then pull it out forwards.
en ... on the appliance Lower spray arm rotates sluggishly. – Spray arm blocked. The door is difficult to open. * – Child-proof lock is activated. The deactivation instructions are at the back in the envelope. * depending on model Door cannot be closed. – Door lock has been activated. To reset, close the door with greater force. Cover on the detergent dispenser cannot be closed. – Detergent dispenser overfilled or mechanism blocked by sticky detergent residue. Detergent residue in the detergent dispenser.
en ... on the utensils Food residue on the utensils. – Utensils placed too closely together, utensils basket overfilled. – Too little detergent. – Rinse programme too weak. – Spray arm rotation obstructed. – Spray arm nozzles blocked. – Filters blocked. – Filters incorrectly inserted. – Waste water pump blocked. – Top basket on right and left not set to same height. Tea or lipstick residue is not completely removed. – The detergent has an inadequate bleaching effect. – Too low rinsing temperature.
en Customer service If the advice given does not resolve your problem, please contact your customer service. Contact details can be found on the back cover of this instruction manual or in the enclosed customer service list. When calling , please quote the appliance number (1) and the production date (FD = 2) which can be found on the rating plate 92 on the appliance door. 1 FD 2 Rely on the expertise of the manufacturer.
en – After installing the appliance, ensure that the plug is easily accessible. – Some models: The plastic housing on the water connection contains an electric valve, the connecting cables are in the supply hose. Do not cut through this hose, do not immerse the plastic housing in water. ã=Warning If the appliance is not in a cavity and a side panel is accessible, the door hinge area must be covered at the side for reasons of safety (risk of injury).
en Inlet rate: minimum 10 litres/minute Water temperature: cold water; hot water max. temperature 60 °C. Warm water connection The dishwasher can be connected to cold or hot water up to max. 60 °C. Connection to hot water is recommended if the hot water can be supplied by energetically favourable means and from a suitable installation, e.g. solar heating system with circulation line. This will save energy and time.
en Transportation Empty the dishwasher and secure loose parts. Drain the appliance according to the following steps: – Turn on the tap. – Open the door. – Switch on ON/OFF switch (. The displays of the last selected programme light up. – Select programme with the highest temperature. The expected programme duration is indicated on the numerical display 8. – Press START button )". – Close the door. Programme sequence starts. – Open door after approx. 4 minutes.
Childproof lock (door lock) * 40 Activate the childproof lock. 41 Open the door with activated childproof lock. 42 Deactivate childproof lock. Always close the appliance door completely when you leave the appliance. This is the only way you can protect your children from potential dangers. Baking sheet spray head * Large sheets or grilles and plates which have a diameter greater than 30 cm (gourmet plates, pasta plates, dinner plates) can be cleaned with the aid of the spray head.
AQUA-STOP guarantee en (does not apply to appliances without Aqua-Stop) In addition to warranty claims against the seller based on the purchase contract and in addition to our appliance warranty we will pay damages under the following conditions: 1. If our Aqua-Stop system is defective and causes water damage, we will make good the damage for private users. To ensure water damage protection, the appliance must be connected to the power supply. 2.