
Specifications


15
Bosch Security Systems 09/07 BLCC500R FTR1.02
Solution 16 i
Quick Start Guide
Copyright © 2007 E&OE
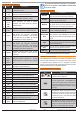
Key Description
The [OFF] key allows you to turn an area
or output off. To turn all areas off at the
same time when the system had been
partitioned, press and hold the [OFF]
key for two seconds.
The [OK] key allows you to enter or select
options as well as saving changes.
The [MAIL] key allows you to read
stored mail. This key can also be used
to initiate a dialler test when you press
and hold for two seconds.
The [] key allows you to move the
cursor left when programming text or
telephone numbers.
The [] key allows you to move the
cursor right when programming text or
telephone numbers.
The [↑] key allows you to navigate
through menus or to toggle characters
when programming telephone
numbers.
The [] key allows you to navigate
through menus or to toggle characters
when programming telephone
numbers. Pressing The [
] key will
display current trouble conditions when
the area that the keypad is displaying is
disarmed.
+
for 2 sec
Pressing the [] and [↑] keys together
and holding them down for 2 seconds
will trigger a Panic alarm. If programmed
the sirens will sound and the monitoring
station will be notified.
+
for 2 sec
Pressing the [] and [] keys together
and holding them down for 2 seconds
will cause trigger a Fire alarm. If
programmed the sirens will sound and
the monitoring station will be notified.
+
for 2 sec
Pressing the [↑] and [] keys together and
holding them down for 2 seconds will
trigger a Medical alarm. If programmed
the sirens will sound and the monitoring
station will be notified.
KEYPAD EMERGENCY AL ARM TRIGGER ’S
Key Sequence Event Triggered
Ë + Ê Hold for 2 seconds
Keypad Fire Alarm
Ê + È Hold for 2 seconds
Keypad Panic Alarm
È + Â Hold for 2 seconds
Keypad Medical Alarm
Table 6: Keypad Emergency Alarm Trigger’s
Figure 20: Keypad Emergency Alarm Trigger’s
Keypad Set up
The Solution 16i control panel can have a maximum of 8
keypads connected via the LAN terminals. Each keypad
must be set to a unique address before they will operate.
Each keypad needs to be assigned to a home area via
MENU 6-1-3. This sets the area the keypad will display and
control by default. Keypads can be locked to a home area
or allowed to roam or move between areas.
When the system is powered up, any keypads which have
not been assigned a home area will be automatically set to
home area 1.
Set each keypad address using the table below as a guide.
i
Note
Only 1 Keypad can be assigned to each address. All
Keypads are supplied from the factory set to address
1. (OFF-OFF-OFF).
Keypad Address S elec t
�
Figure 22: Keypad DIP Switch Address Settings
Keypad DIP Switch Address Settings
Keypad To Address S1 S2 S3 S4
Keypad 1 Off Off Off Off
Keypad 2 On Off Off Off
Keypad 3 Off On Off Off
Keypad 4 On On Off Off
Keypad 5 Off Off On Off
Keypad 6 On Off On Off
Keypad 7 Off On On Off
Keypad 8 On On On Off
Table 7: Keypad DIP Switch Address Settings