Solution 16 plus ���������������� EN User Guide Security System
Solution16 Plus User Guide Co py r i g ht N o t i ce Telepermit Note Unless otherwise indicated, this publication is the copyright of Bosch Security Systems Pty Ltd (“Bosch”). All rights are reserved.You may download a single copy of this publication.
Solution16 Plus User Guide Contents Copyright Notice ......................................................... 2 Trademarks .................................................................. 2 Notice of Liability ........................................................ 2 Notice to Owner ......................................................... 2 Telepermit Note .......................................................... 2 Contents ...........................................................................
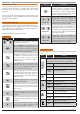
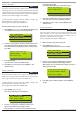
Solution16 Plus User Guide Pro gra m M e n u Tree Table 1: shows all of the system options in a tabular format. Each option can be access by pressing the Menu key and then drilling down using the arrow and OK keys until the required option is listed on the display. A quick way to jump to a particular option is to press the Menu key followed by the specific option number. You may be asked to enter your PIN when accessing some options.
Solution16 Plus User Guide I nt ro d u c t i o n Your system helps to secure life, property and investments against fire, theft and bodily harm. It consists of a keypad (or keypads), sensors such as motion detectors or devices located on doors and windows, and other sensing devices designed to detect the presence of smoke or combustion. The location and quantity of sensing devices will have already been discussed with you by your alarm installer.
Solution16 Plus User Guide Re p o r t i n g Al a r m s Key Description Your system may be programmed to send reports to your security company. Once the report is complete, the system returns the telephone to normal operation (check with your security company). The [] key allows you to navigate through menus or to toggle characters when programming telephone numbers. Pressing The [] key will display current trouble conditions when the area that the keypad is displaying is disarmed.
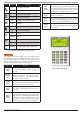
Solution16 Plus User Guide Icon Status Red LED On The area is turned off. Off The area is turned All On or Part On On The area is turned All On Off The area is turned Off On You have mail waiting to be read Off No Mail On Area is ready to turn on (All On / Part On) Off Not ready, Zone Open On All On Flashing Alarm On Green LED Red & Green LED Meaning Exit Delay Tone After you turn an area All On, the keypad will sound 1 short beep every second.
Solution16 Plus User Guide Ba s i c Sys te m O p eration Turning An Area All On Use this function to turn an area All On. The Solution 16Plus control panel is factory default only for one area. As soon as you turn an area on, exit time will start. Exit time allows you to exit the premises without sounding an alarm. Your security company programs the length of exit delay time. 1. Make sure that all zones are normal (not faulted). 2. Enter your PIN, then press the [ON] key.
Solution16 Plus User Guide Remote Arming - Quick Arm If you forget to arm your system it may be possible for you to remotely arm it using a touch tone telephone if the remote arm option has been enabled by your installer. To arm the system call the number which the panel is connected to and when the panel answer you will here 3 beeps in accending frequency if the panel is in the disarmed condition. Press [0] + [#] to arm. You will hear 3 beeps in decending order when the panel arms.
Solution16 Plus User Guide to add, then press [OK]. The keypad will prompt you to enter the new pin. Access > PIN Codes > Change Other PIN MENU 1-1-1 Enter New PIN for User 3 Name U003 If you have a master PIN, this command allows you to change somebody else’s PIN. It is recommended that you write down the old PIN and the new one before you begin. Once the change is complete you should destroy the written copy. The new PIN must have the same number of digits as the old PIN.
Solution16 Plus User Guide Tokens This section outlines how to add and delete token cards that allow an alternate method for users to turn the system on and off via a prox reader enabled Keypads. The system can also be configured to automaticall open a door if it has been fitted with an electric door lock. You should discuss this feature with your installer for more details on your particular installation. U001 JOHN SMITH U002 DEBBIE SMITH U003 USER 3 NAME Press , OK or MENU 3.
Solution16 Plus User Guide Enter keyfob RFid for U016 User 16 Name 000000000 Press OK or MENU User Name U001 User 1 Name Press ◄► OK to SAVE 3. Enter the RF Keyfob ID Number 4. Press [OK] to save and exit, or press [MENU] to exit without saving. Access > RF Keyfob > Delete Keyfob MENU 1-3-1 This menu allows the security installer or a master user to delete the RF keyfob ID that has been assigned to a user. Enter programming mode (PIN + MENU) then, 1.
Solution16 Plus User Guide Schedules Multiple schedules can be linked to the same timer group. 1. Time Groups There are 8 different timer groups available. Enter [MENU] + [1] + [4] + [5] and select the user from the list then press [OK]. Ur001 Ur002 Ur003 Press Timer Group Example 1. 2. 3. To set up a timer group you need to select an unused timer group number from 1 to 8, in this example we will assume timer group number to be 5. 2.
Solution16 Plus User Guide Main Office A001 Armed All On When exit time has expired, the keypad will display that all areas are turned All On (Armed). Area 1 Name ARMED If the area is turned Part On, the keypad will display: Fri,Aug,13 5:34 pm Main Office A001 Armed Part On 3. i Note To exit, press [OK]. Areas > Commands > Areas > Commands > Turn Area On/Off MENU 2-0-1 This menu allows you to turn an area All On or off. Enter programming mode (PIN + MENU) then, 1. Enter [MENU] + [2] + [0] + [1].
Solution16 Plus User Guide keypads programmed to sound the chime tone will be heard when a zone programmed for chime is faulted. The master user can Set Chime Zones on page 16. This allows the master user to program which zones can be monitored for chime. Enter programming mode (PIN + MENU) then, 1. Enter [MENU] + [2] + [0] + [5]. A list of different areas will display on the keypad. A001 Reception Area A002 Sales Dept A003 Administration Dept Press OK or MENU 2.
Solution16 Plus User Guide Inputs > Commands > Bypass Zones MENU 3-0-2 This menu allows you to bypass or un-bypass a single or multiple zones before you turn the area All On, Part On or Part 2 On. When bypassing zones, it disables the ability for a zone to detect intrusion and sound an alarm. A burglary zone will automatically become un-bypassed when you turn the corresponding area off (disarm). Any 24-Hr fire or 24-Hr non fire zones will need to be manually un-bypassed.
Solution16 Plus User Guide Inputs > Commands > Inputs > Commands > Set Part 2 Zones MENU 3-0-4 This menu allows you to program which zones are to be monitored when an area has been turned Part 2 On. Enter programming mode (PIN + MENU) then, Smoke Sensor Reset This menu allows you to reset smoke sensors. Enter programming mode (PIN + MENU) then, 1. 1. Enter [MENU] + [3] + [0] + [4]. A list of areas will display on the keypad. 2.
Solution16 Plus User Guide Inputs > Input Testing > Walk Test All Zones Inputs > Input Testing > MENU 3-9-0 This menu allows you to test all zones within an area at the same time. To successfully walk test each zone, you must open and close each zone. Enter programming mode (PIN + MENU) then, Walk Test A Single Zone This menu allows you to select a single zone to be tested via walk test. Enter programming mode (PIN + MENU) then, 1. 1. Press [MENU] + [3] + [9] + [0].
Solution16 Plus User Guide Output 1 Name O001 Is Off and Ready Output 1 Name O001 Output is OFF, To Turn ON,Press ON. To Go Back Press OK Press OK or MENU To turn the output on, press [ON]. The keypad will display the following when the output is off and missing: The keypad will display the following when the output is on: Output 1 Name O001 Is Off and Ready Connection Trouble Press OK or MENU Output 1 O001 Output is ON, To Turn OFF,Press OFF.
Solution16 Plus User Guide Internal Audible Testing Press any key to abort Outputs > Output Testing > External Siren Test MENU 4-9-0 This menu allows you to test any external sirens which have been connected by your installer. The test will last for 5 seconds. Enter programming mode (PIN + MENU) then, 1. Press OK or MENU When the bell test is complete, the keypad will display the following: Enter [MENU] + [4] + [9] + [0]. If the system has been partitioned, the keypad will display a list of areas.
Solution16 Plus User Guide Communication / Reporting Programming options in this section relate to how you alarm syetm will communicate alarm information. Your installer will advise you on the exact makeup and configuration of your system. Comms > Commands > Call/Answer RAS MENU 5-0-1 This menu allows you to initiate a modem call to the installer’s off-site computer for programming changes or updates.
Solution16 Plus User Guide Domestic Phone Number 3 6789_ Press 6. Comms > Commands > Call Forward Off Number 0-9 OK to SAVE Using the numeric keys, enter all the digits of the third telephone number (if required). You can change a single digit by scrolling the cursor left [←] and right [→]. For special characters (eg. , = pause * or # etc), use the [↑] and [↓] keys. To clear all text from the cursor position to the right, press the [OFF] key. 7.
Solution16 Plus User Guide 3. Comms > Periodic Test > Send Test Report MENU 5-9-0 The display will show each parameter for the device one at a time on the third line of the screen. Keypad 001 Kp001 Graphic + Prox V1.01 Volts = 13.87 Press OK or MENU This menu allows you to test the reporting functions of the Solution 16Plus control panel by manually sending a ‘Test’ report to the receiving party (i.e. security company monitoring station, mobile telephone etc). 1. Enter [MENU] + [5] + [9] + [0]. 4.
Solution16 Plus User Guide Devices > Keypads > Backlight To determine the non system (zone) trouble condition, highlight the zone number Z001 to Z016) that you want to view using the [↑] and [↓] keys, then press [OK] to select. MENU 6-1-2 This menu allows you to adjust the brightness of the keypad’s LCD display backlight. Each keypad can have their display adjusted separately. Enter programming mode (PIN + MENU) then, 1.
Solution16 Plus User Guide Trouble Condition Mains Missing Battery Low Battery Missing Battery Reversed Description The system has detected that the AC mains supply has failed or is disconnected. If there is not a general power outage in your area then you should contact your security company. The backup battery has failed the periodic test which the system performs on a regular basis. You should contact your security company as the battery may need replacing.
Solution16 Plus User Guide System > Schedules > System > Commands > History Log MENU 7-0-2 This menu allows you to review the last 256 history events (from most recent to least recent). Each event will display: Line 1 Line 2 Line 3 Name This menu allows you to program 16 characters of text for each schedule name. Enter programming mode (PIN + MENU) then, 1. Sk001 Schedule 1 Name Sk002 Schedule 2 Name Sk003 Schedule 3 Name Press OK or MENU 2. - Displays the event description.
Solution16 Plus User Guide 3. Enter the new start and stop times in 24-hour format (00:00 to 23:59 hours). 4. Press [OK] to save and exit, or press [MENU] to exit without saving. Use the [] and [] keys to scroll through the different characters available. To clear all text from the cursor position to the right, press the [OFF] key. 4. Press [OK] to save and exit, or press [MENU] to exit without saving.
Solution16 Plus User Guide System > System Testing > Walk Test All Zones MENU 7-9-0 This menu allows you to test all zones within an area at the same time. Enter programming mode (PIN + MENU) then, 1. Press [MENU] + [7] + [9] + [0]. The keypad will display a list of areas that are available to walk test zones. 2. Use the [↑] and [↓] keys to select the area that you want to do walk test, then press [OK] to select. Alternatively, you can enter the area number, then press [OK].
Solution16 Plus User Guide I n s t al lat io n D etails INSTALLED BY: DATE PHONE: FAX: EMAIL: SERVICE PHONE: FAX: EMAIL: MONITORED BY: PHONE: FAX: EMAIL: WARRANTY EXPIRES: NOTES: Bosch Security Systems 09/06 BLCC100U 29
Solution16 Plus User Guide I I nd ex A Access Assignment ................................................................ 13 All On ................................................................................. 5, 8 Areas Area Status.......................................................................... 13 Diasrming an Area .......................................................... 8, 15 Move To Area ..................................................................... 14 Turn All Areas Off ........
Solution16 Plus User Guide Service Required.................................................................... 25 Silencing Alarms....................................................................... 8 Silent Alarms ............................................................................ 9 Smoke Detectors Sensor Reset ....................................................................... 17 Status Area ................................................................................... 13 Keypad ...
Bosch Security Systems 25 Huntingwood Drive Huntingwood, NSW 2128 Australia Phone: +612 9672 1777 Facsimile: +612 9672 1717 © 2006 Bosch Security Systems BLCC100U 920655 Issue FTR1.