Register your applianc e and join the Bosc family of h perks: bosch-h ome.
en-us Table of contents 1 IMPORTANT SAFETY INSTRUCTIONS.................... 4 1.1 Safety definitions.................. 4 1.2 General information.............. 4 1.3 Intended use ........................ 5 1.4 Restrictive Use..................... 5 1.5 Grounding instructions ......... 5 1.6 Safe use............................... 6 1.7 Risk to children .................... 8 1.8 State of California Proposition 65 Warnings ...... 8 2 Preventing material damage .................................
en-us 14 Home Connect™ ............. 29 14.1 Home Connect™ quick start.................................. 30 14.2 Home Connect™ settings ............................ 30 14.3 Remote start ................ 30 14.4 Remote Diagnostics ........ 31 14.5 Software update............... 31 14.6 Data Protection ................ 31 20.3 Extended Warranty ........... 50 20.4 Repair/Replace as Your Exclusive Remedy ............ 50 20.5 Out of Warranty Product... 51 20.6 Warranty Exclusions ......... 51 20.
en-us IMPORTANT SAFETY INSTRUCTIONS READ AND SAVE THESE INSTRUCTIONS Read all instructions carefully before use. These precautions will reduce the risk of electrical shock, fire and injury to persons. When using kitchen appliances, basic safety precautions must be followed including those in the following pages. 1.1 Safety definitions Here you can find explanations of the safety signal words used in this manual.
en-us IMPORTANT SAFETY INSTRUCTIONS READ AND SAVE THESE INSTRUCTIONS ¡ Severe product damage and/or injury could result from the use of unqualified service technicians or non-original parts. All repairs must be performed by an authorized service provider using only original equipment factory replacement parts. ¡ NSF/ANSI 184 Certified residential dishwashers are not intended for licensed food establishments. 1.3 Intended use Only use this appliance: ¡ for cleaning household dishware.
en-us IMPORTANT SAFETY INSTRUCTIONS READ AND SAVE THESE INSTRUCTIONS equipped with a cord having an equipment-grounding conductor. Check with an authorized electrician or service representative if you are in doubt whether the appliance is properly grounded. 1.6 Safe use Follow these safety instructions when using the appliance. WARNING To reduce the risk of serious injury, observe the following. ▶ Read all instructions before using this dishwasher.
en-us IMPORTANT SAFETY INSTRUCTIONS READ AND SAVE THESE INSTRUCTIONS WARNING To avoid risk of injury, when loading items to be washed, observe the following. ▶ Locate sharp items so they are not likely to damage the door seal. ▶ Load knives and other sharp utensils with their handles up to reduce the risk of cut-type injuries. ▶ Do not wash plastic items unless they are marked "dishwasher safe" or the equivalent. For plastic items not so marked, check the manufacturer's recommendations.
en-us IMPORTANT SAFETY INSTRUCTIONS READ AND SAVE THESE INSTRUCTIONS 1.7 Risk to children Follow these safety instructions if there are children in your home. WARNING To reduce risk of injury to children, observe the following. ▶ Do not allow children to play in or on the dishwasher. ▶ When children become old enough to operate the appliance, it is the responsibility of the parents/legal guardians to ensure the children are instructed in safe practices by qualified persons.
Preventing material damage 2 Preventing material damage Preventing material damage Preventing material damage NOTICE: Harsh chemicals such as bleachbased products can damage your dishwasher. ▶ Do not use harsh chemicals such as bleach-based products to clean your dishwasher. Unsuitable cleaning products may damage the appliance. ▶ Do not use a steam cleaner. ▶ So as not to scratch the finish on the appliance, do not use sponges with a rough surface or abrasive cleaning agents.
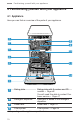
en-us Familiarizing yourself with your appliance 4 Familiarizing yourself with your appliance Familiarizing yourself with your appliance Familiarizing yourself with your appliance 4.1 Appliance Here you can find an overview of the parts of your appliance. 7 8 9 6 5 10 4 3 11 2 12 1 1 Rating plate 2 Detergent dispenser 3 4 Lower rack Rating plate with E number and FD number → Page 48. You will need this data to contact Customer service → Page 47.
Familiarizing yourself with your appliance 5 6 7 8 9 Detergent tab collecting During the wash cycle, detergent tabs tray automatically drop out of the detergent dispenser into the tab collecting tray, where they can dissolve fully. Upper rack Upper rack Silverware drawer Cup shelf 1 Silverware drawer → Page 17 Cup shelf → Page 17 Upper spray arms 10 Lower spray arm 11 12 Silverware basket 1 en-us The upper spray arms wash the dishware in the upper rack.
en-us Familiarizing yourself with your appliance 1 ON/OFF button and reset button 2 3 4 5 6 Cycle buttons Switching on the appliance → Page 25 Switching off the appliance Terminating the wash cycle → Page 26 Cycles Rinse aid refill indicator Rinse aid system → Page 19 WLAN display Home Connect → Page 29 Water supply display Display for water supply 7 Start button 8 Cycle buttons and options button 9 10 Remote Start 11 Display 12 Door opener1 1 12 Electronic delay time If you press
Dishwasher Cycles en-us 5 Dishwasher Cycles Dishwasher Cycles Below is an overview of the different cycles available on your dishwasher. The running time may vary depending on the cycle selected. The running time depends on the water temperature, the quantity of dishware, the level of dirt and the option selected. The running time will change if the rinse aid system is switched off or rinse aid needs to be added. The consumption values relate to normal conditions and a water hardness of 16 20 °E.
en-us Dishwasher Cycles Cycle Purpose Cycle sequence Rinse Dishware: ¡ Cleaning all types of dishware. Level of Soiling: ¡ Cold rinsing, intermediate cleaning. Only when using unloaded appliance. - Cold rinsing: ¡ Pre-rinse Machine Care Favorite Machine Care 162 °F - Usage 1) Hour/min. 2) Electrical/ kWH 3) Water/gal ¡ 1) 0:10 ¡ 2) 0.050 ¡ 3) 1.0 ¡ ¡ ¡ ¡ ¡ ¡ 1) 1:35 2) 0.580 3) 2.4 1) 2) 3) - 5.1 Energy Guide 5.2 Favorite The Energy Guide label was based on the Normal soil sensing cycle.
Options 3. Press the button for the rele- Option vant options. 4. Press Favorite button for 3 seconds. a The selected cycle and option will flash. a The Favorite button flashes. a The program combination is saved. Tip: To reset the cycle, either use the Home Connect app or reset your appliance back to the factory settings. → "Overview of the basic settings", Page 28 Sanitize 6 Options Options You can find an overview of the options that can be selected here.
en-us Features Adjusting upper rack with the side levers To wash large items in the racks, adjust the shelf height of the upper rack. 1. Pull out the upper rack. 2. To prevent the rack from suddenly dropping down, hold the side of the rack by the top edge. 3. Press in the right- and left-hand levers on the outside of the rack. 7.2 Lower rack Arrange pans and plates in the lower rack. a Silverware basket The rack can then slip down slightly. 4. Raise or lower the rack evenly to the right level.
Features en-us 7.3 Silverware Basket 7.5 Cup shelf Arrange the silverware in the silverware basket, ensuring that the items are not nestled together and with the sharp points down. Use the cup shelf and the space underneath for small cups and glasses or for large items of silverware, e.g. cooking spoons or serving cutlery. WARNING The sharp points and edges of knives and other sharp utensils can cause serious injury. ▶ Load knives and other sharp utensils with edges down.
en-us Before using for the first time 1. Push the lever forward fold down the tines 1 . and 2. To use the tines again, fold them back up. a The tines click into position. 2 7.7 Rack heights Set the racks at the right height. Appliance height 32 inches with silverware basket Level 1 max. ø 2 max. ø 3 max. ø Upper rack 8.5" 9.5" 10.5" Lower rack 12" 11" 10" Appliance height 32 inches with silverware drawer Level 1 max. ø 2 max. ø 3 max.
Rinse aid system 9 Rinse aid system Rinse aid system You can use the rinse aid system and rinse aid to get dishware and glasses rinsed perfectly without spots. Rinse aid system 9.1 Rinse aid For optimum drying results, use rinse aid. Only use rinse aid intended for household dishwashers. Adding rinse aid If the rinse aid refill indicator lights up, fill the dispenser with rinse aid. Only use rinse aid intended for household dishwashers. 1.
en-us Detergent 2. To open the basic settings, press for 3 seconds. a The display shows . 3. Press repeatedly until the display shows the value set at the factory r04. 4. Press repeatedly until the display shows r00. 5. To save the settings, press for 3 seconds. a The rinse aid system is switched off and the rinse aid refill indicator is deactivated. 10 Detergent Detergent Find out which detergents are suitable for your appliance. Detergent 10.
Detergent Detergent Description ing and damage the appliance. Detergent con- This may leave taining chlorine chlorine residue on dishware. 10.3 Information on Detergent Follow the instructions on detergents in everyday use. ¡ Detergents marked as "ecological" (environmentally friendly) generally contain lower levels of active agents or none at all. The cleaning effect may be reduced.
en-us Dishware evenly, do not place any other objects in the tablet collecting tray. Tip: If you use powder detergent and select a cycle with pre-rinse, you can also add a little detergent to the interior door of the appliance. 10.5 Detergent table Detergent amount guidelines Auto Normal Heavy 1.75 Tbsp (25 ml) or 1 tab 1.75 Tbsp (25 ml) or 1 tab 3 Tbsp (45 ml) or 1 tab 11 Dishware Dishware Only wash dishware that is suitable for dishwashers.
Dishware en-us Cause Highly caustic alkaline or highly acidic cleaning agents, in particular commercial or industrial cleaning agents, are not suitable for dishwashers in conjunction with aluminum. The water temperature of the program is too high. Recommendation If you are using highly caustic alkaline or highly acidic cleaning agents, in particular commercial or industrial cleaning agents, do not put aluminum parts inside the dishwasher. Select a program with lower temperatures.
en-us Dishware 11.3 Removing dishware Third rack CAUTION Dishes can be very hot immediately after the cycle ends. ▶ Open the door slightly and allow dishes to cool for a few minutes before unloading. 1. To prevent water dripping onto dishware, unload it starting at the bottom and working up. 2. Check the washing tank and accessories for soiling and clean if necessary. → "Cleaning and maintenance", Page 32 Additional loading patterns for 8 place settings: Lower rack 11.
Basic Operation en-us Third rack Requirements ¡ Pressing Start to begin a wash cycle ¡ Setting Delay time and pressing Start ¡ Opening the door while Delay time is active ¡ Opening the door during a wash cycle. 1. Close the door. 2. Press . a The wash cycle will resume. 12.2 Switching on the appliance ▶ Press . The standard program is set by default. If you do not perform any actions on the appliance for 10 minutes, it will automatically switch off.
en-us Basic Operation 12.5 Setting the electronic delay time 12.7 Activating the button lock You can delay the start of the wash cycle by up to 24 hours. 1. Press . a "h:01" appears on the display. 2. Use to set the required start time for the wash cycle. 3. Press . a This activates the electronic delay time. Tip: To deactivate the electronic delay time, press repeatedly until "h:00" appears on the display.
Basic Operation en-us a The cycle is cancelled and ends after approx. 1 minute. 12.11 Switching off the appliance CAUTION To avoid risk of injury, always use caution when opening the door during or following a wash cycle as hot water or steam may escape. ▶ Do not fully open the door until water noises have stopped and steam has subsided. 1. Please note the information on Preventing Material Damage. 2. Press On/Off.
en-us Basic settings 13 Basic settings Basic settings You can configure your appliance to meet your needs. Basic settings 13.1 Overview of the basic settings The basic settings depend on the features of your appliance. Basic setting Rinse aid disp. Display text r04 1 Selection Set the amount of rinse aid. → "Setting the amount of rinse aid", Page 19 Switch the rinse aid system off with level r00.
Home Connect™ Basic setting en-us Selection Description Remote Start Display text rc1 rc0 - rc2 Factory setting rE Starting with Activate or deactivate . The following settings are possible: ¡ With the setting "rc0", the option is permanently deactivated. ¡ With the setting "rc1", the option can be selected via the button. ¡ With the setting "rc2", the option is permanently activated. The basic setting is not available until you have connected the appliance with the Home Connect™ app.
en-us Home Connect™ To be able to use Home Connect™, you must first set up the connection to the WLAN home network (Wi-Fi 1) and to the Home Connect™ app. ¡ → "Connecting appliance to the WLAN home network (Wi-Fi)", Page 30 The Home Connect™ app will guide you through the entire registration process. Follow the instructions in the Home Connect™ app to make the settings. Tips ¡ Please consult the Home Connect™ documents supplied. ¡ Please also note the information in the Home Connect™ app.
Home Connect™ will be permanently activated and you can start your appliance with a mobile device at any time. Activating remote start If you have selected remote start "rc1" with the basic setting, you can activate the remote start function on your appliance. Requirements ¡ The appliance is connected to your WLAN home network. ¡ The appliance is connected to the Home Connect™ app. ¡ With the basic setting Remote start → Page 28, "rc1" is selected. ¡ A program is selected. ▶ Press .
en-us Cleaning and maintenance 15 Cleaning and maintenance Cleaning and maintenance To keep your appliance working efficiently for a long time, it is important to clean and maintain it carefully. Cleaning and maintenance 15.1 Cleaning the tub WARNING Using detergents containing chlorine may result in harm to health. ▶ Never use detergents containing chlorine. 1. Remove any heavy soiling in the interior with a damp cloth. 2. Add detergent to the detergent dispenser. 3.
Cleaning and maintenance en-us Phase 1 Removal of Grease and limescale Cleaner Liquid machine care product or machine descaler in powder form. 2 Food remnants and deposits Machine cleaner To ensure optimal cleaning performance, the program doses the cleaners independently of each another during the relevant cleaning phase. Therefore, it's important to place the cleaners correctly.
en-us Cleaning and maintenance 15.5 Filter system 3. Pull down the micro filter to re- move. The filter system removes coarse soiling from the dishwashing cycle. 3 2 4. Press the locking catches together and lift the coarse filter out . 1 1 2 3 Micro filter 2 Fine filter 1 Coarse filter Cleaning filters Soiling in the dishwashing water may block the filters. 1. Check the filters for residue after each wash. 2. Turn the coarse filter anticlockwise and remove the filter system .
Cleaning and maintenance en-us 15.6 Cleaning the spray arms Limescale and soiling in the dishwashing water may block the nozzles and bearings on the spray arms. Clean the spray arms regularly. 1. Unscrew the upper spray arms and pull down to remove . 1 2 2. Pull up the lower spray arm to remove. 3. Check the outlet nozzles on the spray arms for blockages under running water and remove any foreign objects. 4. Insert the lower spray arm. a The spray arm clicks into position. 5.
en-us Troubleshooting 16 Troubleshooting Troubleshooting ing issues before contacting CusYou can eliminate minor issues on tomer Service. This may avoid unyour appliance yourself. Please necessary repair costs. read the information on eliminatIssue Cause and troubleshooting E:20-60 lights up al- Appliance has detected that the heating element ternately. is calcified. 1. Descale the appliance. 2. Operate the appliance with the Water softening system.
Troubleshooting en-us Issue Cause and troubleshooting E:32-00 lights up al- 5. Remove the filter from the supply hose. ternately or indicator for water supply lights up. 6. Clean the filter. 7. Reinsert the filter in the supply hose. 8. Screw the water connection back on. 9. Check the water connection for leaks. 10. Restore the power supply. 11. Switch the appliance on. E:92-40 lights up al- Filters are soiled or blocked. ternately. ▶ Clean the filters.
en-us Troubleshooting Issue A different error code appears in the display window. E:01-00 to E:90-10 Cause and troubleshooting There is a technical issue. 1. Press . 2. Pull out the power cord plug of the appliance or switch off the breaker. 3. Wait at least 2 minutes. 4. Insert the power cord plug of the appliance in a power outlet or switch on the breaker. 5. Switch the appliance on. 6. If the problem occurs again: ‒ Press . ‒ Turn off the water faucet. ‒ Pull out the power cord plug.
Troubleshooting en-us Issue Cause and troubleshooting Dishware is not dry. Dishware removed too early or drying process not yet ended. 1. Wait until the program ends. 2. Only remove dishware 30 minutes after the program has ended. Rinse aid used has a limited drying performance. ▶ Use a name-brand rinse aid. Eco products may have limited effectiveness. Silverware is not dry. Silverware not arranged properly in the silverware basket or silverware drawer.
en-us Troubleshooting Issue Food remnants on dishware. Cause and troubleshooting Dishware has been precleaned too intensively. Then the sensors choose a lighter cycle. Stubborn remnants cannot be entirely removed. ▶ Only remove large remnants of food and do not pre-rinse dishware. Tall narrow containers in corner areas are not rinsed out adequately. ▶ Do not position tall narrow containers at too great an angle or in corner areas. Upper rack on right and left not set to same height.
Troubleshooting en-us Issue Wipeable or watersoluble coatings inside the appliance or on the door. Cause and troubleshooting There is detergent residue. These coatings cannot generally be removed with chemicals. ▶ Change your Detergent. ▶ Scrub the appliance by hand. There are stubborn white coatings on the dishware, inside the appliance or on the door. There is detergent residue. These coatings cannot generally be removed with chemicals. ▶ Change your Detergent. ▶ Scrub the appliance by hand.
en-us Troubleshooting Issue Plastic parts inside the appliance are discolored. Cause and troubleshooting Plastic parts inside the appliance may become discolored over the life of the dishwasher. ▶ Discoloration may come about and will not impair functioning of the appliance. Plastic parts are dis- Dishwashing temperature is too low. colored. ▶ Select a program with a higher dishwashing temperature. Dishware has been precleaned too intensively. The sensors then choose a weaker program.
Troubleshooting Issue Detergent residue is present in the detergent dispenser or the tab collecting tray. en-us Cause and troubleshooting Spray arms were blocked by dishware so detergent was not rinsed out. ▶ Check that the spray arms are not blocked and can rotate freely. Detergent dispenser was damp when detergent was added. ▶ Only add detergent to the detergent dispenser when dry. Excessive formation Hand soap got in the rinse aid dispenser. of foam occurs.
en-us Troubleshooting Issue Water is left in the appliance at the end of the program. Cause and troubleshooting Filter system or area under the filters is blocked. 1. Clean the Filters → Page 34. 2. Clean the Wastewater pump → Page 45. Program has not yet ended. ▶ Wait until the program ends or terminate the program with Reset. ▶ → "Terminating the wash cycle", Page 26 Appliance cannot be Software update is taking place. switched on or oper- ▶ Wait until the software update has finished. ated.
Troubleshooting en-us Issue Cause and troubleshooting Appliance door can- Door lock has been activated. not be closed. ▶ Close the appliance door with greater force. Door cannot be closed due to installation method. ▶ Check whether the appliance has been installed properly. When closed, the appliance door, its decor or attached parts should not knock against adjacent cabinets or the worktop. Lid on the detergent Detergent dispenser or lid are blocked by sticky dispenser cannot be detergent residue.
en-us Transportation, storage and disposal 5. Prise off the pump cover using a spoon and grip it by the crosspiece. 17 Transportation, storage and disposal Transportation, storage and disposal Here you will find out how to prepare your appliance for transportation and storage. You will also find out how to dispose of old appliances. Transportation, storage and disposal 6. Lift the pump cover inwards at an angle and remove. 7. Remove any food remnants or foreign objects in the area of the impeller. 8.
Customer service 17.3 Transporting the appliance To avoid damage to the appliance, empty it before transporting. Note: Always transport the dishwasher upright to prevent residual water getting into the machine's controls and damaging the appliance. 1. Remove dishware from the appliance. 2. Secure loose parts. 3. Switch on the appliance. → Page 25 4. Select the program with the highest temperature. 5. Start the wash cycle. → Page 26 6. To drain the appliance, terminate the wash cycle after approx.
en-us Customer service 18.1 Model number (ENr.), production number (FD) and consecutive numbering (Z-Nr.) You can find the model number (E-Nr.), the production number (FD) and the consecutive numbering (Z-Nr.) on the appliance's rating plate. The rating plate is located inside the appliance door. Making a note of your appliance's details and the Customer Service telephone number will enable you to find them again quickly. 18.
Technical specifications en-us 19 Technical specifications Technical specifications Technical specifications Weight Voltage Power rating Fuse Water pressure Inlet rate Water temperature Load capacity 19.1 Information regarding Free and Open Source Software This product includes software components that are licensed by the copyright holders as free software or open source software. The applicable license information is stored on your home appliance.
en-us Statement of Limited Product Warranty ¡ New at retail (not a display, "as is", or previously returned model), and not for resale, or commercial use. ¡ Within the United States or Canada, and has at all times remained within the country of original purchase. The warranties stated herein apply to the original purchaser of the product warranted herein and to each succeeding owner of the product purchased for ordinary home use during the term of the warranty.
Statement of Limited Product Warranty en-us uct have been made without success, then BSH will replace your Product (upgraded models may be available to you, in BSH’s sole discretion, for an additional charge). Nothing in this warranty requires damaged or defective parts to be replaced with parts of a different type or design than the original part. All removed parts and components shall become the property of BSH at its sole option.
en-us Statement of Limited Product Warranty ¡ A failure to comply with any applicable state, local, city, or county electrical, plumbing and/ or building codes, regulations, or laws, including failure to install the product in strict conformity with local fire and building codes and regulations. ¡ Ordinary wear and tear, spills of food, liquid, grease accumulations, or other substances that accumulate on, in, or around the Product.
Statement of Limited Product Warranty en-us NOT ALLOW LIMITATIONS ON HOW LONG AN IMPLIED WARRANTY LASTS, SO THE ABOVE EXCLUSIONS OR LIMITATIONS MAY NOT APPLY TO YOU. THIS WARRANTY GIVES YOU SPECIFIC LEGAL RIGHTS, AND YOU MAY ALSO HAVE OTHER RIGHTS WHICH VARY FROM STATE TO STATE. No attempt to alter, modify or amend this warranty shall be effective unless authorized in writing by an officer of BSH. 20.
Wi-Fi® Module FCC/IC Statements Model: SMB FCC ID: 2AHES-SMB IC: 21152-SMB The Home Connect module is a communication device designed to provide communication between appliances and smart devices. This module is integrated at the factory, under direct control of B/S/H Home Appliances Corporation, and is not user serviceable or upgradable. At least 20cm separation distance should be maintained from device to user.
Thank you for buying a Bosch Home Appliance! Register your new device on MyBosch now and profit directly from: • • • • • Expert tips & tricks for your appliance Warranty extension options Discounts for accessories & spare-parts Digital manual and all appliance data at hand Easy access to Bosch Home Appliances Service Free and easy registration – also on mobile phones: www.bosch-home.com/welcome Looking for help? You'll find it here.