en-us Table of contents 1 IMPORTANT SAFETY INSTRUCTIONS 1.1 Safety definitions. 1.2 General information. 1.3 intended use 14 Restrictive Use.. 1.5 Grounding instructions 16 Safe 1.7 Risk to children 1.8 State of California Proposition 65 COCO bd on 2 Preventing material damage... 2.1 Safe use 3 Environmental protection and energy-saving 3.1 Saving energy 3.2 Aqua Sensor 4 Familiarizing yourself with your appliance. 4.1 Appliance... 4.2 Controls 5 Dishwasher Cycles .. 5.1 Energy Guide J. 5.2 Favorite G2 .
14 Home Connect™ 28 14.1 Home Connect™ quick SHAM. ceecnrrnssecennmn mms canniness 30 14.2 Home Connect™ settings 14.3 Remote start [I .. i. 14.4 Remote Diagnostics 31 14.5 Software update... 14.6 Data Protection 15 Cleaning and maintenance 15.1 Cleaning the i. 15.2 Cleaning 15.3 Tips on appliance care. 154 Machine Care 15.5 Filter system... . 15.8 Cleaning the spray arms... 34 16 Troubleshooting... 36 17 Transportation, storage FT FETE | — 46 17.1 Removing the appliance... 46 17.2 Vacation and 48 17.
en-us IMPORTANT SAFETY INSTRUCTIONS READ AND SAVE THESE INSTRUCTIONS Read all instructions carefully before use. These precautions will reduce the risk of electrical shock, fire and injury to persons. When using kitchen appliances, basic safely precautions must be followed including those in the following pages. 1.1 Safely definitions Here you can find explanations of the safety signal words used in this manual.
en-us IMPORTANT SAFETY INSTRUCTIONS READ AND SAVE THESE INSTRUCTIONS = Severe product damage and/or injury could result from the use of unqualified service technicians or non-original parts. All repairs must be performed by an authorized service provider using only original equipment factory replacement parts, = NSF/ANS! 184 Certified residential dishwashers are not intended for li sensed food establishments. 1.3 Intended use Only use this appliance: = for cleaning household dishware.
en-us IMPORTANT SAFETY INSTRUCTIONS READ AND SAVE THESE INSTRUCTIONS equipped with a cord having an equipment-grounding conductor. Check with an authorized electrician or service representative if you are in doubt whether the appliance is properly grounded. 1.6 Safe use Follow these safety Instructions when using the appliance. WARNING To reduce the risk of serious injury, observe the following. > Read all instructions before using this dishwasher.
en-us IMPORTANT SAFETY INSTRUCTIONS READ AND SAVE THESE INSTRUCTIONS WARNING To avoid risk of injury, when loading items to be washed, observe the following. > Locate sharp items so they are not likely to damage the door seal. » Load knives and other sharp utensils with their handles up to reduce the risk of cut-type injuries. * Do not wash plastic items unless they are marked "dishwasher safe" or the equivalent. For plastic items not so marked, check the manufacturer's recommendations.
en-us IMPORTANT SAFETY INSTRUCTIONS READ AND SAVE THESE INSTRUCTIONS 1.7 Risk to children Follow these safety instructions if there are children in your home. WARNING To reduce risk of injury to children, observe the following. » Do not allow children to play in or on the dishwasher. > When children become old enough to operate the appliance, iris the responsibility of the parents/legal guardians to ensure the children are instructed in safe practices by qualified persons.
2 Preventing material damage 2.1 Safe use Follow the instructions when using the appliance. NOTICE: Unsuitable cleaning products may damage the appliance. » Do not use a steam cleaner. » So as not to scratch the finish on the appliance, do not use sponges with a rough surface or abrasive cleaning agents. » To prevent corrosion, do not use cellulose sponge cloths on dishwashers with a stainless steel front or rinse the cloths thoroughly several times before using them for the first time.
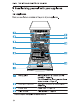
en-us Familiarizing yourself with your appliance 4 Familiarizing yourself with your appliance 4.1 Appliance Here you can find an overview of the parts of your appliance. = Rating plate Rating plate with E number and FD number — Page 48. You will need this data to contact Customer service ~ Page 47. 72 Detergent dispenser Detergent is added to the detergent dispenser.
Familiarizing yourself with your appliance tin-us Detergent {ab collecting During the wash cycle, detergent tabs fray automatically drop out of the detergent dispenser into the tab collecting tray, where they can dissolve fully. Upper rack Upper rack Silverware drawer Silverware drawer — Page 17 Cup sheaf' Cup shelf — Page 17 IRE & Upper spray arms The upper spray arms wash the dishware in the upper rack. If the dishware has not been washed properly, clean the spray arms.
en-us Familiarizing yourself with your appliance ON/OFF button ON/OFF Switching on the appliance and reset button Page 25 Reset 4 sec. Switching off the appliance Terminating the wash cycle — Page 27 Cycle buttons Cycles Rinse aid refill indicator Rinse ald system — Page 18 ELAN display Home Connect — Page 29 Water supply display Display for water supply Setup 3 sec. bunion If you press Setup 3 sec. for approx. 3 seconds, you can open the basic settings.
Dishwasher Cycles en-us 5 Dishwasher Cycles You can find an overview of the cycles that can be selected here. Different cycles, which can be found on the control pane! of your appliance, are available depending on the appliance configuration. The running time may vary depending on the cycle selected. The running time depends on the water temperature, the quantity of dishware, the level of soiling and the option selected.
en-us Dishwasher Cycles Cycle Purpose Cycle sequence Usage 1) Hour/min. 2) Electrical! kWH 3) Water/gal Normal Dishware: Most economical cycle: = 1) 2:10 u Cleaning mixed = Pr-Rinse 2:15 dishware and = Cleaning 122 0.620 silverware. 131 °F 0.660 Level of dolling: 2 intermediate rinse s = Removing com= Final rinse 156 °F mon household = Drying food remnants lightly dried-on. Rinse Dishware: Cold rinsing: w 1) 0:10 = Cleaning all = Pr-rinse ws 2} 0.050 types of dish= 3}1.
Tip: You can use the Home Connect app to download additional Cycles and Options and save them. * Save Favorites on the appliance. 1. Press ON/OFF. 2 Press the right cycle bunion. 3. Press the bunion for the relevant options. 4. Press Favorite button for 3 seconds. v The selected cycle and option will flash. v The Favorite bunion flashes. v The program combination is saved. Tip: To reset the cycle, either use the Home Connect app or reset your appliance back to the factory settings.
en-us Features 7.1 Upper rack Arrange cups and glasses in the upper rack. You can adjust the height of the upper rack to make room for larger items. Adjusting upper rack with the side levers To wash large items in the racks, adjust the shelf height of the upper rack. 1. Pull out the upper rack. 2 To prevent the rack from suddenly dropping down, hold the side of the rack by the top edge. 3 Press in the right and left-hand levers on the outside of the rack. The rack can then slip down slightly. 4.
7.3 Silverware Basket Arrange the silverware in the silverware basket, ensuring that the items are not nestled together and with the sharp points down. A warning The sharp points and edges of knives and other sharp utensils can cause serious injury. » Load knives and other sharp utensils with edges down. De not allow children to handle or play near knives and sharp utensils Features en-us 7.4 Silverware drawer Arrange silverware in the silverware drawer.
en-us Features 7.6 Flip tines Folding down the tines’ Use the flip tines to position dish if you do not need the tines, fold ware securely, e.g. plates. 1. Push the lever forward ® and fold down the tines You can fold the tines down range pans, bowls and glasses 2 To use the tines again, fold better. them back up. + The tines click into position. 7.7 Rack heights Set the racks at the right height. Appliance height 32 inches with silverware basket Level Upper rack Lower rack 1 max. g 8.5" 12" 2 max. o 9.
8 Before using for the first time Apply the settings for the first use. 8.1 Initial use On initial use or after reset fo the factory settings, you will need to configure settings. Tip: Connect your appliance to a mobile device. You can conveniently change all settings using the Home Connect™ app. ~ "Home Connect™ quick start”, Page 30 Requirement: The appliance has been installed and connected. 1. Add rinse aid. = Page 19 2 Switch on the appliance. — Page 25 3. Set the amount of rinse aid.
tin-us Detergent 4. Press Start repeatedly until the right amount of rinse aid has been set. ~ A low settling adds less rinse aid during the wash cycle and reduces streaking on dishware. — A higher setting adds more rinse aid during the wash cycle, reduces Walter spots and improves the drying result. 5 To save the settings, press Setup 3 sec. for 3 seconds. 9.3 Switching the rinse ald system off If you choose not to use rinse aid, you can turn the rinse aid system off.
Detergent Description Liquid deli quid detergent detergent works faster and Is recommended for shorter cycles without a per-rinse. Sometimes liquid detergent may leak out despite the detergent dispenser being closed. This is not a problem, just remember the following: = Only choose a cycle without Pretense. = Do not use the Delay Start option. The dosage can be adjusted to the elev! of soiling. 10.
en-us Dishware 2 Add the detergent to the dry detergent dispenser. Bhp mn If you are using tablets, one is enough. Insert the tablets in a horizontal position. If you are using powder or gulden detergent, follow the manufacturer's instructions and quantities for dosage in the detergent dispenser. 1.510 1.75 Hep detergent is sufficient for normal soiling. If dishware is only lightly soiled, slightly less than the amount of detergent specified is usually sufficient. 3 Close the lid of the detergent dispenser.
Dishware en-us Cause Recommendation Recommendation son = Decorated Highly caustic If you are using glassware, alkaline or highly caustic antique and highly acidic alkaline or hand-crafted cleaning highly acidic dishware agents, in par cleaning = Plastic articular encouragements, in payware not recall or industrial titular commiseration to cleaning vial or industrial heat agents, are not cleaning s Dishware suitable for agents, do not made from dishwashers in put aluminum copper or tin conjunction parts insi
en-us Dishware = To save energy and water, load the machine with the number of place settings specified. ® For better washing and drying results, position items with curves or recesses at an angle so water can run off. Remove large remnants of food from dishware. To save resources, do not pretense dishware under running water. 2 Observe the following when arranging dishware: — Put heavily soiled dishware in the lower rack, e.g. pans.
Third rack Additional loading patterns for 8 place settings: Lower rack Upper rack Basic Operation en-us Third rack 12 Basic Operation 12.1 Protection against unintentional operation Your appliance is equipped with a function that helps fo prevent unintentional operation, e.g. by children. Afire starting the appliance, the door has to be closed within 4 seconds, otherwise the operation will be paused. Note: This function cannot be deactivated.
en-us Basic Operation The standard program is set by default. if you do not perform any actions on the appliance for 10 minutes, it will automatically switch off. 12.3 Setting a cycle To adjust the wash cycle to the soiling level of the dishware, select a suitable cycle. » Press the right cycle bunion. + The cycle is set and the cycle button flashes. v The remaining run time of the cycle appears on the display. 12.4 Settling options You can set options io complete the chosen cycle.
12.8 Deactivating the button lock » Press &O for approx. 3 seconds. 12.9 Interrupting the wash cycle 1. Press On/Off. The program is saved and the appliance switches off. 2 Press On/Off. 3. Press Start to resume the wash cycle. 12.10 Terminating the wash cycle To end a cycle early or to switch from one that has already started, you will need to cancel it first. » Press Reset 4 sec. for approx. 4 seconds. v All displays light up.
en-us Basic settings 13 Basic settings ‘You can configure your appliance to nest your needs. 13.1 Overview of the basic settings The basic settings depend on the features of your appliance. Basic setting Display text Selection Description Rinse aid dips. r04 00 r06 Set the amount of rinse aid. — "Melting the amount of rinse aid’, Page 18 Switch the rinse aid system off with level r00. Intensive drying 400° d00 dot The temperature is Increased during the final rinse, which improves the drying result.
Home Connect™ en-us Basic setting Display Selection Description text Factory selling E Starting with Restore changed settings Start to the factory settings. YES The settings for initial use Confirming must be configured. with Start ' Factory setting (may vary according to model) 13.2 Changing the basic settings 1. Press ON/OFF. 2. To open the basic settings, press Setup 3 sec. for 3 seconds. v The display shows Bl. 3. Press Setup sec. repeatedly until the display shows the required setting. 4.
tin-us Home Connecf™ 14.1 Home Connect™ quick start Connect your appliance to a mobile device quickly and easily. Installing the app 1. Install the Home Connect™ app on your mobile device. PLE EEL Start the app and set up access for Home Connect™. The Home Connect™ app will guide you through the entire registration process. Connecting appliance to the ELAN home network (WI-Fi) Requirements = Home Connect™ app is installed on your mobile device. B WI-Fi is activated on the router.
14.4 Remote Diagnostics The Customer Service can access your appliance via Remote Diagnostics if you ask them your appliance is connected to the Home Connect™ server and if Remote Diagnostics is available in the country where you are using the appliance. Tip: Further information and derails about the availability of Remote Diagnostics in your country can be found in the Serviceability section of your local website: 14.5 Software update You can use this function to update the software of your appliance, e.g.
tin-us Cleaning and maintenance 15.2 Cleaning agent Only use suitable cleaning agents to clean your appliance. 15.3 Tips on appliance care Follow the tips on appliance care fo make sure your appliance functions properly at all times. 15.4 Machine Care &f Deposits, e.g. from food remnants and limescale, can cuss your appliance to malfunction. To avoid these problems and reduce odors, we recommend cleaning your appliance at regular intervals.
Run Machine Care without dishware if the indicator for Machine Care lights up on the control pans! or If advised the display. The indicator will go out after you have run Machine Care. If your appliance does not have a reminder function, we recommend performing Machine Care every 2 months. Fun Machine Care Run the Machine Care program if the indicator for Machine Care lights up on the control panel or if advised the display. Notes = Run the Machine Care program without any dishes in the dishwasher.
tin-us Cleaning and maintenance 2 Turn the coarse filter anticlockwise @ and remove the filter system @, ~ Make sure that no foreign objects fall into the sump. 3 Pull down the micro filter to remove. 4 Press the locking catches @ together and lift the coarse filter out @ 10 5 Clean the filter elements under running water. Carefully clean the rim of dirt between the coarse and fine filter, 6 Reassemble the filter system. 34 Make sure that the locking catches on the coarse filter click into position. 7.
en-us Troubleshooting 16 Troubleshooting You can eliminate minor issues on ing issues before contacting Curious appliance yourself. Please timer Service. This may avoid unread the information on recriminatory repair costs. Issue Cause and troubleshooting lights up appliance has detected heating element is alternatively. died. 1. Descale the appliance. 2. Operate the appliance with the Water softening system.’ lights up saltwater protection system is activated. alternately. 1. Turn off the water faucet. 2.
Troubleshooting en-us Issue Cause and troubleshooting lights up alternately or Indicator for water supply lights up. 8 Remove the filter from the supply hose. 6. Clean the filter. 7. Reinsert the filter in the supply hose. 8. Screw the water connection back on. 8. Check the water connection for leaks. 10. Restore the power supply. 11. Switch the appliance on. lights up alternately. Filters are soiled or blocked. » Clean the filters. "Cleaning filters”, Page 33 lights up alternately.
tin-us Troubleshooting Issue Cause and troubleshooting A different error A technical fault is present. code appears in the 1. Press ON/OFF. display window. 2. Pull out the power cord plug of the appliance or to switch off the breaker. 3 Wait at least 2 minutes. 4 Insert the power cord plug of the appliance in a power outlet or switch on the breaker. 5 Switch the appliance on. 6 If the problem occurs again: Press ON/OFF. Turn off the water faucet. Pull out the power cord plug.
Troubleshooting en-us Issue Cause and troubleshooting Dishware is not dry. Dishware removed too early or drying process not yet ended. 1. Wait until the program ends. 2. Only remove dishware 30 minutes after the program has ended. Rinse aid used has a limited drying performance. » Use a name-brand rinse aid. Eco products may have limited effectiveness. Silverware is not dry. Silverware not arranged properly in the silverware basket or silverware drawer. Droplets can form on the contact points of silverware.
tin-us Troubleshooting Issue Cause and troubleshooting Food remnants on dishware. Dishware has been precanceled too intensively. The sensors then choose a weaker program. Stubborn soiling cannot be entirely removed. » Only remove large remnants of food and do not pretense dishware. Tall narrow containers in corner areas are not rinsed out adequately. » Do not position tall narrow containers at too great an angle or in corner areas. Upper rack on right and left not set to same height.
Troubleshooting en-us Issue Cause and troubleshooting Wipe able or water soluble coatings inside the appliance or on the door. Detergent substances are deposited there. These coatings cannot generally be removed with chemicals. » Change your Detergent. » Clean the appliance mechanically. There are stubborn white coatings on the dishware, inside the appliance or on the door. Detergent substances are deposited there. These coatings cannot generally be removed with chemicals. » Change your Detergent.
tin-us Troubleshooting Issue Cause and troubleshooting Plastic parts inside the appliance are discolored. Plastic parts inside the appliance may become discolored over the life of the dishwasher. » Discoloration may come about and will not impair functioning of the appliance. Plastic parts are discolored. Dish washing temperature is too low. » Select a program with a higher dish washing temperature. Dishware has been precanceled too intensively. The sensors then choose a weaker program.
Troubleshooting en-us Issue Cause and troubleshooting Detergent residue is present in the detergent dispenser or the tab collecting tray. Spray arms were blocked by dishware so detergent was not rinsed out. » Check that the spray arms are not blocked and can rotate freely. Detergent dispenser was damp when detergent was added. » Only add detergent to the detergent dispenser when dry. Excessive formation of foam occurs. Hand soap got in the rinse aid dispenser. » Immediately add rinse aid to the dispenser.
tin-us Troubleshooting Issue Cause and troubleshooting Water is left in the appliance at the end of the program. Filter system or area under the filters is blocked. 1. Clean the Filters ~ Page 33. 2 Clean the Wastewater pump — Page 45. Program has not yet ended. » Wait until the program ends or terminate the program with Reset. » = "Terminating the wash cycle”, Page 27 Appliance cannot be switched on or software update is taking place. > Wait until the software update has finished. ate.
Troubleshooting en-us Issue Cause and troubleshooting Appliance door can Door lock has been activated. not be closed. » Close the appliance door with greater force. Door cannot be closed due to installation method. » Check whether the appliance has been installed properly. When closed, the appliance door, its decor or attached parts should not knock against adjacent cabinets or the worktop. Lid on the detergent Detergent dispenser or lid are blocked by sticky dispenser cannot be detergent residue. closed.
en-us Transportation, storage and disposal 8. Rise off the pump cover using a spoon and grip it by the crosspiece. 6 Lift the pump cover inwards at an angle and remove. 7. Remove any food remnants or foreign objects in the area of the impeller. & Insert the pump cover @ and press down @. v The pump cover clicks into position. 9. Install the filter system. 10.Insert the upper and lower rack.
17.3 Transporting the appliance To avoid damage fo the appliance, employ it before transporting. Note: Always transport the dishwasher upright to prevent residual water getting into the machine's controls and damaging the apple acne. 1. Remove dishware from the appliance. 2 Recurs loose pants. 3. Switch on the appliance. — Page 25 4. Select the program with the highest temperature. 5 Start the wash cycle. — Page 26 & To drain the appliance, terminate the wash cycle after approx. 4 minutes.
en-us Customer service 18.1 Model number (Enron, production number (FD) and consecutive numbering You can find the mode! number the production number (FD) and the consecutive numbering on the appliance's rating plate. The rating plate is located inside the appliance door. Making a note of your appliance’s details and the Customer Service telephone number will enable you to find them again quickly. 18.
Technical specifications en-us 19 Technical specifications Facts and figures for your appliance can be found here. Weight Max. 45 kg Voltage 120V, Power rating 1440 W Fuse 12A Water pressure = Min. 7.25 psi (50 kPa) = Max. 145 psi (1000 kPa) Inlet rate Min. 2.6 gal/min Water temperature Cold water. Hot water max.: 140 °F/ (60 °C) Load capacity 10 place settings 19.
en-us Statement of Limited Product Warranty appliance sold to you provided that the Product was purchased: ® For your normal, household {non-commercial} use, and has in fact at all times only been used for normal household purposes. 2 New at retell {not a display, "as is", or previously returned model}, and not for resale, or commercial use. = Within the United States or Canada, and has at all times remained within the country of original purchase.
Statement of Limited Product Warranty en-us 20.4 Repair/Replace as Your Exclusive Remedy During this warranty period, BSH or ong of its authorized service providers will repair your Product without charge to you (subject to certain limitations stated herein) if your Product proves to have been manufactured with a defect in materials or workmanship.
en-us Statement of Limited Product Warranty u Any party's willful misconduct, negligence, misuse, abuse, accidents, neglect, improper operation, failure to maintain, improper or negligent installation, tampering, failure to follow operating instructions, mishandling, unauthorized service (including self performed "fixing" or exploration of the appliance’s internal workings). = Adjustment, alteration or modification of any kind.
Statement of Limited Product Warranty en-us OR PUNITIVE DAMAGES, LOSSES, OR EXPENSES, INCLUDING WITHOUT LIMITS: SON TIME AWAY FROM WORK, HOTELS AND/OR RESTAURANT MEALS, REMODELING EXPENSES IN EXCESS OF DIRECT DAMAGES WHICH ARE DEFINITIVELY CAUSED EXCLUSIVELY BY BSH, OR OTHERWISE.
Model: SMB FCC ID: 2AHES-SMB IC: 21152-SOB The Home Connect module is a communication device designed to provide communication between appliances and smart devices. This module is integrated at the factory, under direct control of B/S/H Home Appliances Corporation, and is not user serviceable or up gradable. At least 20cm separation distance should be maintained from device to user.
Thank you for buying a Bosch Home Appliance Register your new device on My Bosch now and profit directly Tom: « Expert tips & tricks for your appliance * Warranty extension options * Discounts for accessories & spare-parts » Digital manual and all appliance data at hand access to Bosch Home Appliances Service on also on mobile phones: 5 me welcome Looking for help? You'll find it here. r Bosch home al elms or a repair from Bosch experts.