TES 506.. en fr nl Operating instructions Notice d’utilisation Gebruiksaanwijzing TES506_1RW.indb 1 pl cz ru Instrukcja obsługi Návod k použití Инструкция по эксплуатации 16.06.
en English 2 fr Français 20 nl Nederlands 39 pl Polski 58 cz Čeština 77 96 ru Included in delivery (see page 3) / Contenu de l’emballage (voir page 21) De verpakking bevat (zie pagina 40) / Zawarto ć zestawu (patrz strona 59) Součást dodávky (informace naleznete na stran 78) ( . . 97) NEU 2 3 1 E-Nr. ……… FD… … 4 5 TES506_1RW.indb 2 6 7 16.06.
A 1 2 3 4 18 17 16 15 14 13 12 11 10 5 6 9 8 TES506_1RW.indb 3 7 16.06.
B 19 22 20 21 C D 6e 8a 8b 6d 6a TES506_1RW.indb 4 8d 6b 6c 8c 16.06.
E 5c 5a 5b 5d 5e TES506_1RW.indb 5 16.06.
2 Table of Contents Included in delivery .....................................3 Overview.....................................................3 Controls ......................................................4 − Power on/off switch O / I ..........................4 − button ................................................4 − off / j button ........................................4 − h / g button ..........................................4 − start button .............................................
en Never immerse the appliance or power cord in water. Do not reach into the grinding unit. Use the appliance only in frost-free rooms. ¡ Risk of scalding The milk frother outlet (6a) gets very hot. After use, allow to cool down irst before touching. Use this appliance only after the milk frother (6) has been fully assembled and installed. 3 Overview Figures A, B, C, D and E 1 2 3 4 5 ¡ Risk of suffocation Do not allow children to play with packaging material.
4 en Controls “Coffee strength” rotary knob Power on/off switch O / I The power switch O / I (9) is used to switch the appliance on or to switch it off fully (power supply off). Important: Before switching off, run the cleaning programme or use the off / j button (13) to switch off. e d button Press the d button (11) to prepare two This rotary knob (14) is used to set the coffee strength. h to g With these coffee strengths the coffee is brewed in 2 stages. See “AromaDouble Shot” on page 5.
en 5 Rotary selector for warm milk/milk froth To dispense milk froth – for example for a latte macchiato or cappuccino – turn the symbol to the front. To dispense warm milk, turn the symbol to the front. To dispense hot water, set the rotary selector to the horizontal position. j i AromaDouble Shot The longer the coffee is brewed, the more bitter substances and undesired aromas are released. This has a negative effect on the taste and makes the coffee less easily digestible.
6 Switching on the appliance 1. Place the fully automatic espresso machine on a lat, water-resistant surface that can take its weight. Make sure that the machine’s ventilation slots remain unobstructured. 2. Pull the power cord out of the storage compartment (22) and plug in. Adjust the length of the cable by pushing it back in or pulling it out. The easiest way to do this is to place the appliance so that its back is lush with the edge of the counter and either pull the cable downward or push it upward. 3.
en 7 Water ilter A water ilter can prevent scale buildup. Before a new water ilter is used, it must be rinsed. To do this, proceed as follows: 1. Press the water ilter (20) irmly into the water tank with the aid of the measuring spoon (19). 2. Fill the water tank (17) with water up to the max mark. 3. Press and hold the off / j button (13) for at least three seconds. The menu opens. 4. Press the off / j button (13) repeatedly until the display shows No / Old filter. 5.
8 You can set the following: Shut off: Here you can set the time span after which the appliance automatically switches off following the last drink preparation. A time between 15 minutes and 4 hours can be set. The default time is 1 hour, but this can be shortened to save energy. Filter: Here you can set whether a water ilter is being used. If a water ilter is not being used, turn the setting to No / Old. If a water ilter is being used, turn the setting to Activate filter.
en 9 Preparation using coffee beans This fully automatic espresso machine grinds beans freshly for each brew. The appliance must be ready for use. To prepare a coffee-based drink with milk, irst insert the milk tube into a milk container and turn the rotary selector (6b) to “Milk froth” . j Important: Dried milk residue is dificult to remove, so the milk frother (6) must be cleaned with lukewarm water immediately after use and rinse using the Rinse milk system programme (see page 11).
10 4. Select the required drink by turning the upper rotary knob (15) (only one cup possible). 5. Press the start button (10). The coffee is brewed and then dispensed into the cup. N.B.: Repeat the procedure for another cup of coffee. If no coffee is taken within 90 seconds, the brewing chamber empties automatically to avoid overilling. The appliance rinses. Dispensing hot water ¡ Risk of burns The milk frother (6) gets very hot. Hold the milk frother (6) by the plastic part only.
en Important: Dried milk residue is dificult to remove, so the milk frother (6) must be cleaned with lukewarm water immediately after use and rinse using the Rinse milk system programme (see page 11). Maintenance and daily cleaning ¡ Risk of electric shock Unplug the appliance before cleaning it. Never immerse the appliance in water. Do not use a steam cleaner. Wipe the outside of the appliance with a soft, damp cloth. Do not use abrasive cloths or cleaning agents.
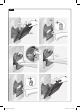
12 Dismantling the milk system for cleaning: 1. Pull the milk frother (6) forward out of the appliance. 2. Dismantle the milk frother into its individual parts (6a) to (6d) (see igure C at the start of the operating instructions). 3. Clean the individual parts with a detergent solution and a soft brush. If necessary, soak in a warm detergent solution. 4. Rinse all parts with clear water and dry them. 5. Reassemble all the parts and replace fully in the appliance.
en 13 N.B.: After cleaning thoroughly, the seals of the brewing unit should be greased regularly for optimal care. Apply a thin layer of the special grease intended for this purpose (Order No. 311368) all around the seals. Service Programmes Tip: Refer also to the quick reference guide in the storage compartment (5c).
14 en Order number Retail Customer service Cleaning tablets TCZ6001 310575 Descaling tablets TCZ6002 310967 Important: If there is a ilter in the water tank (17), it needs to be removed before the service programme is run. Descaling Pour lukewarm water into the empty water tank (17) up to the 0,5l mark and dissolve 2 Bosch descaling tablets in it. Press the start button (10). Place container Press start Place a receptacle with a capacity of at least 0.5 litres under the outlet (6a).
en 15 appears in the display. To start the cleaning procedure, press the start button (10). The display will guide you through the programme. Empty drip tray Insert drip tray Empty drip tray (8) and replace them. Cleaning in progress To run Calc‘n‘Clean before being prompted, press the off / j button (13) for at least 3 seconds. Then press the off / j button (13) briely twice. Turn the upper rotary knob (15) until Start Calc‘n‘Clean appears in the display.
16 Clean / Fill water tank Press Start Rinse the water tank (17) and reill it with fresh water up to the max mark. Press the start button (10). Calc‘n‘Clean in progress The descaling programme now runs for about 10 minutes and rinses the appliance. Empty drip tray Insert drip tray Empty drip tray (8) and replace them. Replace the ilter if one is being used. The appliance has inished cleaning is ready for use again.
en 17 Simple troubleshooting Problem Cause Display shows Beans are not falling into the grinding unit the bean container (1) is full, (beans too oily). or the grinding unit does not grind the beans. Refill beans! although Solution Gently tap the bean container (1). Change the type of coffee if necessary. When the bean container (1) is empty, wipe it with a dry cloth. No hot water dispensed. The milk frother (6) is soiled. Clean the milk frother (6), see “Maintenance and daily cleaning”.
18 en Simple troubleshooting Problem Cause Solution Coffee is too “bitter”. The grinding setting is too ine or the pre-ground coffee is too ine. Adjust the grinding unit to a coarser setting or use coarser pre-ground coffee. Unsuitable type of coffee. Change type of coffee used. Display shows The appliance has a fault. Please call the hotline. The water filter (20) does not stay in position in the water tank (17). The water filter (20) is not mounted correctly.
en 19 Simple troubleshooting Problem Cause Solution Display shows Brewing unit (5) is missing or was not recognised. Switch off the appliance with the brewing unit (5) in place, wait three seconds and switch on the appliance. Restore the unit to its original factory settings (“Reset”). You changed some settings Turn off the unit with the and want to discard them. power on/off switch O / I (9).
20 fr Sommaire Contenu de l’emballage ............................21 Présentation .............................................21 Eléments de commande ...........................22 − Interrupteur électrique O / I ....................22 − Touche ............................................22 − Touche off / j .....................................22 − Touche h / g ......................................22 − Touche start ..........................................22 − Sélecteur rotatif « Arôme du café » .......
fr la part de la personne responsable de leur sécurité. Bien surveiller les enfants ain de les empêcher de jouer avec l’appareil. En cas de défaut, débrancher immédiatement le cordon électrique. Les réparations sur la machine, par ex. le remplacement du cordon électrique, doivent être effectuées uniquement par notre Service après-vente ain d’éliminer tous les risques. Ne jamais plonger la machine ou le cordon électrique dans l’eau. Ne pas glisser les doigts à l’intérieur du moulin.
22 fr Eléments de commande Interrupteur électrique O / I L’interrupteur réseau O / I (9) permet de mettre en marche et d’arrêter entièrement la machine (alimentation électrique coupée). Important : Avant d’arrêter la machine, lancer un programme de rinçage ou bien utiliser la touche off / j (13). e d Sélecteur rotatif « Arôme du café » Le sélecteur rotatif (14) sert à régler l’arôme du café. h à g Touche Appuyer sur la touche (11) pour préparer simultanément deux tasses de la boisson sélectionnée.
fr 23 Remarque : lorsqu’il est sélectionné une boisson impossible à préparer, l’écran afiche Combinaison non valide. Modiier l’arôme du café ou la sélection de la boisson. Sélecteur rotatif Lait chaud/ Mousse de lait Pour prélever de la mousse de lait – par exemple pour préparer du Latte Macchiato ou un Cappuccino – tourner le symbole vers l’avant. Pour prélever du lait chaud, tourner le symbole vers l’avant. Pour prélever de l’eau chaude, placer le sélecteur horizontalement.
24 Mise en service de la machine 1. Placer la machine à café sur un plan horizontal, sufisamment solide pour supporter son poids et résistant à l’eau. Assurez-vous que la fente de ventilation de la machine n’est pas obstruée. 2. Extraire du logement (22) la longueur de cordon électrique nécessaire et brancher dans une prise. Pour ajuster la longueur du cordon, il sufit de le tirer ou de le repousser à l’intérieur. Pour cela, placer la machine sur un bord de table, par ex.
fr 25 Après une utilisation extensive, il peut se former des gouttelettes d’eau sur les fentes de ventilation. C’est un phénomène normal. Filtre eau L’utilisation d’un iltre à eau peut diminuer la formation de dépôts calcaires. Avant d’utiliser un nouveau iltre à eau il faut tout d’abord effectuer un rinçage. Pour cela, procéder comme indiqué ci-après. 1. En s’aidant de la cuillère dose (19), bien insérer le iltre à eau (20) dans le réservoir d’eau. 2. Remplir d’eau le réservoir (17) jusqu’au repère max.
26 fr Réglages menu Vous pouvez adapter votre machine de manière individuelle à l’aide des réglages menu. 1. Maintenir appuyée la touche off / j (13) au moins 3 secondes. 2. Appuyer plusieurs fois sur la touche off / j (13) jusqu’à ce que l’option de menu souhaitée s’afiche à l’écran. 3. A l’aide du sélecteur du haut (15), choisir le réglage souhaité. 4. Conirmer avec la touche start (10).
fr 27 Régler la inesse de la mouture Important : les restes de lait séchés sont dificiles à retirer. Après chaque utilisation du mousseur lait (6), il est impératif d’effectuer un nettoyage à l’eau tiède à l’aide du programme Rinçage syst. lait (voir page 30). Attention Modifier le réglage de la mouture uniquement lorsque le broyeur fonctionne. Sinon la machine peut être endommagée. Ne pas glisser les doigts à l’intérieur du moulin.
28 fr Appuyer de nouveau sur la touche start (10) pour interrompre avant terme la percolation. Préparation à partir de café moulu La machine peut aussi préparer un café à partir de café moulu (pas du café soluble). La machine doit être prête à fonctionner. Pour préparer une boisson café avec du lait, placer tout d’abord le lexible lait dans un récipient de lait et positionner le sélecteur rotatif (6b) sur « Mousse lait » .
fr 29 Préparer de la mousse de lait et du lait chaud ¡ Risque de brûlure ! Le mousseur de lait (6) devient brûlant. Ne saisir le mousseur de lait (6) que par la partie plastique. Conseil pratique : faire mousser tout d’abord le lait puis préparer le café ; ou bien faire mousser séparément le lait et verser la mousse sur le café. La machine doit être prête à fonctionner. 1. Placer une tasse préchauffée sous l’embout (6a). 2. Placer le lexible Lait (6c) dans un récipient de lait. 3.
30 fr Les éléments suivants peuvent passer en lave-vaisselle : bac collecteur du bec verseur du café (8c), récipient pour marc de café (8b), grille bec verseur du café (8d), couvercle préservateur d’arôme (2) et cuillère-dose (19). Essuyer l’intérieur de la machine (bacs collecteurs et tiroir à café). Important : vider et nettoyer tous les jours le bac collecteur du bec verseur du café (8c) et le récipient pour marc de café (8b) ain d’éviter le développement de moisissures.
fr 31 5. Rincer soigneusement l’unité de percolation (5a) sous un jet d’eau courante. ¡ Risque de brûlure ! N’utilisez la machine que lorsque le mousseur de lait (6) est entièrement monté et installé. Nettoyer l’unité de percolation Nettoyer régulièrement l’unité de percolation ! Pour effectuer un nettoyage prélable automatique de l’unité de percolation : 1. A l’aide du sélecteur (15), choisir . 2. Disposer un verre vide sous l’embout (6a). 3. Appuyer sur la touche start (10).
32 fr Conseils pour économiser l’énergie La machine à café s’arrête automatiquement au bout d’une heure (réglage usine). Il est possible de réduire la durée de une heure réglée (voir Arrêt point « Réglages menu », page 26). Lorsque vous n’utilisez pas la machine à café, vous devez l’arrêter. Pour cela, appuyer sur la touche off / j (13). La machine effectue un rinçage et s’arrête. Autant que possible ne jamais interrompre la production de café ou de mousse de lait.
fr 33 Détartrage Détartrage en cours Le programme de détartrage se déroule maintenant durant 20 minutes environ. Durée : env. 25 minutes. Important : lorsqu’un iltre à eau est présent dans le réservoir d’eau (17), le retirer impérativement avant de lancer un détartrage. Lorsque le message Détartrage nécessaire ! apparaît à l’écran, appuyer sur la touche off / j (13) durant 3 secondes et appuyer ensuite sur la touche start (10). Le détartrage commence.
34 fr Ouvrir tiroir Ouvrir le tiroir à café (4). Remplir nettoyant Placer une pastille de nettoyage Bosch dans le tiroir (4) et refermer. Nettoyage en cours Le nettoyage est activé pour une durée de 8 minutes env. Vider bac Placer bac Vider le bac collecteur (8) et le replacer. La machine est maintenant nettoyée et de nouveau prête à fonctionner. Calc‘n‘Clean Durée : env. 35 minutes. Calc‘n‘Clean combine les fonctions Détartrage et Nettoyage.
fr 35 Mise au rebut Vider bac Placer bac Vider le bac collecteur (8) et le replacer. Si un iltre est utilisé, le replacer maintenant. La machine est maintenant nettoyée et de nouveau prête à fonctionner. Protection contre le gel ¡ Ain d’éviter les dommages provo- qués par le gel lors du transport et du stockage, il faut préalablement vider entièrement la machine. Info : la machine doit être prête à fonctionner et le réservoir d’eau (17) doit être rempli. 1.
36 fr Eliminer soi-même les problèmes simples Problème Cause Remède Afichage de Remplir grains ! bien que le bac à café (1) soit rempli, ou bien le moulin ne parvient pas à moudre. Les grains ne tombent pas dans le broyeur (grains trop gras). Frapper légèrement le bac à café (1). Changer éventuellement de café. Une fois que le bac à café (1) est vide, l’essuyer avec un chiffon sec. Impossible de produire de l’eau chaude.
fr 37 Eliminer soi-même les problèmes simples Problème Cause Remède Le café est trop « acide ». La mouture n’est pas assez ine ou bien le café moulu n’est pas assez in. Régler une mouture plus ine ou acheter du café moulu plus in. Qualité de café non adaptée. Utiliser un café torréié plus foncé. La mouture est trop ine ou le café moulu est trop in. Régler une mouture moins ine ou acheter du café moulu moins in. Qualité du café ne convient pas. Changer de qualité de café.
38 fr Eliminer soi-même les problèmes simples Problème Cause Remède Qualité de la mousse de café ou de lait variable. La machine est entartrée. Détartrer la machine en utilisant deux pastilles de détartrage et en respectant les instructions. Présence d’eau sur le fond interne de la machine une fois que l’on a retiré le bac collecteur (8). Bac collecteur (8) retiré trop Retirer le bac collecteur tôt. (8) en attendant quelques secondes après la dernière boisson préparée.
nl 39 Inhoudsopgave De verpakking bevat .................................40 De onderdelen ..........................................40 Bedieningselementen ...............................41 − Netschakelaar O / I ................................41 − Toets ...............................................41 − Toets off / j .......................................41 − Toets h / g .........................................41 − Toets start .............................................41 − Draaiknop “kofiesterkte” .
40 Om gevaren te vermijden, mogen reparaties aan het apparaat – bijvoorbeeld het vervangen van een beschadigd aansluitsnoer – uitsluitend worden uitgevoerd door onze klantenservice. Het apparaat en het aansluitsnoer niet onderdompelen in water. Niet in het maalwerk grijpen. Gebruik het apparaat uitsluitend in vorstvrije ruimten. ¡ Risico op brandwonden! De uitloop (6a) van de melkschuimer wordt zeer heet. Na gebruik eerst laten afkoelen en pas daarna aanraken.
nl 41 Bedieningselementen Netschakelaar O / I Met de netschakelaar O / I (9) wordt het apparaat ingeschakeld of volledig uitgeschakeld (onderbreking van de stroomtoevoer). Belangrijk: Voer voordat u het apparaat uitschakelt het reinigingsprogramma uit of gebruik de knop off / j (13) om het apparaat uit te zetten. e d Toets Druk op de toets (11) als u twee kopjes van de gekozen drank tegelijk wilt zetten. Deze toets kan worden geactiveerd voor dranken zonder melk en zonder de functie AromaDouble Shot.
42 nl Keuzeschakelaar voor warme melk/melkschuim Als u melkschuim wilt hebben – bijvoorbeeld voor een latte macchiato of cappuccino – draait u het symbool naar voren. Als u warme melk wilt hebben, draait u het symbool naar voren. Voor heet water zet u de draaiknop in de horizontale stand. j i AromaDouble Shot Hoe langer het bereiden van de kofie duurt, des te meer bittere stoffen en ongewenste aroma‘s vrijkomen. Dit heeft een negatieve invloed op de smaak en maakt de kofie minder goed verteerbaar.
nl Het apparaat in gebruik nemen 1. Plaats de espressoautomaat op een vlakke, waterbestendige ondergrond met voldoende draagvermogen. Zorg dat de ventilatieopeningen van het apparaat niet geblokkeerd worden. 2. Trek het netsnoer uit het snoervak (22) en steek de stekker in. De gepaste lengte kan worden ingesteld door het snoer naar boven terug te schuiven of naar beneden uit te trekken. Zet het apparaat daarvoor met de achterzijde aan bijv.
44 nl Waterilter Een waterilter kan kalkafzetting helpen voorkomen. Alvorens een nieuw waterilter kan worden gebruikt, moet dit gespoeld worden. Hiervoor gaat u als volgt te werk: 1. Duw het waterilter (20) met behulp van de maatlepel (19) stevig in het waterreservoir. 2. Het waterreservoir (17) tot aan de markering max met water vullen. 3. Houd de toets off / j (13) minstens drie seconden lang ingedrukt. Het menu wordt geopend. 4.
nl 45 Menu-instellingen In de menu-instellingen kunt u het apparaat individueel aanpassen. 1. Houd de toets off / j (13) minstens 3 seconden ingedrukt. 2. Druk herhaaldelijk op de toets off / j (13), tot het gewenste menupunt op het display verschijnt. 3. Selecteer met de bovenste draaiknop (15) de gewenste instelling. 4. Bevestig met een druk op de toets start (10). Om het menu zonder wijzigingen te verlaten, dient u de keuzeschakelaar op Terug te zetten en vervolgens op de toets start (10) te drukken.
46 nl Maalgraad instellen Met de draaiknop (3) voor de maalgraadinstelling kan de gewenste ijnheid van de gemalen kofie worden ingesteld. Let op! Stel de maalgraad alleen bij draaiend maalwerk in! Anders kan het apparaat worden beschadigd. Niet in het maalwerk grijpen. Stel, terwijl het maalwerk draait, de draaiknop (3) in van ijn gemalen kofie (a: tegen de klok in draaien) tot grof gemalen kofie (b: met de klok mee draaien).
nl 47 3. Selecteer met behulp van de onderste draaiknop (14) de gewenste kofiesterkte. De geselecteerde sterkte verschijnt op het display. Als u twee kopjes tegelijk wilt zetten, drukt u op de toets (11) (alleen voor dranken zonder melk en zonder de functie AromaDouble Shot). 4. Druk op de toets start (10). De kofie wordt bereid en loopt vervolgens in de kop(pen). d Opmerking: Bij sommige instellingen wordt de kofie in twee fasen bereid (zie “AromaDouble Shot” op pagina 42).
48 nl 3. Houd de toets h / g (12) ongeveer 3 seconden ingedrukt. Het apparaat warmt op. Er stroomt ongeveer 40 seconden lang heet water uit de uitloop van de melkschuimer (6). 4. Druk opnieuw op de toets h / g (12) om het proces af te breken. Melkschuim en warme melk bereiden ¡ Risico op brandwonden! De melkschuimer (6) wordt zeer heet. Houd de melkschuimer (6) uitsluitend aan het plastic gedeelte vast.
nl 49 De volgende onderdelen mogen niet in de vaatwasser: deksel van het opbergvak (5c), scherm lekschalen (8a), poederlade (4), zetgroep (5a). De volgende onderdelen zijn vaatwasbestendig: lekschaal voor kofie-uitloop (8c), kofiedikreservoir (8b), lekplaat kofieuitloop (8d), aromadeksel (2) en maatlepel (19). Wrijf de binnenzijde van het apparaat schoon (ladehouders en poederlade).
50 nl ¡ Risico op brandwonden! Gebruik dit apparaat alleen wanneer de melkschuimer (6) volledig is gemonteerd en geïnstalleerd. Zetgroep reinigen Reinig de zetgroep regelmatig. De zetgroep automatisch voorreinigen: 1. Selecteer met de draaiknop (15). 2. Plaats een leeg glas onder de uitloop (6a). 3. Druk op de toets start (10). Het apparaat spoelt.
nl 51 Tips om energie te besparen De espressoautomaat wordt na een uur automatisch uitgeschakeld (farieksinstelling). De standaardtijd van een uur kan worden verkort (zie Uitzetten op pagina 45). Zet het volautomatische espressoapparaat uit als u het niet gebruikt. Druk hiervoor op de knop off / j (13). Het apparaat wordt gespoeld en uitgeschakeld. Onderbreek de kofie- of melkschuimbereiding indien mogelijk niet.
52 nl Ontkalken Houder plaatsen start indrukken Duur: circa 25 minuten. Belangrijk: Als een waterilter in het waterreservoir (17) geplaatst is, dient dit vóór de start van het ontkalkingsproces in elk geval te worden verwijderd. Als op het display de melding Ontkalken nodig! verschijnt, dient u de toets off / j (13) gedurende 3 seconden ingedrukt te houden en vervolgens op toets start (10) te drukken. Het ontkalkingsprogramma wordt gestart.
nl 53 Lekbak legen Lekbak plaatsen Lade openen Om Calc‘n‘Clean tussendoor uit te voeren, houdt u de toets off / j (13) gedurende minstens 3 seconden ingedrukt. Druk vervolgens tweemaal kort op de toets off / j (13). Draai de bovenste draaiknop (15), tot Calc‘n‘Clean starten op het display verschijnt. Om Calc’n’Clean te starten, drukt u op de toets start (10). Het display leidt u door het programma.
54 Calc‘n‘Clean bezig Het ontkalkingsprogramma loopt nu gedurende ca. 22 minuten. Vul/reinig watertank start indrukken Spoel het waterreservoir (17) en vul het tot de markering max met vers water. Druk op de toets start (10). Calc‘n‘Clean bezig Het ontkalkingsprogramma loopt nu gedurende ca. 10 minuten en spoelt het apparaat. Lekbak legen Lekbak plaatsen Lekschaal (8) leeggieten en weer terugplaatsen. Plaats het ilter terug (als u een ilter gebruikt).
nl 55 Eenvoudige problemen zelf oplossen Probleem Oorzaak Oplossing Op het display verschijnt De bonen vallen niet in het Bonen bijvullen!, maalwerk (bonen zijn te hoewel het bonenreservoir olieachtig). (1) gevuld is, of het maalwerk maalt geen koffiebonen. Klop zachtjes tegen het bonenreservoir (1). Gebruik eventueel een andere koffiesoort. Maak het bonenreservoir (1) leeg en veeg het uit met een droge doek. Er kan geen warm water worden genomen.
56 nl Eenvoudige problemen zelf oplossen Probleem Oorzaak Oplossing De koffie is te “zuur”. De maalgraad is te grof ingesteld of de gemalen koffie is te grof. Stel de maalgraad fijner in of gebruik fijner gemalen koffie. Ongeschikte koffiesoort. Gebruik een donkerder gebrande soort. De maalgraad is te fijn ingesteld of de gemalen koffie is te grof. Stel de maalgraad grover in of gebruik grover gemalen koffie. Ongeschikte koffiesoort. Gebruik een andere koffiesoort.
nl 57 Eenvoudige problemen zelf oplossen Probleem Oorzaak Oplossing Lekwater op binnenzijde apparaatbodem bij verwijderde lekschaal (8). Lekschaal (8) te vroeg verwijderd. Lekschaal (8) pas enkele seconden na de laatste drankbereiding wegnemen. Op het display verschijnt De zetgroep (5) ontbreekt of Schakel het apparaat uit met is niet herkend. de zetgroep (5) op zijn plaats, wacht drie seconden en schakel het apparaat in. Zetgroep plaatsen.
58 pl Spis tre ci Zawarto ć zestawu ...................................59 W skrócie ..................................................59 Elementy obsługi ......................................60 − Wył cznik sieciowy O / I .........................60 − Przycisk ...........................................60 − Przycisk off / j...................................60 − Przycisk h / g ....................................60 − Przycisk start ........................................
pl Trzymać dzieci z dala od urz dzenia. Uwa ać, eby dzieci nie bawiły si urz dzeniem. W przypadku usterki natychmiast odł czyć urz dzenie od sieci. Ze wzgl du na bezpiecze stwo do wszelkich napraw urz dzenia, takich jak wymiana uszkodzonego kabla sieciowego, uprawniony jest jedynie personel serwisowy producenta. Nigdy nie zanurzać urz dzenia ani kabla sieciowego w wodzie. Nie wkładać palców do młynka do kawy. Urz dzenie nale y u ywać wył cznie w pomieszczeniach, w których wyst puje dodatnia temperatura.
60 pl Elementy obsługi Wył cznik sieciowy O / I Wył cznik zasilania O / I (9) słu y do wł czania urz dzenia lub całkowitego jego wył czania (odci cie zasilania). Wa ne: Przed wył czeniem uruchom program czyszczenia lub wył cz urz dzenie, naciskaj c przycisk off / j (13). e d Przycisk Naci nij przycisk (11), aby przygotować dwa kubki wybranego napoju jednocze nie. Ten przycisk mo na wł czać dla napojów bez mleka i bez funkcji AromaDouble Shot.
pl 61 Obrotowy przeł cznik wyboru podgrzanego mleka/pianki mlecznej W celu dodania pianki mlecznej np. do kawy latte macchiato lub cappuccino, obróć rozdzielacz, aby symbol był widoczny z przodu. W celu pobrania ciepłego mleka obróć rozdzielacz, aby symbol był widoczny z przodu. Aby pobrać ciepł wod , obróć rozdzielacz do poło enia poziomego.
62 pl Wył czanie urz dzenia Je li urz dzenie nie b dzie u ywane przez godzin , automatycznie rozpocznie si przepłukiwanie. Nast pnie urz dzenie wył czy si (czas mo na regulować, patrz sekcja Wyłączenie na stronie 63). 4. Otworzyć pokryw pojemnika na wod (18). 5. Wyj ć pojemnik na wod (17), wypłukać go i napełnić wie zimn wod . Przestrzegać oznaczenia max. 6. Wło yć równo pojemnik na wod (17) i docisn ć go w dół. 7. Zamkn ć pokryw pojemnika na wod (18). 8. Napełnić pojemnik na kaw ziarnist (1).
pl 63 e 3. Naci nij i przytrzymaj przycisk off / j (13) przez co najmniej 3 sekundy — zostanie wy wietlone menu. 4. Naciskaj przycisk off / j (13), a zostanie wy wietlona opcja Brak filtra/ Stary filtr. 5. Za pomoc górnego pokr tła obrotowego (15) wybierz pozycj Aktywacja filtra. 6. Nacisn ć przycisk start (10). 7. Umie ć pojemnik zbiorczy o pojemno ci 0,5 litra pod wylotem (6a). 8. Nacisn ć przycisk start (10). 9. Woda przepływa przez iltr, płucz c go. 10. Nast pnie opró nić naczynie.
64 Filtr: Tu mo na wybrać ustawienia dotycz ce u ywania iltra wody. Je li iltr wody nie jest u ywany, wybierz ustawienie Brak filtra/Stary filtr. Je li jest u ywany, wybierz ustawienie Aktywacja filtra. Nowe iltry wody nale y przepłukać przed u yciem (patrz sekcja „Filtr wody” na stronie 62). Uruchom Calc‘n‘Clean: W tym miejscu mo na r cznie wybrać program serwisowy (Calc‘n‘Clean / odkamien. / czyszczenie).
pl 65 Parzenie z kawy ziarnistej Automatyczny ekspres do kawy miele wie kaw do ka dego. Urz dzenie musi być gotowe do u ycia. Aby przygotować napój kawowy z mlekiem, włó najpierw rurk doprowadzaj c mleko do zbiornika mleka i obróć rozdzielacz (6b) do pozycji „Pianka mleczna” . j Wa ne: Poniewa zaschni te resztki mleka s trudne do usuni cia, spieniacz do mleka (6) trzeba koniecznie oczy cić letni wod natychmiast po u yciu i przepłukać, u ywaj c programu systemowego Płukanie ukł. mleczn.
66 Przygotowanie 1. Otworzyć szuladk na kaw mielon (4). 2. Wsypać maksymalnie 2 płaskie miarki kawy mielonej. Uwaga: Nie sypać do tej szuladki całych ziaren kawy ani kawy rozpuszczalnej. 3. Zamkn ć szuladk (4). 4. Obracaj c górne pokr tło obrotowe (15) wybierz wymagany napój (parzona jest tylko jedna ili anka). 5. Nacisn ć przycisk start (10). Kawa jest parzona i nalewana do ili anki. Wskazówka: W celu zaparzenia nast pnej ili anki kawy powtórzyć czynno ci.
pl Wskazówka: Aby uzyskać optymaln piank mleczn , zaleca si zastosowanie zimnego mleka o zawarto ci tłuszczu minimum 1,5%. Wa ne: Poniewa zaschni te resztki mleka s trudne do usuni cia, spieniacz do mleka (6) trzeba koniecznie oczy cić letni wod natychmiast po u yciu i przepłukać, u ywaj c programu systemowego Płukanie ukł. mleczn. (patrz strona 67).
68 pl 4. Umie ć ko cówk rurki doprowadzaj cej mleko (6c) w naczyniu. 5. Naci nij przycisk start (10). Urz dzenie automatycznie wlewa wod do naczynia, a nast pnie zasysa j z powrotem w celu wypłukania systemu podawania mleka. Po ok. 1 minut proces płukania zako czy si automatycznie. 6. Wylej wod z naczynia i wymyj rurk doprowadzaj c mleko (6c). Czy cić regularnie tak e cz ci maj ce kontakt z mlekiem (w zmywarce lub r cznie). Rozkładanie spieniacza mleka do czyszczenia: 1.
pl 69 Porady dotycz ce oszcz dzania energii Wa ne: Do czyszczenia nie wolno u ywać adnych detergentów, rodków czyszcz cych ani zmywarki. 6. Wytrzeć dokładnie wn trze urz dzenia za pomoc wilgotnej szmatki i usun ć resztki kawy. 7. Jednostk zaparzania (5a) i wewn trzn cz ć urz dzenia nale y wysuszyć. 8. Wło yć jednostk zaparzania (5a) do oporu. 9. Przesun ć czerwon blokad (5e) w prawo do ko ca i zamkn ć drzwiczki (5b).
70 pl Uwaga Przy ka dym programie serwisowym stosować odkamieniacz oraz rodek czyszcz cy zgodnie z instrukcj . Nale y przestrzegać instrukcji bezpiecze stwa umieszczonych na opakowaniu rodka czyszcz cego.
pl Wstaw pojemnik Naciśnij start Umie ć pojemnik o pojemno ci przynajmniej 0,5 litra pod wylotem (6a). Nacisn ć przycisk start (10). 71 Czyszczenie Czas trwania: ok. 10 minuty Program odkamieniania trwa teraz jeszcze 3 minuty, w jego trakcie urz dzenie zostanie przepłukane. Je li na wy wietlaczu zostanie wy wietlony komunikat Konieczne czyszczenie, naci nij przycisk off / j (13) przez 3 sekundy, a nast pnie naci nij przycisk start (10). Zostanie uruchomiony program czyszczenia.
72 pl Calc‘n‘Clean Czas trwania: ok. 35 minuty Calc‘n‘Clean ł czy funkcj odkamieniania i czyszczenia. Je eli termin obu programów wypada blisko siebie, ekspres automatycznie proponuje ten program serwisowy. Wa ne: Je li w pojemniku na wod (17) znajduje si iltr wody, nale y go koniecznie usun ć przed uruchomieniem programu serwisowego. Je li na wy wietlaczu zostanie wy wietlony komunikat Konieczne Calc‘n‘Clean, naci nij przycisk off / j (13) przez 3 sekundy, a nast pnie naci nij przycisk start (10).
pl 73 Ochrona przed zamarzaniem bolem przekre lonego kontenera na odpady. ¡ Aby unikn ć uszkodze spowodowanych zamarzaniem podczas transportu i przechowywania urz dzenia, nale y całkowicie opró nić urz dzenie. Informacja: Urz dzenie musi być gotowe do pracy, a pojemnik na wod (17) napełniony. 1. Umie ć du y pojemnik pod wylotem (6a). 2. Naci nij przycisk h / g (12) i pozwól, aby urz dzenie wytwarzało par przez 15 sekund. 3. Wył czyć urz dzenie wył cznikiem sieciowym O / I (9). 4.
74 pl Samodzielne usuwanie drobnych usterek Problem Przyczyna Post powanie Wy wietlacz wskazuje Ziarna nie wpadaj do młyn- Postukać lekko w pojemnik ka (zbyt oleiste ziarna). na kaw ziarnist (1). mimo pełnego pojemnika (1) Ewentualnie u yć innego lub młynek nie miele kawy. gatunku kawy. Po opró nieniu pojemnika na kaw ziarnist (1) wytrzeć go such szmatk . Uzupełnij kawę ziarn.! Brak gor cej wody.
pl 75 Samodzielne usuwanie drobnych usterek Problem Przyczyna Post powanie Kawa jest za „kwa na”. Zbyt gruby stopie zmielenia lub zbyt grubo mielona kawa. Ustawić drobniejszy stopie zmielenia lub u yć drobniej zmielonej kawy. Nieodpowiedni gatunek kawy. U yć ciemniej pra onej kawy. Zbyt drobny stopie zmielenia lub zbyt drobno mielona kawa. Ustawić grubszy stopie zmielenia lub u yć grubiej zmielonej kawy. Nieodpowiedni gatunek kawy. U yć kawy innego gatunku. W urz dzeniu wyst pił bł d.
76 pl Samodzielne usuwanie drobnych usterek Problem Przyczyna Wewn trz urz dzenia, na dnie, znajduj si skropliny (przy wyj tym pojemniku na skropliny). Pojemnik na skropliny (8) Wyjmować pojemnik na został wyj ty zbyt wcze nie. skropliny (8) dopiero kilka sekund po ostatnim pobraniu napoju. Komunikat na wy wietlaczu Brak jednostki zaparzania (5) lub nie została ona rozpoznana. Wył cz urz dzenie z zamontowan jednostk zaparzania (5), odczekaj trzy sekundy, a nast pnie wł cz je ponownie.
cz 77 Obsah Součást dodávky ......................................78 P ehled .....................................................78 Ovládací prvky ..........................................79 − Hlavní vypínač O / I ................................79 − Tlačítko ...........................................79 − Tlačítko off / j ...................................79 − Tlačítko h / g .....................................79 − Tlačítko start .........................................
78 jejich bezpečnost, nebo takovou osobou byly poučeny. D ti držte mimo dosah spotebiče. Dbejte, aby si d ti se spot ebičem nehrály. V p ípad poruchy spot ebič ihned odpojte od elektrické sít . Opravy spot ebiče, nap . vým nu poškozeného p ívodního vedení, smí provád t pouze náš servisní pracovník, aby nedošlo k ohrožení zdraví a poškození majetku. Spot ebič ani sí ový kabel nikdy neponoujte do vody. Nesahejte do mlýnku. Spot ebič používejte výhradn v místnostech vytáp ných nad bod mrazu.
cz 79 Ovládací prvky Otočný knolík „síla kávy“ Hlavní vypínač O / I Hlavní vypínač O / I (9) se používá k zapnutí spot ebiče nebo k jeho úplnému vypnutí (odpojení napájení). D ležité: P ed vypnutím spus te čisticí program nebo p ístroj vypn te tlačítkem off / j (13). e d Tlačítko Stisknete-li tlačítko (11), p ipravíte dva šálky vybraného nápoje současn . Tlačítko lze použít pouze v p ípad nápoj p ipravovaných bez mléka a bez funkce AromaDouble Shot. Otočný knolík (14) slouží k nastavení síly kávy.
80 cz Otočný volič teplé mléko/mléčná p na Chcete-li p ipravovat mléčnou p nu (nap íklad pro latte macchiato nebo cappuccino), nastavte dop edu symbol . Chcete-li p ipravovat teplé mléko, nastavte dop edu symbol . Chcete-li p ipravovat horkou vodu, nastavte otočný volič do vodorovné polohy. j i Zprávy na displeji Na displeji (16) se zobrazuje nejen aktuální provozní stav, ale také r zné zprávy informující o stavu spot ebiče nebo upozor ující na nutnost provést n jakou akci.
cz 81 5. Vyjm te nádržku na vodu (17), vypláchn te ji a napl te čerstvou studenou vodou. Nenapoušt jte vodu nad rysku max. 6. Vra te nádržku na vodu (17) na místo a pevn na ni shora zatlačte. 7. Zav ete víko nádržky na vodu (18). 8. Napl te zásobník (1) zrnkovou kávou. (Pokyny pro p ípravu nápoj z mleté kávy naleznete v části „P íprava nápoj z mleté kávy“ na stránce 84.) 9. Stiskn te vypínač O / I (9). Na displeji (16) se zobrazí nabídka pro nastavení jazyka displeje. 10.
82 Poznámka: Současn s propláchnutím iltru se aktivuje nastavení zprávy Vyměnit filtr na displeji. Po zobrazení zprávy Vyměnit filtr nebo nejpozd ji po uplynutí dvou m síc již iltr nemá pot ebnou účinnost. Je t eba vym nit jej z hygienických d vod a také proto, aby nedošlo k zanesení vodním kamenem (a následnému poškození spot ebiče). Náhradní iltry lze získat u prodejc (TCZ7003) nebo v zákaznickém servisu (467873). Není-li použit nový iltr, nastavte položku Filtr na hodnotu starý nebo chybí.
cz 83 Teplota: Tato položka umož uje nastavit teplotu p i spa ování (Vysoká / Střední / Nízká). Jazyk : Zde m žete nastavit jazyk displeje. Tvrdost vody: Tento spot ebič umož uje upravit nastavenou tvrdost vody. Správné nastavení tvrdosti vody je d ležité, aby spot ebič správn informoval o tom, kdy je t eba spustit odváp ovací program. Z továrny je tvrdost vody nastavena na stupe 4. Skutečnou tvrdost vody m žete zjistit pomocí p iloženého testovacího proužku nebo dotazem u místního dodavatele vody.
84 cz P íprava nápoj z kávových zrn Tento automat na espresso p ipravuje každý nápoj z čerstv mletých zrn. Spot ebič musí být p ipraven k použití. Chcete-li p ipravit kávový nápoj s mlékem, nejprve vložte hadičku na mléko do nádoby s mlékem a nastavte otočný volič (6b) do polohy „mléčná p na“ .
cz P íprava nápoj 1. Otev ete p ihrádku (4). 2. Nasypte do ní nejvíce 2 zarovnané odm rné lžičky mleté kávy. Varování: Nepoužívejte celá zrna ani instantní kávu. 3. Zav ete p ihrádku (4). 4. Otočným voličem (15) vyberte požadovaný nápoj (lze zvolit jen jeden šálek). 5. Stiskn te tlačítko start (10). P ístroj uva í kávu a naplní šálek. Upozorn ní: Chcete-li p ipravit další šálek kávy, zopakujte celý postup.
86 D ležité: Zaschlá mléčná usazenina se t žko odstra uje, proto je nutné omýt šlehač mléka (6) ihned po použití vlažnou vodou a vypláchnout jej pomocí programu Vyčistit mléčný syst (informace naleznete na stran 86). Údržba a každodenní čišt ní ¡ Nebezpečí úrazu elektrickým proudem! P ed čišt ním spot ebič vždy odpojte od elektrické sít . Nikdy jej nepono ujte do vody. Nepoužívejte parní čističe. Ot ete spot ebič zvenčí m kkým vlhkým had íkem. Nepoužívejte hrubé ut rky ani abrasivní čisticí prost edky.
cz 6. Vyprázdn te nádobu a vyčist te hadičku na mléko (6c). V pravidelných intervalech navíc mléčný systém d kladn umývejte (ručn nebo v myčce). Demontáž mléčného systému p ed mytím: 1. Vysu te šlehač mléka (6) ze spot ebiče. 2. Rozmontujte šlehač mléka na jednotlivé díly (6a) až (6d) (viz obrázek C na začátku návodu k použití). 3. Jednotlivé součásti očist te m kkým kartáčkem namočeným ve vod s čisticím prost edkem. V p ípad pot eby je nechte odmočit v teplé vod s čisticím prost edkem.
88 cz Upozorn ní: Po d kladném vyčišt ní by t snicí části varné jednotky m ly být v rámci optimální péče pravideln mazány. Kolem všech t snicích částí naneste tenkou vrstvu speciálního maziva určeného pro tento účel (objednací číslo 311368). Programy údržby Rada: Informace najdete také ve stručném návodu k použití v p ihrádce (5c).
cz 89 D ležité: Je-li do nádržky na vodu (17) vložen iltr, musíte jej p ed spušt ním programu údržby vyjmout. Odstran ní vápenatých usazenin Trvání: p ibl. 25 minut D ležité: Je-li do nádržky na vodu (17) vložen iltr, musíte jej p ed spušt ním odváp ovacího programu vyjmout. Jestliže se na displeji objeví zpráva Je potřebné odvápnění!, stiskn te tlačítko off / j (13) na dobu 3 sekund a poté stiskn te tlačítko start (10). Spustí se odváp ovací program.
90 cz Čišt ní Calc‘n‘Clean Trvání: p ibl. 10 minut Trvání: p ibl. 35 minut Jestliže se na displeji objeví zpráva Je potřebné vyčištění!, stiskn te tlačítko off / j (13) na dobu 3 sekund a poté stiskn te tlačítko start (10). Spustí se čisticí program. Chcete-li spot ebič vyčistit d íve, než k tomu budete vyzváni, stiskn te tlačítko off / j (13) na dobu alespo 3 sekund. Potom stiskn te tlačítko off / j (13) ješt dvakrát krátce.
cz Upozorn ní: Je-li aktivován vodní iltr (20), displej vás ve stanovenou dobu vyzve k vým n iltru (20). Po vým n znovu stiskn te tlačítko start (10). Pokud jste tak dosud neučinili, vyjm te iltr. Stiskn te tlačítko start (10). Naplnit odvápňovač Stisknout start Do prázdné nádržky na vodu (17) napus te vlažnou vodu po rysku 0,5 l a rozpus te v ní dv odváp ovací tablety Bosch. Stiskn te tlačítko start (10). Umístit kontejner Stisknout start Pod výpus (6a) umíst te nádobu o objemu nejmén 1 l.
92 cz P íslušenství Záruční podmínky Následující p íslušenství je k dostání v obchod a v autorizovaném servisu: Pro tento p ístroj platí záruční podmínky, které byly vydány naší kompetentní pobočkou v zemi, ve která byl p ístroj zakoupen. Záruční podmínky si m žete kdykoliv vyžádat prost ednictvím svého odborného prodejce, u kterého jste zakoupili p ístroj, nebo p ímo v naší pobočce v p íslušné zemi.
cz 93 ešení jednoduchých problém Problém P íčina Náprava Na displeji se zobrazí text: Zrna nepadají do mlýnku (jsou p íliš olejnatá). Opatrn poklepejte na zásobník zrnkové kávy (1). Zkuste použít jiný druh kávy. Vyt ete prázdný zásobník na kávová zrna suchým had íkem. Doplnit kávová zrna! Zásobník je plný, spot ebič p esto zrna nemele. Nelze odebírat horkou vodu. Šlehač mléka (6) nebo jeho sací jednotka je ucpaná.
94 cz Problém P íčina Náprava Káva je p íliš „kyselá“. Je nastaveno p íliš hrubé mletí nebo je p edemletá káva p íliš hrubá. Nastavte mlecí jednotku na jemn jší mletí nebo používejte jemn jší p edemletou kávu. Nevhodný typ kávy. Používejte tmavší pražení. Je nastaven p íliš jemný stupe mletí nebo je mletá káva p íliš jemná. Nastavte hrubší stupe mletí nebo použijte hrubší mletou kávu. Nevhodný druh kávy. Zm Na displeji se zobrazí text: Došlo k závad spot ebiče.
cz 95 Problém P íčina Náprava Kvalita kávy nebo mléčné p ny se značn liší. V p ístroji se vytvá í vodní kámen. Odstra te z p ístroje vodní kámen pomocí dvou tablet pro odstran ní vodního kamene. Postupujte podle pokyn . Po vyjmutí odkapávací misky (8) nakapala na vnit ní základnu p ístroje voda. Odkapávací miska (8) byla vyjmuta p íliš brzy. Po vydání posledního nápoje počkejte n kolik sekund, než vyjmete odkapávací misku (8). Zpráva na displeji Varná jednotka (5) chybí nebo nebyla rozpoznána.
96 − − − − − − − − ru .......................... 112 ................................... 112 ............................................ 112 .. 112 ..................................97 .......................................................98 ............................98 O / I ..................98 ............................................98 off / j ....................................98 h / g ......................................98 start ..........................................98 « » ..........
ru 97 ! ¡ , . . - . 5 - , , . . TES506 ) , , 1 2 3 4 . ( . , . ( , . ) , 6 7 8 ( ) - . - . . . ¡ ! . . (6a) , - - - (6). ¡ ! . TES506.. 06/2011 TES506_1RW.indb 97 16.06.
98 ru A, B, C, D 1 2 3 4 5 6 8 ( O/I O / I (9) / ) ( . E) ( a) b) c) ). ! d . C) ( « d (11) » , , AromaDouble Shot. e off / j ( . D) start e off / j (13) . e off / j (13) h/g O/I . h/g « « ( - » » . start , - . h / g (12), d e off / j - - . »/« a) b) c) - - . d) e) c) d) e) - e off / j (13), d) 9 10 11 12 13 14 15 16 17 18 19 E , a) b) 7 20 21 22 start (10) - - . start (10) ) . Robert Bosch Hausgeräte GmbH TES506_1RW.indb 98 16.06.
ru 99 « » ! (14) . h g . «AromaDouble Shot» . 99. « - . - . c m n e . « »/« » , , , , , . j i. - . » (15) a неверная комбинация. - очень слабый слабый нормальный крепкий DoubleShot крепкий + DoubleShot крепкий ++ , , - . - (16) , - . : малый эспрессо эспрессо малый со сливками cо сливками большая со сливками , . AromaDouble Shot , : малый капучино большой капучино малый макиато mакиато большой макиато промыть машину промыть молоч. сист. - . .
100 ru . AromaDouble Shot 2. : (22), . , , . , , 3. - . - . (6). , , - , . , , 4. « 103). 7. ( 5. 6. - 4, воды - (18). (17), , . . , 4. – . . . . жесткость » . 1. 8. - max .). (17) , . , (18). - (1). ( « 9. . ( - » . 104.) (16) O / I (9). . - . Robert Bosch Hausgeräte GmbH TES506_1RW.indb 100 16.06.
ru 101 10. 11. : English Français Svenska Polski Türkçe Norsk Português ελληνικα русский (6a). 12. - (15). , Nederlands Italiano Español Magyar Dansk Suomi Čeština български start (10). . . - . 1. ( . 102). . — « - , - 5. . фильтра нет или старый. (15) включить фильтр. start (10). 6. 7. (6a). start (10). . 10. - 0,5 , . . : , , . . . e off / j (13), 8. 9. , e off / j (13). e off / j (13) : (19). (17) max. 4. . » : : (20) 2. 3. выкл. через - .
102 ru - ( ). - (TCZ7003) (467873). , фильтра нет или старый. . e off / j (13) 1. 3 2. e off / j (13) , . 3. 4. start (10). start (10). - : выкл. через: . ). ( , - . 4 15 , , . ,—1 - , , - . фильтр: . , фильтра , нет или старый. : , ), ( . . - - (15). , выход : - . - , - включить фильтр. ( . . 101). » « запуск Calc‘n‘Clean: (Calc‘n‘Clean / оч. от накипи / очистки). start (10) « » ( . . 109). Robert Bosch Hausgeräte GmbH TES506_1RW.indb 102 16.06.
ru 103 температ.: (высокая / средняя / низкая) - . язык : (a: . жесткость воды: . ). a . 4. , . (°dH) 1-7 8-14 15-21 22-30 - . : - - (°fH) 1-13 14-25 26-38 39-54 - . , . . « » : . ! . , – . - . ) b - : (3) - : , счетчик напитков: (b: . 1 2 3 4 - (3) - - , (6b) - , , сист. ( j. . - (6) . 107). промыть молоч. TES506.. 06/2011 TES506_1RW.indb 103 16.06.
104 ru : . , . (17) . - (17) . - - ( , (7) . 2. - , : . , (14). . . - сист. ( AromaDouble Shot). start (10). ). : «AromaDouble Shot» - . (6) . 107). промыть молоч. (17) . - , . - - (4). : 3. - , (17) 1. , (6b) . : 2. ( . . 99). . j. - AromaDouble Shot , , d (11) ( ( » : , (15). 3. « - . ). , ) - 1. ( : . . : 4. start (10) , (4). ( « »). . - - Robert Bosch Hausgeräte GmbH TES506_1RW.indb 104 16.06.
ru 105 4. , (15) ( ). start (10). 5. - - . : (6) . 90 , ! ¡ . . (6). . : - - , - . ! ¡ (6) . 2. (6). . . « 3 4. 40 . j (6) . ! (6) - h / g (12) - . ¡ . (6b) h / g (12). h / g (12) , 20 h / g (12) i. » (6b) 4. 3. » - (6c) . « - (6) 2. (6a). 3. . 1. . 1. . (6a) . - . - . TES506.. 06/2011 TES506_1RW.indb 105 16.06.
106 5. ru h/g , (12). : - 1,5%. : - , , сист. ( . : (6) . 107). (5c), (8 ), (4), промыть молоч. (5a). - : (8 ), ! ¡ . . . . . - (8d). - (8b) (8 ) (8b) (8 ) : - - - . : , . ( ), - , , . - - (8 ) . . (4) - ). : . - ( - , (8d), (2) (19). . . , (8b), - , O / I (9), - , - - . Robert Bosch Hausgeräte GmbH TES506_1RW.indb 106 16.06.
ru 107 - , - промыть молоч. сист.! ! (6b) , - - . 1. 2. 3. 4. 5. (15), f. : . 5. . - (6a) . . (6 ) - . start (10). . 1 6. . ). ( ¡ ! - (6). . : (6) 2. (6a)–(6d) ( - (6 ). , 1. 4. .C . 3. . . . - 1. 2. ). 3. e. : (15), (6a). start (10). - . (5a) - - TES506.. 06/2011 TES506_1RW.indb 107 16.06.
108 ( ru .E ). . 1. O / I (9). 2. . 3. 4. . (5b) (5e) (5d), 5. - . (5a) - . : - . . 6. . 7. 8. . 9. (5e) : 311368). ). ( . выкл. , ( , через - . 102). , . (5a) . (5a) - - e off / j (13). . . (5b). , - . ( . - . , . . Robert Bosch Hausgeräte GmbH TES506_1RW.indb 108 16.06.
ru 109 : . (5c). , - : 310575 TCZ6002 310967 : требуется удал. накипь! требуется очистка! требуется Calc‘n‘Clean! , (17) - - . «Calc‘n‘Clean» - . : . 25 : , (17) - - . - требуется удал. накипь!, e off / j (13) . 3 start (10). , . ! , ! 3 , e off / j (13). (15) - . - - , start (10), . - . - запуск оч. от накипи. (4)! . , e off / j (13) ! - - . . Calc‘n‘Clean ( . 111). TCZ6001 . - очистите поддон вставьте поддон (8). TES506.. 06/2011 TES506_1RW.
110 ru : (20), (20) start (10). . start (10). , : . 10 3 start (10). . засыпьте антинакип. нажмите start (17) 2 . 0,5l Bosch start (10). start (10). . . . идет очистка (17) max. . откройте отсек - - (4). - засыпьте очиститель Bosch очистите поддон вставьте поддон (8). - (8). идет удал. накипи , , запуск очистки. очистите поддон вставьте поддон - очис./запол. емк. д/воды нажмите start - start (10), . (6a). . - . e off / j (13). идет удал. накипи 20 3 (15) start (10).
ru 111 Calc‘n‘Clean Calc‘n‘Clean : засыпьте очиститель . 35 Bosch - . , : (20), - . : (17) , . 3 start (10). . off / j (13) (15) e Calc‘n‘Clean. . - запуск start (10). Calc‘n‘Clean 1 , . - (4). - - start (10). start (10). (6a). идет Calc‘n‘Clean 22 - . очис./запол. емк. д/воды нажмите start (17) max. идет Calc‘n‘Clean (8). откройте отсек 0,5l Bosch start (10). очистите поддон вставьте поддон идет Calc‘n‘Clean .
112 ru A ¡ , . : , 1. 2. 3. - (6a). h / g (12) , . 15 . . - O / I (9). 4. 2002/96/ (waste electrical and electronic equipment – WEEE). (17) . . - (8). - , (17) . « », , . TCZ6001 ( ( ) ) 310575 TCZ6002 310967 TCZ7003 467873 TCZ7009 674992 – 311368 . - Robert Bosch Hausgeräte GmbH TES506_1RW.indb 112 16.06.
ru 113 досыпьте зерна!, (1) ( , - ). (1). . - (1) . . - ( ). . , (6) . (6), . « - ». - (6) . - - (6) (6), . « - ». . . . - (6) . - . . . - 1,5%. . . . . . . . - . . - - . - . . »! , « TES506.. 06/2011 TES506_1RW.indb 113 16.06.
114 « ru ». - , . . . « ». . - , . . . . ошибка обр. в техсл. (20) . « ». (20) - . (17). (20), . . - , 2 . очистите зав. механ. - (5). - (5). . »! - . (5). (5). ( 2 .) . . - ( « . 311368). ». . , « Robert Bosch Hausgeräte GmbH TES506_1RW.indb 114 16.06.
ru 115 - (8) . (8) . (8). (5) вставьте завар. блок - . - - (5), . , . («Reset»). O / I (9). e off / j (13) h (12) - O / I (9). start ( ) (10). . , »! ( ) 220-240 / 50-60 1600 , ( « / , - 15 1,7 ) 300 100 ( ( ) 385 x 280 x 479 ) 9,3 TES506.. 06/2011 TES506_1RW.indb 115 16.06.
Kundendienst-Zentren • Central-Service-Depots • Service Après-Vente • Servizio Assistenza • Centrale Servicestation • Asistencia técnica • Servicevaerkter • Apparatservice • Huolto DE Deutschland, Germany BSH Hausgeräte Service GmbH Zentralwerkstatt für kleine Hausgeräte Trautskirchener Straße 6 – 8 90431 Nürnberg Online Auftragsstatus, Pickup Service für Kaffeevollautomaten und viele weitere Infos unter: www.bosch-home.com Reparaturservice* (Mo-Fr: 8:00-18:00 erreichbar) Tel.
FI Suomi, Finland BSH Kodinkoneet Oy Itälahdenkatu 18 A, PL 123 00201 Helsinki Tel.: 0207 510 700 Fax: 0207 510 780 mailto:Bosch-Service-FI@ bshg.com www.bosch-home.fi Lankapuhelimesta 8,28 snt/puhelu + 7 snt/min (alv 23%) Matkapuhelimesta 8,28 snt/puhelu + 17 snt/min (alv 23%) FR France BSH Electroménager S.A.S.
MK Macedonia, GORENEC Jane Sandanski 69 lok. 3 1000 Skopje Tel.: 02 2454 600 Mobil: 070 697 463 mailto:gorenec@yahoo.com MT Malta Oxford House Ltd. Notabile Road Mriehel BKR 14 Tel.: 021 442 334 Fax: 021 488 656 www.oxfordhouse.com.mt MV Raajjeyge Jumhooriyyaa, Maledives Lintel Investments Ma. Maadheli, Majeedhee Magu Malé Tel.: 0331 0742 mailto:mohamed.zuhuree@ lintel.com.mv NL Nederlande, Netherlands BSH Huishoudapparaten B.V. Burg. Stramanweg 122 1101 EN Amsterdam Zuidoost Storingsmelding: Tel.
Garantiebedingungen DEUTSCHLAND (DE) Die nachstehenden Bedingungen, die Voraussetzungen und Umfang unserer Garantieleistung beschreiben, lassen die Gewährleistungsverpflichtungen des Verkäufers aus dem Kaufvertrag mit dem Endabnehmer unberührt. Für dieses Gerät leisten wir Garantie gemäß nachstehenden Bedingungen: Für Produktinformationen sowie Anwendungsund Bedienungsfragen aus Deutschland: Bosch-Infoteam (Mo-Fr: 8.00-18.00 Uhr erreichbar) Tel.: 01805 267242* oder unter bosch-infoteam@bshg.
Robert Bosch Hausgeräte GmbH Carl-Wery-Str. 34 81739 München Germany www.bosch-home.com 9000649328 – 06/11 TES506_1RW.indb 120 16.06.