en-us Use and Care Manual, Installation Instructions Washer WAT28400UC
Welcome to Your New Washer! Congratulations on your selection of a new Bosch washer for your laundry needs. We are confident you will enjoy the superior performance and reliability. Please do not hesitate to contact our Customer Service department if you have any questions or comments about your new washer. Thank you for choosing Bosch. Visit our web site at www.bosch-home.com/us for more information and to view a selection of our products.
Table of contents enu-sUseandCrMoaniuIstlc, Important information ................................................... 4 Purchase information ........................................................... 4 Customer service ................................................................. 4 Your washing machine is intended for ........................ 5 Importance and meaning of symbols .......................... 5 IMPORTANT SAFETY INSTRUCTIONS ........................ 6 Introduction to your new washer ......
Important information Purchase information Customer service Please take a moment to record the following basic information about your new Bosch washer. This information will be helpful in the event you need to contact Customer Service or would like to order accessories or replacement parts. Your washer does not require any special care other than the maintenance and care mentioned in this manual. If you have a problem with your washer, please consult ~ Troubleshooting; Page 30 This may save you money.
Your washing machine is intended for ▯ ▯ ▯ ▯ Only household use and in a non-commercial environment. Household use only washing machine-washable textiles. Washing with common cold and hot (maximum 140 °F/60 °C) tap water and commercially available detergents and cleaning products suitable for use in washing machines. We recommend HE (High Efficiency) detergents because they are designed to deliver optimum performance from your front-loading washer.
9 S N I Y T E F A S IMPORTANT SAFETY INSTRUCTIONS READ AND SAVE THESE INSTRUCTIONS T N A T R OD PA ME RI D N A WARNING When properly cared for, your new appliance has been designed to be safe and reliable. Read all instructions carefully before use. These precautions will reduce the risk of burns, electric shock, fire, and injury to persons. When using appliances, basic safety precautions must be followed, including those in the following pages.
9 S N I Y T E F A S IMPORTANT SAFETY INSTRUCTIONS READ AND SAVE THESE INSTRUCTIONS T N A T R OD PA ME RI D N A E V A S E S E H T WARNING WARNING WARNINGS FOR CHILDREN ▯ Do not allow children to play on or in the appliance. Close supervision of children is necessary when the appliance is used near children. ▯ Make sure to utilize all child lock/safety features of your appliance, and be sure to turn the appliance Off when not in use.
Environmentally friendly use of your washer ▯ Your new Bosch washing machine is designed to use water, energy and detergent in a highly efficient way to help reduce operating costs, conserve resources and protect the environment. ▯ Utilize the maximum amount of laundry for the appropriate program. ▯ Avoid using too much detergent. ▯ Wash normally soiled laundry without a prewash. ▯ ▯ Save energy and detergent when washing lightly and normally soiled laundry.
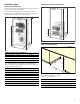
Installation types Stand alone (shown) or Side-by-Side Stacked washer and dryer A Bosch dryer of the same dimensions can be placed on top of the washer to save space. Use the special washer-dryer stacking kits (noted in Bosch Dryer User Manuals) which can be purchased from customer service or your local dealer. % ( + ( ) . ) & - $ ' * & $ Under counter (Preferred) ' Clearance requirements (Minimum) A Both Sides 0.6 in. 1.5 cm B Top 6.3 in. 16 cm C Rear* 2.5 in. 6.4 cm D Front 2.4 in. 6.
Under counter (Less Desirable) If front of the appliance is covered ventilation openings must be installed. E & F are minimum area sizes E F 63 sq.in. 63 sq.in. 404 sq.cm 404 sq.cm G & H actual spacing dimensions for min. open area sizes ( G H 3 in. 14 in. 7.6 cm 35.
Tools needed Parts provided with your washer The following tools may be helpful during installation of your washer. Back side of the washing mashine ▯ ▯ ▯ 13mm socket for removing the transport bolts. 17mm wrench for adjusting the appliance feet. Bubble level for leveling the appliance. Waste disposal Disposal of Packaging Materials After unpacking your new appliance dispose of the protective packaging materials in an environmentally friendly way.
Washer drum contents Two reinforced water supply hoses are shipped in the washer drum. Be sure to remove each of these items from the drum before using the washer. Installation checklist Review the following list and check off each step as it is completed during installation. è Installation Step + 3 H Hot water hose P Cold water hose NOTICE: If any parts are missing please notify your dealer immediately.
Remove the transport bolts 9 CAUTION DAMAGE TO THE APPLIANCE OR INJURY POSSIBLE ▯ The machine is secured for transport with transport bolts. Transport bolts that are not removed can damage the drum during operation of the machine, the washer will vibrate, and it will be much noisier during spin cycles if the transport bolts are not removed before use. Be sure to remove all 4 transport bolts completely before first use. Keep the transport bolts.
▯ ▯ ▯ ▯ Make sure rubber washers are in place at both ends of the water supply hose. Missing washers could cause leaks. The connection points are under full water pressure. Turn on the water tap and check for leaks. Periodically inspect the water supply hose and replace with a new hose if cuts, kinks or leaks are observed. Water drain hose connection NOTICES ▯ Do not reuse an old drain hose. Only use the drain hose and parts included with your washer. ▯ Do not kink or modify the water drain hose.
Wash Basin 9 WARNING SCALDING When washing at high temperatures, there is a risk of scalding if you touch hot suds, e.g. when pumping out hot suds into a wash basin. Do not reach into the hot suds. Note: APPLIANCE DAMAGE/DAMAGE TO TEXTILES If the end of the drain hose touches the discharge water (water drained from washer) it (the discharge water) can be sucked back into the appliance and may damage the appliance or textiles. Make sure that: ▯ There is no stopper in the sink drain.
Electrical connection 9 ▯ WARNING ELECTRICAL SHOCK HAZARD Improper connection of the equipment-grounding conductor may result in electric shock. Have the appliance checked by a qualified technician or licensed electrician if you are in doubt as to whether the washer has been properly grounded. ▯ ▯ ▯ 9 WARNING ELECTRICAL SHOCK HAZARD To reduce the risk of fire or electrical shock, DO NOT use an extension cord or an adapter to connect the washing machine to the power supply.
Transporting the washer Before transporting the washer 1. Disconnect the washer power cord from the wall outlet. 2. Turn off the water supply to the washer. 3. Disconnect water supply lines from the tap. 4. Disconnect the drain hose from the drain location. 5. Install the transport bolt assemblies as shown in the following images. Remove the transport bolt hole covers 1. Remove all four transport bolt hole covers. 2. Pull the tip of the arrow on the cover out slightly to disengage the locking tab. 3.
Getting to know your appliance Control panel +3; C 1 2 ³4 Ĉ ( Program Selector for selecting a cycle and on/off switch; turns in both directions. 0 Selectable temperature ranges Cold, Warm, Hot, Extra Hot 8 Temperature, Finish in, Spin Speed To change the default cycle settings. Indicator lamp lights up if the setting is active.
Operating Instructions 9 WARNING To reduce the risk of fire, electric shock, or injury to persons, read the Important Safety Instructions and Operating Instructions before operating this appliance. Before doing any laundry with your washing machine Check to make sure your washer has been installed properly by following the installation instructions in this manual. ~ Installation instructions; Page 10 Check the machine.
Recommended Load Size Recommended maximum load size can be found: ~ Standard features and helpful information; Page 7 B C Filling 9 D a 1/3 Load - woolens, delicates, silk b 1/2 Load - cotton, synthetic fabrics, or knitted textiles c Full Load - cotton and linen Tips After loading, close the door carefully so as not to trap any items between the door and the rubber seal. The door should close easily and should not be forced to close. Foreign objects left in the drum may damage laundry.
1. Open the detergent dispenser tray. 2. Add detergent or additive. 3. Avoid overfilling the compartment to prevent early dispensing. 4. Close the detergent dispenser tray completely before starting the wash cycle. Tip: DO NOT operate the washer without the detergent compartment in place and fully closed. Liquid detergent insert To measure liquid detergent: 1. Pull out the detergent dispenser tray. Press down on the insert and remove the drawer completely. 2.
Removing laundry/switching the appliance off 1. Open the front door of the washer and remove the laundry. 2. Turn the cycle selector to the Off position. Appliance is switched off. 3. Turn off the water tap. NOTICES ▯ Do not leave any laundry in the drum. It can shrink or be discolored by the next laundry. ▯ ▯ ▯ ▯ Remove any remaining items from the drum and rubber gasket. Leave the front door and detergent drawer open so that any remaining water can dry.
Laundry Preparing the laundry NOTICE: Damage to the appliance/fabrics Foreign objects (e.g. coins, paper-clips, needles, nails) may damage the laundry or components in the washing machine. Therefore, note the following tips when preparing your laundry: ▯ ▯ ▯ ▯ ▯ Empty all pockets to ensure no loose debris (coins, keys, other hard objects) are placed in the washer drum. Close any fasteners (such as zippers and hooks) that could cause laundry to catch or become entangled.
Removing stains ▯ Remove/pretreat stains as soon as possible after they have occurred. ▯ ▯ Dab with a soapy solution. Do not rub. Select an appropriate wash cycle and wash the item. Several washing cycles may be required in order to remove stubborn or dried-in stains. Laundry detergents and additives Adding the correct amount of HE detergent 9 ▯ WARNING ▯ To avoid risk of poisoning, keep detergents and cleaning products out of the reach of children. Avoid overuse of detergent.
Program selection table Programs Max.
Programs Max. Load up to: Selectable program settings, default settings (bold) Type of laundry Additional program settings; Information Temperature Spin speed Perm Press 1/2 Hot High Cotton, linen synthetic or load blended fabrics Light Soil Warm Med Cold Low Perm Press SpeedPerfect, Prewash, Extra Rinse +1, +2 No spin Heavy Soil Perm Press Tips Do not wash new multicolored laundry together with other laundry. The cycles are time-controlled for lightly soiled fabrics.
Additional Program Option settings Extra Rinse +1, +2 SpeedPerfect G This feature is helpful for locations with very soft water or to generally improve rinsing results. It allows up to 2 additional rinse cycles to be added to selected programs and will increase program time. For washing in a shorter time with a washing result comparable to that of the standard program. Note: Do not exceed the maximum load. ~ Program selection table; Page 25 Prewash PW For heavily soiled washing.
Cleaning the water inlet strainers Clean the strainers at the washer end of the hose If the washer water supply slows or stops completely, the water inlet strainer may be blocked. Cleaning is recommended every 6 months in any event to reduce chances of valve blockage in areas using hard water. Release the water under pressure in the supply hoses Normal water pressure in your home will cause some water to leak when you remove the water supply hose from the back of the washer.
1. If the washer has not been drained, try to drain it now. Turn the program selector to the Drain and touch the Start/Pause button. Wait a few moments to let the cycle drain the water from the drum. If the pump is totally blocked, the water will be unable to drain and the cycle will end. 2. Shut off the tap so that no more water flows in and has to be drained. Switch the appliance off. Unplug the power plug. 6. Turn the pump cover counterclockwise to remove it. A 3. Open and remove the service cover.
Troubleshooting Emergency door lock release In the event of a power interruption the program will continue running when the power supply has been restored. If the washer door must be opened and the normal door unlock procedures do not work, the emergency door lock release rod can be actuated to open the door. WARNING 9 RISK OF SCALDING To avoid risk of scalding, allow water to cool down prior to activating the emergency door lock release. The drum may be full of hot water which could cause burn injury.
Determing the Problem Problem Possible cause(s) Washer door cannot be Child lock is activated. opened. A power failure occured. Door still cannot be opened, even after turning the washer Off and back on again. Wash cycle time is increased. Cycle does not start Start/Pause flashes. Cycle does not start Finish in-Time is displayed. Cycle does not start D symbol flashes. Detergent residue remains in the detergent dispenser. Cycle is running, or water level is too high and/or too hot.
Problem Possible cause(s) Solution(s) Water has not drained completely. Suds may be excessive (usually due to too much detergent or nonHE detergent being used). Pump is blocked. Use less detergent for future loads. Be sure to use only high efficiency HE-detergents. Check and clean the drain pump, water drain hose and/or the drain pipe. Drain hose or drain pipe is blocked. Clean drainage pipe and/or drainage hose.
Error messages Display Fault Measure è flashes Door not closed properly. r Cold water tap not turned on. Supply hose for cold water kinked or pinched closed. Strainer in water supply hose clogged. Check to be sure no laundry is caught in the washer door. Close the door securely. Turn on the cold water tap. Eliminate the cause, replace the hose if damaged. Clean the water inlet strainer. ~ Cleaning the water inlet strainers; Page 28 Cold water pressure too low. Eliminate the cause.
STATEMENT OF LIMITED PRODUCT WARRANTY What this Warranty Covers & Who it Applies to The limited warranty provided by BSH Home Appliances ("Bosch") in this Statement of Limited Product Warranty applies only to the Bosch appliance sold to you, the first using purchaser, provided that the Product was purchased: ▯ ▯ For your normal, household (non-commercial) use, and has in fact at all times only been used for normal household purposes.
Warranty Exclusions: The warranty coverage described herein excludes all defects or damage that are not the direct fault of Bosch, including without limitation, one or more of the following: Use of the Product in anything other than its normal, customary and intended manner (including without limitation, any form of commercial use, use or storage of an indoor product outdoors, use of the Product in conjunction with air or water-going vessels).
*9001002399* 9001002399 9502 1901 Main Street, Suite 600 • Irvine, CA 92614 • 1-800-944-2904 www.bosch-home.