
Installation Instruction
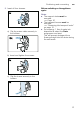
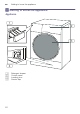
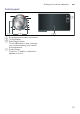
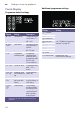
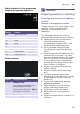
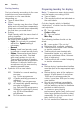
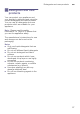
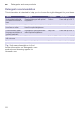
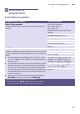
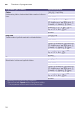
Table Of Contents
- en Instruction Manual and Installation Instructions
- Display rules
- : Warning!
- Caution!
- Note/tip
- 1. 2. 3. / a) b) c)
- Contentsen Instruction Manual and Installation Instructions
- 8 Intended use 4
- ( Safety instructions 5
- 7 Environmental protection 12
- 5 Positioning and connecting 13
- * Getting to know the appliance 22
- Z Laundry 25
- C Detergents and care products 27
- P Overview of programmes 29
- 0 Programme default settings 36
- \ Additional programme settings 38
- 1 Operating the appliance 40
- o Home Connect 45
- Q Appliance settings 51
- H Sensors 52
- 2 Cleaning and maintenance 52
- 3 Faults and what to do about them 56
- 4 Customer Service 63
- [ Consumption values 65
- J Technical data 66
- r Aqua-Stop warranty 66
- 8 Intended use
- Intended use
- ( Safety instructions
- Safety instructions
- Children/people/pets
- Installation
- : Warning
- Risk of electric shock/fire/ material damage/damage to the appliance!
- : Warning
- Risk of electric shock/fire/ material damage/damage to the appliance!
- : Warning
- Risk of fire/material damage/ damage to the appliance!
- : Warning
- Risk of injury/material damage/damage to the appliance!
- : Warning
- Risk of injury!
- Caution!
- Operation
- Cleaning/Maintenance
- 7 Environmental protection
- 5 Positioning and connecting
- Positioning and connecting
- Standard accessories
- Safety instructions
- Installation surface
- Installation on a base or a wooden joist floor
- Installing the appliance in a kitchenette
- Removing the transport locks
- 1. Take the hoses out of the holders.
- 2. Unscrew and remove all four transport brace screws.
- 3. Fit the covers.
- 4. Lock the covers firmly in place by applying pressure to the snap-in hooks.
- 1. Unscrew and remove all screws in the vertical transport struts.
- 2. Remove the transport struts.
- 3. Undo and remove the screws on the horizontal transport strut.
- 4. Remove the transport strut.
- 1. Connect the water supply hose to the water tap (¾" = 26.4 mm) and to the appliance:
- 2. Open the water tap carefully, checking the leak tightness of the connection points. The screw connection is under mains water pressure.
- 1. Loosen the lock nuts using a wrench, by turning it in a clockwise direction.
- 2. Check the alignment of the appliance with a spirit level, and adjust it if necessary. Change the height by turning the appliance feet.
- 3. Tighten the lock nut against the housing.
- 1. Insert mains plug.
- 2. Turn the water tap on.
- 3. Press the # button till the indicator lamp lights up, release the button. The appliance is switched on.
- 4. Close the door. Do not load any laundry.
- 5. Select the Drum Clean 90°C programme.
- 6. Open the detergent drawer.
- 7. Pour approx. 1 litre of water into dispenser II.
- 8. Add standard detergent to dispenser II according to manufacturer’s instructions for light soiling.
- 9. Close the detergent drawer.
- 10. Select A.
- 11. When the programme ends, press the # button till the indicator lamp turns off, release the button.
- 1. Turn off the water tap.
- 2. Reduce the water pressure in the supply hose. ~ Page 55
- 3. Drain any residual water. ~ Page 54
- 4. Disconnect the appliance from the mains.
- 5. Remove the hoses.
- 6. Empty the dispensers. ~ "Detergent drawer and housing" on page 53
- 1. Remove the covers and keep them in a safe place.
- 2. Insert all four sleeves.
- * Getting to know the appliance
- Getting to know the appliance
- Appliance
- Control panel
- Touch-Display
- Programme default settings
- Additional programme settings
- Status indicators for the programme progress (programme sequence)
- Further settings
- Z Laundry
- C Detergents and care products
- P Overview of programmes
- 0 Programme default settings
- Programme default settings
- Temperature
- Spin speed
- Finish in
- To do this:
- 1. Select a programme (except My Time programme).
- 2. Select the ˜ button repeatedly until the required number of hours is displayed.
- 3. Select the A button.
- 1. Select the A button.
- 2. Touch the ˜ or ~ button to change the number of hours.
- 3. Select the A button.
- \ Additional programme settings
- Additional programme settings
- Note:
- Speed
- T (Prewash)
- O (Rinse plus)
- 2 (Hygiene care)
- p (Easy iron)
- Z (Water plus)
- â (Memory)
- To store:
- 1. Switch on the appliance.
- 2. Select a programme.
- 3. If required, change the programme default settings and/or select programme additional settings.
- 4. Touch and hold â (Memory) button for approx. three seconds.
- 1 Operating the appliance
- Operating the appliance
- Preparing the appliance
- 1. Insert mains plug.
- 2. Turn the water tap on.
- 3. Open the appliance door.
- 1. Connect the appliance to your home network and the Home Connect app.
- 2. Select ... further programme.
- 3. Select the desired programme on the Home Connect app.
- 4. If necessary, adjust programme settings and touch the A button.
- 1. Pull out the detergent drawer.
- 2. Pour in detergent and/or cleaning product.
- 1. Pull out the detergent drawer. Press down the insert and fully remove the drawer.
- 2. Slide the measuring aid forwards, fold it down and click it into place.
- 3. Reinsert the drawer.
- 1. Touch the A button.
- 2. Select another programme.
- 3. And touch the A button again. The new programme starts from the beginning.
- 1. Touch the A button.
- 2. To cool down laundry: Select Rinse.
- 3. Touch the A button.
- 1. Touch the A button.
- 2. Select Spin.
- 3. Touch the A button.
- 1. Switch the appliance off.
- 2. Switch the appliance on again.
- 3. To cool down laundry: Select the My Time + Dry.
- 4. Touch the A button.
- 1. Press the # button till the indicator lamp turns off, release the button. The appliance is switched off.
- 2. Open the door and remove the laundry.
- 3. Turn off the water tap.
- o Home Connect
- Home Connect
- 1. Install the Home Connect app on your mobile device.
- 2. Register in the Home Connect app.
- 3. Connect your appliance to your home network automatically or manually (you only need to do this the first time).
- 4. Connect your appliance to the Home Connect app.
- 1. Switch on the appliance.
- 2. Press and hold } (Remote start) } for at least 3 seconds.
- Connecting to your home network automatically
- Connecting to your home network manually
- 1. Set the programme to position 2.
- 2. Press A.
- 3. Call up the Wi-Fi setting on the mobile device.
- 4. Connect the mobile device to the Home Connect Wi-Fi network and enter the password (key) HomeConnect.
- 5. Once you have connected successfully, open the Home Connect app on your mobile device and carry out the steps in the app.
- 6. In the Home Connect app, enter the network name (SSID) and password (key) for your home network.
- 7. Carry out the last steps in the Home Connect app to connect your appliance.
- Connecting to the Home Connect app
- 1. Set the programme to position 3.
- 2. Press A.
- 3. Once your appliance is displayed in the app, carry out the last steps in the Home Connect app.
- 1. Set the programme to position 4.
- 2. Press A.
- 1. Set the programme to position 5.
- 2. Press A.
- 3. Press A.
- 1. Set the programme to position 6.
- 2. Press A.
- 3. Press A.
- Q Appliance settings
- H Sensors
- 2 Cleaning and maintenance
- Cleaning and maintenance
- : Warning
- Risk of death!
- Caution!
- Fire and explosion hazard!
- Caution!
- The appliance may be damaged!
- Appliance housing/control panel
- Drum
- Descaling
- Detergent drawer and housing
- If the appliance contains detergent or fabric softener residues:
- 1. Pull out the detergent drawer. Press down the insert and fully remove the drawer.
- 2. To remove the insert: Push the insert upwards from below with your finger.
- 3. Clean the detergent dispenser tray and insert with water and a brush, and dry it. Clean the inside of the housing as well.
- 4. Fit the insert and lock it in place (push the cylinder onto the guide pin).
- 5. Push in the detergent drawer.
- 1. Switch off the appliance. Pull out the mains plug.
- 2. Open the service flap.
- 3. Take the drain hose out of the retainer.
- 4. Carefully unscrew the pump cover; residual water may leak out.
- 5. Refit and screw on the pump cover. The handle must be in a vertical position.
- 6. Close the service flap.
- 1. Press the # button. Pull out the mains plug.
- 2. Loosen the hose clamp. Carefully remove the drain hose; residual water may leak out.
- 3. Clean the drain hose and siphon connecting piece.
- 4. Re-attach the drain hose and secure the connection point using the hose clamp.
- 1. Turn off the water tap.
- 2. Select the Cotton (activate Speed setting) programme.
- 3. Select the A button. Allow the programme to run for approx. 40 seconds.
- 4. Press the button #.
- 5. Pull out the mains plug.
- 1. Disconnect the hose from the rear of the appliance.
- 2. Use pliers to remove the filter.
- 3. Clean the filter with a small brush.
- 4. Connect the hose and check for leaks.
- 3 Faults and what to do about them
- Faults and what to do about them
- Emergency release
- However, if the laundry has to be removed, the appliance door can be opened as follows:
- 1. Press the # button. Pull out the mains plug.
- 2. Open the service flap.
- 3. Drain the water. ~ Page 54
- 4. Pull the emergency release downwards with a tool and release.
- 4 Customer Service
- [ Consumption values
- J Technical data
- r Aqua-Stop warranty
- Aqua-Stop warranty
- In addition to warranty claims against the vendor based on the purchase agreement and to our appliance warranty, we will provide compensation under the following conditions:
- 1. If water damage is caused due to a fault in our Aqua-Stop system, we will compensate domestic customers for the damage caused.
- 2. The liability guarantee is valid for the service life of the appliance.
- 3. It is a prerequisite of all warranty claims that the appliance with Aqua- Stop must have been installed and connected correctly in accordance with our instructions; this also includes a correctly fitted Aqua-Stop extension (genuine accessories).
- 4. Appliances with Aqua-Stop do not need to be supervised during operation, nor secured afterwards by turning off the tap.

en Detergents and care products
28
Detergent recommendation
This information is intended to help you to choose the right detergent for your items.
Tip: Visit www.cleanright.eu to find
further information on detergents, care
products and cleaning agents for
domestic use.
Fabrics Detergent Programme Temperature
Heat-resistant white fab-
rics made from cotton or
linen
Standard detergent with optical
brighteners
Cottons From cold up to 90 °C
Coloured fabrics made
from linen or cotton
Detergent for colours without
bleach or optical brighteners
Cottons From cold up to 60 °C
Coloured fabrics made
from easy-care fabrics or
synthetic materials
Detergent for colours/delicates
without optical brighteners
Easy Care From cold up to 60 °C
Delicate fabrics made from
silk or viscose
Delicates Delicates/Silk From cold up to 40 °C
Wool Detergent for Woollens Wool From cold up to 40 °C