
Installation Instructions
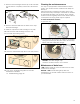
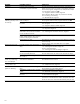


Table Of Contents
- en-us Use and Care Manual, Installation Instructions
- Table of contentsen-us Use and Care Manual, Installation Instructions
- Important information
- Your dryer is intended for
- Safety Definitions
- IMPORTANT SAFETY INSTRUCTIONS
- READ AND SAVE THESE INSTRUCTIONS
- Introduction to your new dryer
- Dimensions and clearances required
- Installation Instructions
- Introduction
- Before installing the dryer
- Waste disposal
- Parts provided with your dryer
- Accessories for your appliance
- Installation - step by step
- 1. Unpack the dryer.
- 1. Fasten the dryer drain hose to the washer drain/elbow as shown in picture “A”. Secure with plastic ties supplied.
- Electrical Connections
- NOTICE:
- 1. Unplug the current power cord being used from the outlet/receptacle.
- 2. To disconnect and/or reconnect a new power cord you must remove the top cover of the appliance as shown below.
- 3. Open the connection box toward the rear of the appliance by removing the T20 torx head screw fastening the cover.
- 4. Remove the 4-wire power cord (as supplied):
- NOTICE:
- NOTICE:
- NOTICE:
- 9. Ensure the terminal ends are long enough and are formed (bent) so they will align with the terminal block fastening locations (screw holes).
- 10. Reinstall the 2 terminal block screws (Philips head) at locations L as shown below.
- 11. If the ground wire shown below from N to PE is not part of the 3-wire cord assembly you have it must be obtained/purchased separately and it must be installed.
- 12. Install the last terminal block screw (Philips) and 1 grounding screw (T20 torx) at locations N and PE.
- 13. Tighten the strain relief screw ensuring the power cord cannot be pulled out of the connection box but not so tight as cut the power cord insulation.
- 14. Reinstall the connection box cover making sure all wires are routed so they do not touch any part of the enclosure and are secure.
- 15. Reinstall the appliance top cover as previously described in “2” above.
- 9 CAUTION
- 9 CAUTION
- Leveling the dryer
- 1. Install the dryer on a level and solid surface, preferably in a corner of a room.
- 2. If the floor is uneven (or not level) adjust the dryer feet as required to level the dryer. Do not place anything under the dryer feet to help level the dryer.
- 3. Extend the dryer feet no more than is necessary. The more the feet are extended, the more vibration the dryer will experience. Start with the dryer feet turned all the way in and adjust each foot as necessary.
- 4. Use a bubble level to check the top of the dryer to make sure it is level side to side and front to rear.
- 5. Press down on each corner of the dryer top to make sure the dryer does not “wobble“. There should be no "give" or movement. All four dryer feet should press equally against the floor. This is just as important as the dryer being level to preve...
- 1. Install the dryer on a level and solid surface, preferably in a corner of a room.
- Check heating system
- Preparing to transport the dryer - step by step
- Getting to know your appliance
- Operating Instructions
- 9 WARNING
- Your new dryer
- 9 WARNING
- Before using the dryer for the first time
- 1. Read these operating instructions carefully.
- 2. Check that the supply voltage corresponds with the voltage specifications on the rating plate on the dryer, see top rear side of the dryer and/or rating plate label inside of the dryer door. ~ Electrical Connections; Page 14
- 3. Remove all objects from the drum.
- 4. Check the dryer for visible damage. If damage found contact your dealer.
- 5. Wipe the inside of the drum with a damp cloth.
- 6. Check heating system. ~ Check heating system; Page 17
- 7. If the dryer does not work, switch the dryer to Off. Look in the Troubleshooting section of the operating instructions for support. ~ Troubleshooting; Page 32
- 1. Read these operating instructions carefully.
- Temporary disconnection of the dryer
- Using the program selector to choose a drying cycle
- Program selection
- Selecting program settings and additional options
- Loading the laundry
- Starting the program
- Indicator of program sequence
- Childproof lock
- Selecting a different program
- Cancel program
- Program end
- Removing laundry/switching the appliance off
- Signal
- Laundry
- Program selection table
- Default Program and Option settings
- Additional Program Option settings
- Spin speed
- Cleaning and maintenance
- 9 WARNING
- 9 CAUTION
- Cleaning the housing and control panel
- Cleaning the lint filter area
- Cleaning the lint filter
- Cleaning the heat exchanger
- 1. If the dryer is hot, run on Air Fluff/No Heat program to allow the dryer to cool down.
- 2. Residual water may escape, place an absorbent cloth under the maintenance flap.
- 3. Unlock the maintenance flap and open it completely.
- 4. Turn both locking levers towards each other.
- 5. Pull out the heat exchanger cap.
- 6. Remove the heat exchanger.
- NOTICE:
- 7. Rinse the heat exchanger and the cap on all sides with a jet of water to completely remove all of the lint and fluff.
- 8. Remove all lint and fluff from the seals on the dryer and heat exchanger.
- 9. Allow the cap and the heat exchanger to dry fully.
- 10. First insert the heat exchanger, then the cap.
- 11. Turn back both locking levers.
- 12. Close the maintenance flap until it locks into position.
- 13. Look in the Troubleshooting table to reset the maintenance indication. ~ Troubleshooting; Page 32
- 1. If the dryer is hot, run on Air Fluff/No Heat program to allow the dryer to cool down.
- Cleaning the moisture sensors
- Maintenance of drain hose
- Troubleshooting
- STATEMENT OF LIMITED PRODUCT WARRANTY

33
General Troubleshooting
Often when you encounter a problem it will be something minor. Before you call customer service, consider the
suggestions and instructions below:
NOTICE: The troubleshooting items listed below can help you resolve minor issues with your dryer quickly and without
the necessity of a service call.
Determing the Problem
Problem Possible cause(s) Solution(s)
Dryer does not start.
Start/Pause indicator
light does not illumi-
nate.
Power cord end not inserted at all
or not inserted correctly.
Insert power cord end correctly.
A fuse is blown or breaker is
tripped.
Replace fuse or reset breaker.
Start/Pause button not touched. Touch Start/Pause button.
Door not closed properly. Check if laundry is caught in the door. Close the door
until a click is heard.
Program not selected. Rotate the program selector to desired program.
~ Program selection table; Page 26
The display panel and
indicator lights go out,
Start/Pause indicator
light flashes.
Energy-saving mode is activated. Touch any button to activate the display.
~ Environmentally friendly use of your dryer; Page 8
The display panel and
Start/Pause indicator
switch off.
Sleep mode after setting the Finish
in option is activated.
Touch any button to activate the display.
é indicator light up.
Lint filter dirty. Clean lint filter.
~ Cleaning the lint filter; Page 29
Touch the Start/Pause button to reset the displayed
indication and then touch Start/Pause button again to
reset the appliance if necessary.
Heat exchanger dirty. Clean heat exchanger.
~ Cleaning the heat exchanger; Page 30
Touch the Start/Pause button to reset the displayed
indication and then touch Start/Pause button again to
reset the appliance if necessary.
DR indicator light up.
Water has not drained
completely.
Drain hose is blocked. Check drain hose.
~ Maintenance of drain hose; Page 31
Check drain hose connection conditions.
Water is leaking out. Dryer is not leveled. Level the dryer.
~ Leveling the dryer; Page 17
The heat exchanger seal is dirty. Clean the heat exchanger seal.
~ Cleaning the heat exchanger; Page 30
Drain hose is leaking. Check entire length of drain hose for leaks; replace if
necessary.
Check that hose is clamped on hose barb at back of
the dryer securely.
Program terminates
shortly after starting.
Laundry is not loaded. Load the laundry.
~ Loading the laundry; Page 22
Load too small for selected pro-
gram.
Use time program.
~ Program selection table; Page 26
Loaded laundry is too dry. Check the loaded laundry. If it is dry, open the door,
remove laundry and turn program selector to Off.
The door opens by
itself.
The door not closed properly. Close the door until a click is heard.