
Installation Guide


13
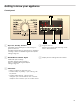
1.
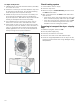
Fasten the dryer drain hose to the washer drain/elbow
as shown in picture “A”. Secure with plastic ties
supplied.
9 CAUTION
Do not over tighten plastic ties pinching or
causing a restriction in the drain hose.
2.
Place drain hose assembly into standpipe as shown in
picture “B”.
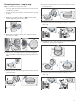
▯ Sink/Basin or Floor drain:
If using the elbow supplied on the hose re-position
elbow closer to the drain end of hose and fasten with
the plastic ties as shown in picture “C”.
Secure hose and/or elbow as shown below. Sink “D”
or floor “E”.
NOTICE: Examples shown are for reference only. Not all
fittings, connectors, nuts, brackets, ties, etc. are supplied
to accommodate every application.
Maximum height of drain is 39 in. (100 cm).
▯ Sink Drain Pipe:
Attach and secure drain hose as shown below in
picture “F”.
Use a standard hose clamp which can be purchased
from your local hardware store.
NOTICES
▯ Examples shown are for reference only. Not all fittings,
connectors, nuts, brackets, ties, etc. are supplied to
accommodate every application.
▯ Ensure there are no kinks or crimps along the entire
lenght of hose.
▯ If installed in an upper floor of a multi-story building,
the dryer should be installed on a drained floor to
prevent water damage to lower floors in the event of a
leak.
$
%
&
'
(
PD[LQ
FP
)