
Installation Instructions
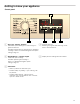
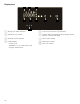

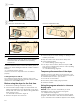

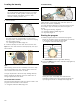


Table Of Contents
- en-us Use and Care Manual, Installation Instructions
- Dryer
- Welcome to Your New Dryer!
- Congratulations on your selection of a new Bosch® dryer for your laundry needs. We are confident you will enjoy the superior performance and reliability.
- Please do not hesitate to contact our Customer Service department if you have any questions or comments about your new dryer.
- Thank you for choosing Bosch®.
- Visit our website at www.bosch- home.com/us for more information and to view a selection of our products.
- Table of contentsen-us Use and Care Manual, Installation Instructions
- Important information
- When writing or calling please have the following information available:
- IMPORTANT SAFETY INSTRUCTIONS
- IMPORTANT SAFETY INSTRUCTIONS
- READ AND SAVE THESE INSTRUCTIONS
- Introduction to your new dryer
- Standard features
- These installation instructions are intended for use by qualified installers. In addition to these instructions, the installation must comply with:
- 5. Disconnect the power cord and drain hose from their clips on the back of the dryer.
- 6. Connect the outlet end of the drain hose to a standpipe or other drain inlet. Examples are shown below.
- 2. Place drain hose assembly into standpipe as shown in picture “B”.
- 2. To disconnect and/or reconnect a new power cord the top cover of the appliance must be removed as shown below.
- 3. Open the connection box toward the rear of the appliance by removing the T20 torx head screw fastening the cover.
- 4. Remove the 4-wire power cord (as supplied):
- 7. Install the new power cord back through the strain relief clamp.
- 8. Ensure the terminal ends are long enough and are formed (bent) so that no part of them (wires or terminal ends) come in contact with connection box enclosure.
- NOTICE:
- 9. Ensure the terminal ends are long enough and are formed (bent) so they will align with the terminal block fastening locations (screw holes).
- 10. Reinstall the 2 terminal block screws (Philips head) at locations L as shown below.
- 11. If the ground wire shown below from N to PE is not part of the 3-wire cord assembly it must be obtained/ purchased separately and it must be installed.
- NOTICE:
- 12. Install the last terminal block screw (Philips) and 1 grounding screw (T20 torx) at locations N and PE.
- 13. Alternate Grounding Methode: Neutral wire of 3-wire cord (usually white or middle conductor) can be connected directly to PE as shown below.
- Electric shock hazard
- 14. Tighten the strain relief screw ensuring the power cord cannot be pulled out of the connection box but not so tight as to cut the power cord insulation.
- 15. Reinstall the connection box cover making sure all wires are routed so they do not touch any part of the enclosure and are secure.
- 16. Reinstall the appliance top cover as previously described in “2” above.
- 9 CAUTION
- 9 CAUTION
- Leveling the dryer
- 1. Install the dryer on a level and solid surface, preferably in a corner of a room.
- 2. If the floor is uneven (or not level) adjust the dryer feet as required to level the dryer. Do not place anything under the dryer feet to help level the dryer.
- 3. Extend the dryer feet no more than is necessary. The more the feet are extended, the more vibration the dryer will experience. Start with the dryer feet turned all the way in and adjust each foot as necessary.
- 4. Use a bubble level to check the top of the dryer to make sure it is level side to side and front to rear.
- 5. Press down on each corner of the dryer top to make sure the dryer does not “wobble“. There should be no "give" or movement. All four dryer feet should press equally against the floor. This is just as important as the dryer being level to preve...
- 1. Install the dryer on a level and solid surface, preferably in a corner of a room.
- Check heating system
- Electric shock hazard
- 4. After 2-3 minutes touch the Start/Pause button and open the door.
- 2. Remove the hinge screws from the dryer side then remove the door and hinge assembly from the dryer housing.
- 3. Place the door on a flat, smooth, secure surface such as a towel or cloth lying on the floor or table.
- 4. Remove screws from the hinge insert and then remove it from the door.
- 5. Remove screws from the hook insert and then remove it from the door.
- 6. Follow the instructions at images bellow to unlock the door ring from the door body.
- 7. Separate the ring from the door body and rotate the ring 180° from it's original position. Fit the ring back to the door body as shown below.
- 8. Follow the instructions of the images bellow to lock the door ring in the door body.
- 9. Place the hook insert in position adjacent to the handle slots/openings and the hinge insert in the opposite position as shown. Reinstall the original screws.
- 10. Remove screws from the door lock cover and then remove it from the dryer housing.
- 11. Remove the door latch from the dryer housing.
- 12. Install the door latch (1) and then door latch cover (2) on the opposite site of the door opening.
- 13. Install the door and hinge assembly back on the dryer with the original screws.
- 14. Confirm the door closes and latches in place. Plug in the dryer to operate it.
- Getting to know your appliance
- OPERATING INSTRUCTIONS
- Operating Instructions
- 9 WARNING
- Your new dryer
- 9 WARNING
- Before using the dryer for the first time
- 1. Read these operating instructions carefully.
- 2. Check that the supply voltage corresponds with the voltage specifications on the rating plate on the dryer, see top rear side of the dryer and/or rating plate label inside the dryer door. ~ Electrical Connections; Page 15
- 3. Remove all objects from the drum.
- 4. Check the dryer for visible damage. If damage found contact your dealer.
- 5. Wipe the inside of the drum with a damp cloth.
- 6. Check heating system. ~ Check heating system; Page 18
- 7. If the dryer does not work, switch the dryer to Off. Look in the Troubleshooting section of the operating instructions for support. ~ Troubleshooting; Page 36
- 1. Read these operating instructions carefully.
- Temporary disconnection of the dryer
- Using the program selector to choose a drying cycle
- Program selection
- ▯ Regular/Cotton
- 2. Touch the Start/Pause button. Indicator lamp lights up and the cycle starts.
- NOTICES
- Tip:
- Indicator of program sequence
- Childproof lock
- Selecting a different program
- Cancel program
- Program end
- Removing laundry/switching the appliance off
- Signal
- ▯ Position 3 for buzzer volume
- Therefore, note the following tips when preparing your laundry:
- Do not dry the following textiles in the dryer:
- 2. Open the door.
- 3. Pull out filter.
- 4. Open the filter.
- 5. Remove fluff (run hand over filter).
- 6. Close the filter and re-insert it.
- 7. Close the door.
- 3. Unlock the maintenance flap and open it completely.
- 4. Turn both locking levers towards each other.
- 5. Pull out the heat exchanger cap.
- 6. Remove the heat exchanger.
- 7. Rinse the heat exchanger and the cap on all sides with a jet of water to completely remove all of the lint and fluff.
- 11. Turn back both locking levers.
- 12. Close the maintenance flap until it locks into position.
- 2. The deposit on the sensors can easily be removed by wiping the sensors (the two bars next to the lint filter) with a cloth and a little white vinegar.

30
Program selection table
Program selection table
Tip: For best results it is recommended to load the amount of textiles into the drum according to the fabric type and
amount shown in the above table.
Programs Max.
load up
to:
Type of laundry
Standard programs
Cotton Dry full load Normal cotton and linen type load (bed linen, cotton clothes, etc.)
Cotton Extra Dry full load Terry bathrobes and terry bed linen (particularly thick or multi-ply)
Perm P Damp 1/2 load Trousers, dresses, skirts, shirts, blouses, leggings, sports clothing with synthetic-
rich fibers, lingerie (not to be or only lightly ironed)
Perm P Dry 1/2 load Shirts, blouses, sports clothing (not to be ironed)
Perm Press Extra Dry 1/2 load Bed linen and table linen, track suits, paraks, blankets (not to be ironed, thick or
multi-ply)
Delicates 1/4 load Lingerie made of synthetic fibers, cotton or blended fabric
Quick 40™ 1/3 load Multi-layered, sensitive fabrics made of acrylic fibers
or separate small items of laundry
also for subsequent drying
Time Dry Variable 1/3 load Pre-dried, multi-layered, sensitive fabrics made of acrylic fibers
or separate small items of laundry
also for subsequent drying
Hand Wash/Wool 1/3 load Wool fabrics suitable for washing
used to refresh or fluff up wool articles but not dry completely
remove fabrics after program end, lay on flat surface and allow to dry
Air Fluff/No Heat 1/3 load All type of fabrics
for freshing up or airing of items of laundry that have been worn for a short period
of time
Quick Dry Auto 1/4 load Laundry made of synthetic fibers, cotton or blended fabrics (for example) that
needs to be dried quickly
Values may differ from those specified depending on the type of fabric, mixture of
laundry to be dried and residual moisture in the fabric
Special programs
Towels 1/2 load Terrycloth type laundry e.g. towels and bathrobes
Sanitize 1/2 load Cotton fabrics for drying in higher temperatures to keep them more hygienic
Jeans 1/2 load Fabrics made from jeans/denim
Bulky/Large Items full load Garments with down feather fillings, pillows and blankets but not quilts
only dry one article at a time