
Owners Manual and Installation Guide
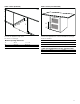
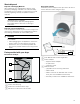

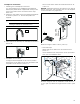
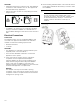
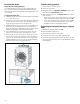
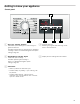
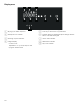
Table Of Contents
- en-us Use and Care Manual, Installation Instructions
- Dryer
- Welcome to Your New Dryer!
- Congratulations on your selection of a new Bosch dryer for your laundry needs. We are confident you will enjoy the superior performance and reliability.
- Please do not hesitate to contact our Customer Service department if you have any questions or comments about your new dryer.
- Thank you for choosing Bosch.
- Visit our website at www.bosch- home.com/us (USA) or www.bosch- home.ca (Canada) for more information and to view a selection of our products.
- Table of contentsen-us Use and Care Manual, Installation Instructions
- Important information
- Your dryer is intended for
- Safety Definitions
- IMPORTANT SAFETY INSTRUCTIONS
- IMPORTANT SAFETY INSTRUCTIONS
- READ AND SAVE THESE INSTRUCTIONS
- Introduction to your new dryer
- Dimensions and clearances required
- INSTALLATION INSTRUCTIONS
- Installation Instructions
- Introduction
- Before installing the dryer
- Waste disposal
- Parts provided with your dryer
- Accessories for your appliance
- Installation - step by step and check list
- 1. Unpack the dryer.
- 1. Fasten the dryer drain hose to the washer drain/elbow as shown in picture “A”. Secure with plastic ties supplied.
- Electrical Connections
- 2. Use an existing individual 240V, 15A minimum branch circuit having a NEMA 6-15R outlet (or choose to have one installed).
- 9 WARNING
- 9 WARNING
- 9 WARNING
- 9 WARNING
- 9 WARNING
- Leveling the dryer
- 1. Install the dryer on a level and solid surface, preferably in a corner of a room.
- 2. If the floor is uneven (or not level) adjust the dryer feet as required to level the dryer. Do not place anything under the dryer feet to help level the dryer.
- 3. Extend the dryer feet no more than is necessary. The more the feet are extended, the more vibration the dryer will experience. Start with the dryer feet turned all the way in and adjust each foot as necessary.
- 4. Use a bubble level to check the top of the dryer to make sure it is level side to side and front to rear.
- 1. Install the dryer on a level and solid surface, preferably in a corner of a room.
- 5. Press down on each corner of the dryer top to make sure the dryer does not “wobble“. There should be no "give" or movement. All four dryer feet should press equally against the floor. This is just as important as the dryer being level to preve...
- 5. Screw the height-adjustable feet of the dryer into the housing to prevent them from being damaged during transportation.
- Getting to know your appliance
- OPERATING INSTRUCTIONS
- Operating Instructions
- 9 WARNING
- Your new dryer
- 9 WARNING
- Before using the dryer for the first time
- 1. Read these operating instructions carefully.
- 2. Check that the supply voltage corresponds with the voltage specifications on the rating plate on the dryer, see top rear side of the dryer and/or rating plate label inside the dryer door. ~ Electrical Connections; Page 16
- 3. Remove all objects from the drum.
- 4. Check the dryer for visible damage. If damage found contact your dealer.
- 5. Wipe the inside of the drum with a damp cloth.
- 6. Check heating system. ~ Check heating system; Page 18
- 1. Read these operating instructions carefully.
- 7. If the dryer does not work, switch the dryer to Off. Look in the Troubleshooting section of the operating instructions for support. ~ Troubleshooting; Page 34
- 3. Clean the lint filter.
- Using program selector to choose a drying cycle
- Program selection
- Selecting program settings and additional options
- Loading the laundry
- Starting the program
- Indicator of program sequence
- Childproof lock
- Selecting a different program
- 3. Touch Start/Pause. The new drying cycle starts from the beginning.
- 2. Rotate the program selector to Off.
- Program end
- Removing laundry/switching the appliance off
- Signal
- Laundry
- Program selection table
- Default Program and Option settings
- Additional Program Option settings
- Spin speed
- USER-MAINTENANCE INSTRUCTIONS
- User-maintenance instructions
- 9 WARNING
- 9 CAUTION
- Cleaning the Dryer's exterior
- Cleaning the lint filter area
- Cleaning the lint filter
- Cleaning the Condenser
- 1. If the dryer is hot, run on Air Fluff/No Heat program to allow the dryer to cool down.
- 2. Residual water may escape, place an absorbent cloth under the maintenance flap.
- 3. Unlock the maintenance flap and open it completely.
- 4. Turn both locking levers towards each other.
- 5. Pull out the Condenser cap.
- 6. Remove the Condenser.
- NOTICE:
- 7. Rinse the Condenser and the cap on all sides with a jet of water to completely remove all of the lint and fluff.
- 8. Remove all lint and fluff from the seals on the dryer and Condenser.
- 9. Allow the cap and the Condenser to dry fully.
- 10. First insert the Condenser, then the cap.
- 11. Turn back both locking levers.
- 12. Close the maintenance flap until it locks into position.
- 1. If the dryer is hot, run on Air Fluff/No Heat program to allow the dryer to cool down.
- 13. Look in the Troubleshooting table to reset the maintenance indication. ~ Troubleshooting; Page 34
- 4. Reinstall the fuse and fuse holder in the Power Adapter ensuring it snaps into place.
- 3. Call Customer Service. ~ Customer service; Page 4

11
Under counter (Preferred)
Front of the appliance fully open.
No doors or coverings.
Under counter (Less Desirable)
If front of the appliance is covered ventilation openings
must be installed.
Minimum opening dimensions
A 28 in. 71.1 cm
B 23.8 in. 60.5 cm
C 34.5 in. 87.6 cm
$
&
%
E & F are minimum area sizes
E 63 sq.in. 404 sq. cm
F 63 sq.in. 404 sq. cm
G & H
actual spacing dimensions for min. open area sizes
G 3 in. 7.6 cm
H 14 in. 35.6 cm
(
)
*
+