
Interactive User Manual

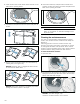
Table Of Contents
- en-us Use and Care Manual, Installation Instructions
- Dryer
- Welcome to Your New Dryer!
- Congratulations on your selection of a new Bosch dryer for your laundry needs. We are confident you will enjoy the superior performance and reliability.
- Please do not hesitate to contact our Customer Service department if you have any questions or comments about your new dryer.
- Thank you for choosing Bosch.
- Visit our website at www.bosch- home.com/us (USA) or www.bosch- home.ca (Canada) for more information and to view a selection of our products.
- Table of contentsen-us Use and Care Manual, Installation Instructions
- Important information
- Your dryer is intended for
- Safety Definitions
- IMPORTANT SAFETY INSTRUCTIONS
- IMPORTANT SAFETY INSTRUCTIONS
- READ AND SAVE THESE INSTRUCTIONS
- Introduction to your new dryer
- Dimensions and clearances required
- INSTALLATION INSTRUCTIONS
- 5. Disconnect the power cord and drain hose from their clips on the back of the dryer.
- 7. Connect the outlet end of the drain hose to a standpipe or other drain inlet. Examples are shown below.
- 2. Place drain hose assembly into standpipe as shown in picture “B”.
- 2. Remove the tank and empty it.
- 3. Take the blue filter from the Tank Kit and install it in the working position as shown in the picture below. Make sure it snaps completely in place.
- 5. Turn the Tank over and you will see a small hole for the plug to be inserted into. Insert the plug into the hole. Ensure it is completely inserted and will not fall out.
- 6. Check that both the blue filter and black plug are fully in their correct positions and insert the complete tank into its position in the dryer.
- 7. Now you are ready to use the tank for collecting all the condensate water from the drying process.
- 2. Use an existing individual 240V, 15A minimum branch circuit having a NEMA 6-15R outlet (or choose to have one installed).
- 9 WARNING
- 9 WARNING
- 9 WARNING
- 9 WARNING
- 9 WARNING
- Leveling the dryer
- 1. Install the dryer on a level and solid surface, preferably in a corner of a room.
- 2. If the floor is uneven (or not level) adjust the dryer feet as required to level the dryer. Do not place anything under the dryer feet to help level the dryer.
- 3. Extend the dryer feet no more than is necessary. The more the feet are extended, the more vibration the dryer will experience. Start with the dryer feet turned all the way in and adjust each foot as necessary.
- 4. Use a bubble level to check the top of the dryer to make sure it is level side to side and front to rear.
- 1. Install the dryer on a level and solid surface, preferably in a corner of a room.
- 5. Press down on each corner of the dryer top to make sure the dryer does not “wobble“. There should be no "give" or movement. All four dryer feet should press equally against the floor. This is just as important as the dryer being level to preve...
- 5. After 15-16 minutes press the Start/Pause button and open the door.
- 5. Screw the height-adjustable feet of the dryer into the housing to prevent them from being damaged during transportation.
- 6. If installed, remove the drain hose from the stand pipe, washbasin or floor drain.--> Page 16-17
- 8. Disconnect the appliance's power cord from the receptacle.
- 2. Remove the hinge screws from the dryer side then remove the door and hinge assembly from the dryer housing.
- 3. Place the door on a flat, smooth, secure surface such as a towel or cloth lying on the floor or table.
- 4. Remove screws from the hinge insert and then remove it from the door.
- 5. Remove screws from the hook insert and then remove it from the door.
- 6. Follow the instructions in the images below to unlock the door ring from the door body.
- 7. Separate the ring from the door body and rotate the ring 180° from it's original position. Fit the ring back to the door body as shown below.
- 8. Follow the instructions of the images below to lock the door ring.
- 9. Place the hook insert in position adjacent to the handle slots/openings and the hinge insert in the opposite position as shown. Reinstall the original screws.
- 10. Remove screws from the door latch cover and then remove it from the dryer housing.
- 11. Remove the door latch from the dryer housing.
- 12. Install the door latch (1) and then door latch cover (2) on the opposite side of the door opening.
- 13. Install the door and hinge assembly back on the dryer with the original screws.
- 14. Confirm the door closes and latches in place. Plug in the dryer to operate it.
- Getting to know your appliance
- OPERATING INSTRUCTIONS
- Operating Instructions
- 9 WARNING
- Your new dryer
- 9 WARNING
- Before using the dryer for the first time
- 1. Read these operating instructions carefully.
- 2. Check that the supply voltage corresponds with the voltage specifications on the rating plate on the dryer, see top rear side of the dryer and/or rating plate label inside the dryer door. ~ Electrical Connections; Page 18
- 3. Remove all objects from the drum.
- 4. Check the dryer for visible damage. If damage found contact your dealer.
- 5. Wipe the inside of the drum with a damp cloth.
- 6. Check heating system. ~ Check heating system; Page 19
- 1. Read these operating instructions carefully.
- 7. If the dryer does not work, press the center of the Program Selector to switch off the dryer. Look in the Troubleshooting section of the operating instructions for support. ~ Troubleshooting; Page 42
- 3. Clean the lint filters.
- 2. Press the Start/Pause button. Indicator lamp lights up and the cycle starts.
- 4. If required, select Wrinkle Block by pressing the button. ~ Wrinkle Block; Page 37
- 2. Select another program and/or a different optional program setting.
- 3. Press Start/Pause. The new drying cycle starts from the beginning.
- 2. Press the center of the Program Selector to switch off the appliance.
- 4. Connect your appliance to the Home Connect app.
- Connecting to your home network automatically
- Connecting to your home network manually
- 1. Set the program to position 2.
- 4. Connect the mobile device to the HomeConnect Wi-Fi network and enter the password (key) HomeConnect.
- 5. Once you have connected successfully, open the Home Connect app on your mobile device and carry out the steps in the app.
- 6. In the Home Connect app, enter the network name (SSID) and password (key) for your home network.
- 7. Carry out the last steps in the Home Connect app to connect your appliance.
- Note:
- Connecting to the Home Connect app
- 1. Set the program to position 3.
- Activating/deactivating Wi-Fi
- Resetting your network settings
- Updating the software
- Information on data protection
- Declaration of Conformity
- Wi-Fi® Module FCC/IC Statements
- Laundry
- Program selection table
- Optional program settings
- Appliance settings
- 2. Use the Finish in N or M button to set the volume you require.
- 2. Use the Finish in N or M button to switch the appliance's automatic switch-off function on (‹Ÿ) or off (‹””).
- 2. Open the door and clean all lint from around top of the lint filter and door perimeter. Pull out the two-part lint filter as shown.
- 3. Clean lint from the recess shown below. Ensure no lint falls into the opening below.
- 4. Separate the two-part lint filter and open both parts as shown.
- 5. Gently remove all lint and debris from both filters by rubbing with your fingers only.
- 6. Close filters until they snap shut and reinsert them together, as they were when removed, and place them back in the opening as shown.
- 2. The deposit on the sensors can easily be removed by wiping the sensors (the two bars next to the lint filter) with a cloth and white vinegar.
- 2. Check the drain hose for kinks, restrictions or blockage.
- 3. Replace suspected bad fuse with a known good one.
- 4. Reinstall the fuse and fuse holder in the Power Adapter ensuring it snaps into place.
- 3. Call Customer Service. ~ Customer service; Page 4

31
Home Connect®
Home Connect®
This appliance is Wi-Fi-capable and can be remotely
controlled using a mobile device.
You can use the Home Connect app to do the following
on your appliance from your mobile device:
▯ Set up programs and start them.
▯ Adjust, activate and deactivate program settings.
▯ Query the status of programs.
▯ Adjust, activate and deactivate appliance settings.
▯ Switch off the appliance.
Before you can use the Home Connect functions, you will
need to carry out the following steps:
1.
Install the Home Connect app on your mobile device.
2.
Register in the Home Connect app.
3.
Connect your appliance to your home network
automatically or manually (you only need to do this the
first time).
4.
Connect your appliance to the Home Connect app.
You can find information about the app on our
Home Connect website www.bosch-home.com/us (USA)
or www.bosch-home.ca (Canada)
Home Connect services are not available in every
country. The availability of the Home Connect function
depends on the availability of Home Connect services in
your country. You can find information on this at:
www.bosch-home.com/us (USA) or www.bosch-home.ca
(Canada)
Notes
▯ Please observe the safety precautions in this
instruction manual and make sure that these are
complied with even when operating the appliance via
the Home Connect app while you are away from
home. You must also follow the instructions in the
Home Connect app.
▯ You cannot use the Home Connect app to make
changes while the controls on the appliance are being
operated. However, you can use the
Home Connect app to see any adjustments made
directly on the appliance itself.
Calling up the Home Connect menu
In the Home Connect menu, you can create and view
network connections, reset network settings, activate/
deactivate Wi-Fi and find other Home Connect functions.
1.
Switch the appliance on.
2.
Press and hold Remote Start for at least 3 seconds.
‘ž£ appears in the display.
You are now in the Home Connect menu.
Note: Briefly press Remote Start to exit the Home
Connect menu.
Connecting your home network to the
Home Connect app
Connect your appliance to the home network
automatically or manually (you only need to do this the
first time).
Notes
▯ If your home network router has a WPS function, you
can connect the appliance to your home network
automatically.
▯ If your home network router does not have a
WPS function, you need to connect the appliance to
your home network manually.
You must then connect to the Home Connect app.
Note: To connect your appliance to the home network,
Wi-Fi must be activated on the appliance. Wi-Fi is
deactivated on the appliance by default and is activated
automatically when you connect your appliance to your
home network.
Connecting to your home network automatically
Step 2.1
Ensure that you are in the Home Connect menu.
~ Calling up the Home Connect menu; Page 31
1.
Press Start/Pause.
The appliance now attempts to connect to your home
network. | flashes in the display.
2.
Activate the WPS function on your home network
router within the next 2 minutes.
If the appliance has connected to your home network
successfully, ™©Ÿ è and | appear in the display and
light up continuously.
Note: If you are not able to establish a connection,
check whether your appliance is within range of your
home network. Try connecting automatically again or
connect your appliance manually.