Washer dryer WVH28490AU en Instruction Manual and Installation Instructions
Your new washer dryer Display rules You have chosen a Bosch washer dryer. : Warning! Please take a few minutes to read and become familiar with the advantages of your washer dryer. To meet the high quality demands required by Bosch, every washer dryer that leaves our factory is carefully checked to ensure that it functions correctly and is in perfect condition. For more information on our products, accessories, replacement parts and services, see our website www.boschhome.
en Contents enI structionManual ndInstal tionI structions 8 Intended use. . . . . . . . . . . . . . . . .4 ( Safety instructions . . . . . . . . . . .5 Electrical safety. . . . . . . . . . . . . . . . . . 5 Risk of injury . . . . . . . . . . . . . . . . . . . . 5 Safety for children. . . . . . . . . . . . . . . . 5 7 Protection of the environment . .6 Packaging/old appliance . . . . . . . . . . 6 Hints and tips . . . . . . . . . . . . . . . . . . . 6 Y The main points in brief . . . . . . .
en Intended use 4 Customer service . . . . . . . . . . . 35 J Technical specifications . . . . . 35 [ Consumption values . . . . . . . . 36 5 Installation and connection . . . 37 Standard accessories . . . . . . . . . . . 37 Installation . . . . . . . . . . . . . . . . . . . . 37 Secure installation . . . . . . . . . . . . . . 37 Installation area . . . . . . . . . . . . . . . . 38 Installing the appliance on a base or on a wooden joist ceiling. . . . . . .
Safety instructions ( Safety instructions en : Warning Risk of injury Risk of scalding! ■ When washing at high temperatures, you may be scalded if you touch the hot washing water (e.g. if draining hot washing water into a washbasin). Do not touch the hot washing water. ■ If a drying programme was interrupted, the washer dryer and laundry may be very hot. Select Intensive Dry 5 or Gentle Dry ‰ and set the 15 min programme to cool down the laundry and then remove.
en Protection of the environment : Warning Risk of poisoning! Detergents and care products may cause intoxication if consumed or eye/skin irritation if touched. Keep detergents and care products out of the reach of children. : Warning Eye / skin irritation! Contact with detergents and care products may cause eye or skin irritation. Keep detergents and care products out of the reach of children. : Warning Risk of injury! When washing at high temperatures, the glass part of the door becomes hot.
The main points in brief en Y The main points in brief feirbnstiopnmaeTh 1 @ Insert mains plug. Turn the tap on. @ Open the washer dryer door. -------- 2 @ Select the washing/ drying programme @ If required, change the programme default settings and/or select additional functions. -------- 3 @ Max. load in display panel. @ Sort the laundry. @ Load the laundry. @ FODFN Open the detergent drawer. -------- 4 @ End of the programme. Close the washer dryer door.
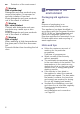
Getting to know your appliance en * Getting to know your appliance Washer dryer ecnailpruoywnktgniGte # 6 7 FODFN ( 0 8 9S 9T @ 8 Hot air outlet Operating/display panel Door with handle Open the door Close the door Service flap and cool air inlet
Getting to know your appliance en Control panel + # Change the default settings for the selected programme and select additional functions: ( Select buttons °C (Temperature), 5 (Finish in) time, 0 (Spin speed) and 5 (Drying) for changing default settings ~ Page 24 @ Start programme. Select the Start/ ReloadA button to start, interrupt (e.g.
en Getting to know your appliance Display panel Displays for the programme # + (: Temperature for washing programme. Ž (cold) – 90°C Temperature in °C 1:50* Programme duration after programme selection in h:min (hours:minutes) 0: Programme information. Time: 1 – 24 h Finish in time in h (h=hour) Capacity: 8.0 kg* Max.
Getting to know your appliance 8: Spin speed $ – 1400* @: Programme progress sym- 9 bols ' en Spin speed in revolutions per minute; $ (Rinse stop = without final drain/spin cycle, laundry remains in the water after the last rinse cycle) Washing Rinsing 0 Draining/Spinning ˆ Drying Auto On if auto drying programme is selected ˆ On if drying programme is selected. Automatic load detection function: ¤¥¦ Detects the load when the water has run in and sets the remaining time accordingly.
Laundry en W Z Laundry Ž Preparing laundry for washing Suitable for washing by hand; e.g. W Wool program Do not machine wash. yrdnuaL Sorting laundry according to: Sort your laundry according to the care instructions and specifications of the manufacturer on the care labels: ■ Type of fabric/fibre ■ Colour Note: Laundry can discolour or not be cleaned correctly. Wash white and coloured items separately. Wash new bright fabrics separately the first time you wash them.
Laundry ■ ■ ■ ■ Wash delicates in a net or bag (tights, underwired bras, ect). Close zips, button up covers. Brush sand out of pockets and collars. Remove curtain fittings or include in the net/bag. Preparing laundry for drying Note: To ensure an even drying result, sort the laundry according to the: ■ Type of fabric ■ Drying programme ■ Care symbols which are indicated on the care labels.
en Operating the appliance 1 Operating the appliance Preparing the washer dryer ecnailpehtgniaOrep The washer dryer was tested before delivery. To remove residual water from the test procedure, the first wash cycle should be run without laundry using the Fluff clean l programme. Before washing/drying for the first time Selecting the programme/ Switching on the appliance Note: If you have activated the childproof lock, you must deactivate it before you can set a programme.
Operating the appliance ■ The buttons are sensitive, they only need to be touched gently. If the button °C (Temperature), 0 (Spin speed), 5 (Finish in) is held down, the setting options are automatically scrolled through. Changing default settings for a washing programme, e. g. washing temperature: ■ Touch the °C (Temperature) button to set desired washing temperature.
en Operating the appliance Loading the laundry : Warning Danger of death! Laundry items pretreated with solventbased detergents, e.g. stain remover/ petroleum ether, may cause an explosion if loaded into the washer dryer. Thoroughly rinse laundry items by hand before washing. Notes ■ Mix large and small items. Laundry items of different sizes distribute themselves better during the spin cycle. Individual laundry items may cause an unbalanced load. ■ Observe the indicated maximum load.
Operating the appliance en 2. Pour in detergent and/or cleaning product. Dispenser I Detergent for prewash. Dispenser i Softener, starch. Do not exceed the maximum load. Dispenser II Detergent for main wash, water softener, bleach, stain remover. Dispenser A For dosing liquid detergent. Notes ■ Always follow the manufacturer's instructions when dosing all detergents, cleaning aids, care products and cleaning agents. ■ Dilute viscous fabric softener and fabric conditioner with water.
en Operating the appliance Childproof lock You can secure the washer dryer to prevent the set functions from being changed inadvertently. To do this, activate the childproof lock when the programme has started. Activating/deactivating: Touch and hold the button 5 (Finish in) for approx. 5 seconds. The symbol @ is indicated in the display. If the button signal is activated, an acoustic signal sounds. ■ ■ @ lights up: The childproof lock is activated.
Operating the appliance For drying programmes: 1. Select Intensive Dry 5 or Gentle Dry ‰. 2. Touch button 5 (Drying) and set drying time to 15 minutes. 3. Select Start/Reload A. End of the programme – 0 – or – – – – (Rinse stop = without final drain/spin cycle) is indicated in the display and acoustic signal sounds. Setting the signal~ Page 27 If $ (Rinse stop = without final drain/ spin cycle) was selected, press Start/ Reload button to start the final drain/ spin cycle.
en Overview of programmes / Overview of programmes Programme on the programme selector margsoepfweivOr Programme/Type of washing Options/Information Name of the programme Brief explanation of the programme and which textiles it is suitable for. maximum load according to EN50229 maximum load for washing/ maximum load for drying selectable temperature in °C selectable spin speeds in rpm possible additional functions for washing possible settings for drying Cottons i max.
Overview of programmes Programme/Type of washing Options/Information Delicates/Silk “ For delicate, washable textiles, e.g.made of silk, satin, synthetic fibres or blended fabrics. max. 2 kg en Ž (cold) – 40 °C $ – 800 rpm G, F, O, p – W Wool ã Hand and machine-washable fabrics made of wool or that contain wool; particularly gentle wash programme to prevent shrinkage of laundry, with longer programme breaks (fabrics rest in the detergent solution). Note: Wool is of animal origin, e.g.
en Overview of programmes Programme/Type of washing Options/Information Allergy Plus ; Hard-wearing textiles made of cotton or linen, for particularly sensitive skin, longer wash cycle at the selected temperature, more water, extra rinsing. Note: * Reduced load for G additional function. max. 7(4)* kg/4 kg Ž (cold) – 60 °C $ – 1400 rpm G, F, O, p Aut 1, Aut 2 Fluff Clean l – Special program for drum hygiene or fluff removal. Ž (cold) , 40, 90 °C 90 °C = antibacterial program, do not use detergent.
Overview of programmes en Drying table Cottons/coloureds (textiles made of cotton or linen such as underwear, T-shirts, sweaters, trousers, kitchen towels) Dry weight in kg 0,5 ~1,0 1,0 ~ 2,0 2,0 ~ 3,0 3,0 ~ 4,0 Estimated drying time in min Cupboard dry Aut1 <60 60 ~ 85 85 ~ 120 120 ~ 160 Extra dry <65 65 ~ 100 100 ~140 140 ~170 Aut2 Recommended programme Intensive Dry 5 (Auto) ~ 0,5 ~ 1,0 ~ 2,0 ~ 2,5 Adjustable drying time in min 30 60 90 120 Intensive Dry 5 (Time) Quilt/terry
en Changing programme default settings Starching Note: The laundry should not be treated with fabric softener. Liquid starch can be used in all wash programmes. Pour starch into the dispenser M according to manufacturer’s specifications (if required, clean beforehand). 0 Changing programme default settings You can change the default settings for selected programmes. The settings can be changed even while the selected programme is running.The effects depend on the progress of the programme.
Changing programme default settings When the programme has started, the preselected time is displayed e.g.8:00h and counts down until the programme starts. Then the programme duration is displayed, e.g. 2:30h When the programme has started, the preselected time can be changed as follows: 1. Select Start/Reload A. 2. Select the 5 (Finish in) button and change the Finish in time. 3. Select Start/Reload A.
en Selecting additional functions \ Selecting additional functions You can select your desired additional functions by touching the respective buttons. snoitcuf lanoitdagnitceSl # G (SpeedPerfect) (For a shorter wash time with a comparable washing result to the standard programme. Note: Do not exceed maximum load. Overview of programmes F (EcoPerfect) 0: Energy-optimised washing by reducing the temperature while achieving a consistent washing result.
Setting the signal en M Setting the signal langisehtgni Ste 1. Activate setting mode for the signal volume Turn to Ú Off. Turn one position clockwise. Press and hold the ° C button + turn one position clockwise. Release the button. 2.a Set the volume for the button signals (depending on model) Press the 0 button until the required volume is reached. Go to step 2.b or Set to Ú Off, which exits setting mode for the signal volume. 2.
en Cleaning and maintenance 2 Cleaning and maintenance : Warning Risk of electric shock! Danger of death if live parts are touched. Switch off the appliance and disconnect at the mains plug. ecnatmidgnaeCl : Warning Risk of poisoning! Solvent-based cleaning agents, e.g. petroleum ether, in the washer dryer may cause toxic vapours. Do not use solvent-based cleaning agents. Caution! Damage to the appliance Solvent-based cleaning agents, e.g.
Cleaning and maintenance en 2. Turn the programme selector to Ú Off. Pull out the mains plug. 3. Open the service flap. 4. Take the drainage hose out of the holder. 2. Loosen hose clip, carefully remove drainage hose. Residual water may run out. 3. Clean drainage hose and siphon spigot. 5. Remove the cover flap, draining the washing water into a suitable container. Press on the cover flap and insert the drainage hose into the holder. Note: Residual water may run out. 6. Carefully unscrew the pump cover.
en Faults and what to do about them 6. Clean the filter on the back of the appliance: Remove the hose from the rear of the appliance. Take out the filter with pliers and clean it. 3 Faults and what to do about them Emergency release, e.g. if a power failure occurs meht uobadt wahdnstluFa The programme continues running when the power supply is restored. If the washing is still to be removed, the door can be opened as described below: 7. Connect the hose and check for leaks. Air filter blocked 1.
Faults and what to do about them en Information on the display panel Display Cause/Remedy A:01 Close the door immediately because of the rising water level. If an interruption occurs, A:01 and OPEn are displayed alternately. A:02 The door is locked for safety reasons (water level and/or temperature too high). ■ Washing programme: In pause mode A:02 and PAUS are displayed alternately. If you have to open the door, wait until the temperature has dropped slightly or pump out the water (select e.g.
en Faults and what to do about them Faults and what to do about them Faults Cause/Remedy Water is running out. ■ ■ Water not flowing in. Detergent not dispensed. ■ ■ ■ ■ The washing machine door cannot be opened. ■ ■ ■ ■ Programme does not start. Detergent solution is not drained. ■ ■ ■ ■ ■ Water not visible in the drum. Spin result not satisfactory. Laundry wet/too damp. Spin cycle activated several times. Residual water in the dispenser for care product.
Faults and what to do about them Faults Display panel/indicator lights do not function while the appliance is running. The programme duration changes during the wash cycle. Detergent residue on the washing. en Cause/Remedy ■ ■ ■ ■ ■ ■ ■ Power failure? Fuse tripped? Switch on/replace fuse. If the fault occurs repeatedly, call customer service. Not a fault – unbalanced load detection system adjusts imbalance. Not a fault – foam detection function active. Additional rinse cycle.
en Faults and what to do about them Faults The drying result is not satisfactory (laundry is not dry enough). Cause/Remedy ■ ■ ■ ■ ■ ■ When the door is opened, you will notice that a small amount of water drips onto the dried laundry. ■ ■ Excessively high ambient temperature (above 30 °C) or inadequate ventilation in the room in which the washer dryer is situated. Ensure adequate ventilation to allow surplus heat to escape. The laundry has not been spun well enough before drying.
Customer service 4 Customer service If you cannot correct the fault yourself, see section, Faults and what to do about them, please contact our customer service. We will always find a suitable solution, and aim to avoid unnecessary visits by technicians. Please give customer service the product number (E-Nr.) and the production number (FD) of the appliance.
en Consumption values [ Consumption values seulavnoimuCstp Programme Option Load (kg) Energy consumption *** Water consumption *** Programme duration *** (kWh) (liter) (min) Cottons i 20 °C 8,0 0,25 66 128 Cottons i 30 °C 8,0 0,35 61 112 8,0 0,55 61 112 8,0 0,82 68 283 Cottons i 40 °C Cottons i 60 °C* F (EcoPerfect)* Cottons i 90 °C 8,0 2,20 61 150 Easy-Care f 40 °C G(SpeedPerfect) 3,5 0,42 58 123 Mixed faricso 40 °C G(SpeedPerfect) 3,5 0,48 55 58 Delicates/
Installation and connection Note: A hose clip Ø 24–40 mm (specialist store) is also required for connection to a siphon. Connecting the water ~ Page 40 5 Installation and connection Standard accessories noitcednaoitlasnI Note: Check the washer dryer for damage sustained in transit. Do not switch on a damaged washer dryer. If you have any complaints, contact the dealer where you purchased the appliance or our customer service.
en Installation and connection Installation area Note: Stability is important to prevent the washer dryer from wandering! ■ The installation area must be firm and level. ■ Soft floors and floor coverings are not suitable. ■ To ensure good drying results, ensure that the room is well ventilated. Installing the appliance on a base or on a wooden joist ceiling Caution! Damage to the appliance The washer dryer may wander during the spin cycle and topple or fall off its base.
Installation and connection en Removing the transportation protection devices Caution! Damage to the appliance ■ Before using the washer dryer for the first time, it is essential to remove all 4 transportation protection devices. Keep the transportation protection devices. The washer dryer is secured for transportation with transportation protection devices. Transportation protection devices which have not been removed may damage the drum, for example, while the washer dryer is running.
en Installation and connection Available from dealer/customer service: ■ Extension for Aqua-Stop or cold water inlet hose (approx. 2.50 m). Order no. WMZ 2380, WZ 10130, CZ 11350, Z 7070X0. ■ Longer supply hose (approx. 2.20 m), for standard model. Connecting the water : Warning Risk of electric shock! Danger of death if live parts come into contact with water. Do not immerse the Aqua-Stop safety device in water (it contains an electric valve).
Installation and connection 2. Carefully turn on the tap and check that the connection points are not leaking. en and damage the washer dryer and/or textiles. Ensure that: ■ the sealing plug does not block the outflow of the washbasin. ■ the water drains quickly enough. ■ the end of the drainage hose is not immersed in the drained water. Installing the drainage hose: Note: The screw connection is under water pipe pressure. Water drainage Notes ■ Do not kink or overextend the water drainage hose.
en Installation and connection Alignment Electrical connection 1. Loosen the lock nut in a clockwise direction with a wrench. 2. Check the alignment of the washer dryer with a spirit level and, if required, correct. Adjust the height by rotating the appliance foot. Note: All four appliance feet must be firmly on the floor. The washer dryer must not wobble! 3. Tighten the lock nut against the housing. Grip the foot and do not adjust the height.
Installation and connection Before washing/drying for the first time The washer dryer was inspected thoroughly before leaving the factory. To remove any residual test water, run the Fluff Clean l programme the first time without laundry. Note: ■ The washer dryer must have been installed and connected properly. Installation and connection ~ Page 37 ■ Never switch on a damaged washer dryer. Inform your customer service. Insert mains plug. Turn the tap on. Switch on the appliance. Close the door.
Aqua-Stop warranty Only for appliances with Aqua-Stop In addition to warranty claims against the vendor based on the purchase agreement and to our appliance warranty, we will provide compensation under the following conditions: 1. If water damage is caused due to a fault in our Aqua-Stop system, we will compensate domestic customers for the damage caused. 2. The liability guarantee is valid for the service life of the appliance. 3.