
User Manual
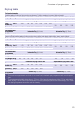
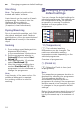

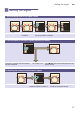
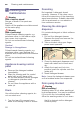
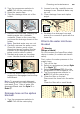

Table Of Contents
- Your new washer dryer
- Contentsen Instruction Manual and Installation Instructions
- 8 Intended use 4
- ( Safety instructions 5
- 7 Protection of the environment 6
- Y The main points in brief 7
- * Getting to know your appliance 8
- Z Laundry 12
- 1 Operating the appliance 14
- / Overview of programmes 20
- 0 Changing programme default settings 24
- \ Selecting additional functions 26
- M Setting the signal 27
- 2 Cleaning and maintenance 28
- 3 Faults and what to do about them 30
- 4 Customer service 35
- J Technical specifications 35
- [ Consumption values 36
- 5 Installation and connection 37
- 8 Intended use
- Intended use
- ( Safety instructions
- 7 Protection of the environment
- Y The main points in brief
- * Getting to know your appliance
- Z Laundry
- 1 Operating the appliance
- Operating the appliance
- Preparing the washer dryer
- Selecting the programme/ Switching on the appliance
- Adjusting the washing programme
- Adjusting the drying programme
- Loading the laundry
- Dosing and adding detergent and care product
- Starting the programme
- Childproof lock
- Reloading the laundry
- Changing the programme
- Interrupting or ending the programme
- End of the programme
- After washing/drying
- / Overview of programmes
- Overview of programmes
- Programme on the programme selector
- Drying table
- Starching
- Dyeing/Bleaching
- Soaking
- 1. Pour soaking agent/detergent into dispenser II according to the manufacturer’s instructions.
- 2. Set the programme selector to Cottons 60°C and select Start/ Reload A.
- 3. After approximately 10 minutes select Start/Reload A.
- 4. After the required soaking time, reselect Start/Reload A if the programme is to be continued or change the programme.
- Note:
- 0 Changing programme default settings
- \ Selecting additional functions
- M Setting the signal
- 2 Cleaning and maintenance
- Cleaning and maintenance
- : Warning
- Risk of electric shock!
- : Warning
- Risk of poisoning!
- Caution!
- Damage to the appliance
- Appliance housing/control panel
- Drum
- Descaling
- Cleaning the detergent dispenser
- 1. Pull out the detergent drawer. Depress the insert and remove the drawer completely.
- 2. Take out insert: using your finger, press insert upwards.
- 3. Clean the detergent dispenser and insert with water and a brush and dry.
- 4. Attach the insert and lock into position (push the cylinder onto the guide pin).
- 5. Insert detergent drawer.
- Note:
- Drain pump blocked
- : Warning
- Risk of scalding!
- 1. Turn the tap off to prevent more water from flowing in and to ensure that it is drained via the detergent solution pump.
- 2. Turn the programme selector to Ú Off. Pull out the mains plug.
- 3. Open the service flap.
- 4. Take the drainage hose out of the holder.
- 5. Remove the cover flap, draining the washing water into a suitable container. Press on the cover flap and insert the drainage hose into the holder.
- Note:
- 6. Carefully unscrew the pump cover. Clean the interior, pump cover thread and pump housing (the fan impeller in the detergent-solution pump must be able to rotate).
- 7. Reinsert and screw on the pump cover. Handle should be vertical.
- 8. Close the service flap. If required, engage the disengaged service flap beforehand.
- Note:
- Drainage hose on the siphon blocked
- Filter in the water inlet hose blocked
- : Warning
- Danger of death!
- 1. Turn off the tap.
- 2. Select any programme (except Spin 0 or Drain [).
- 3. Select Start/Reload A. Allow the programme to run for approx. 40 s.
- 4. Turn the programme selector to Ú Off. Pull out the mains plug.
- 5. Clean the filter on the tap:
- 6. Clean the filter on the back of the appliance:
- 7. Connect the hose and check for leaks.
- Air filter blocked
- 3 Faults and what to do about them
- 4 Customer service
- J Technical specifications
- [ Consumption values
- 5 Installation and connection
- Installation and connection
- Standard accessories
- Installation
- Secure installation
- Installation area
- Installing the appliance on a base or on a wooden joist ceiling
- Installing the appliance under/ between kitchen units
- Removing the transportation protection devices
- Hose and cable lengths
- Connecting the water
- Water supply
- Water drainage
- Drainage into a wash basin
- Drainage into a siphon
- Drainage into a plastic pipe with rubber sleeve or into a gully
- Alignment
- Electrical connection
- Before washing/drying for the first time
- Note:
- 1. Insert mains plug.
- 2. Turn the tap on.
- 3. Switch on the appliance.
- 4. Close the door. Do not load any laundry.
- 5. Select the Fluff Clean 90°C l programme. For AU variant, two cycles of Fluff Clean 90°C lprogramme without laundry are required to be run at initial setup, and this operation only needs to be completed once.
- 6. Open the detergent drawer.
- 7. Pour approx. 1 litre of water into dispenser II.
- 8. Add standard detergent to dispenser II according to manufacturer’s instructions for light soiling.
- Note:
- Note:
- Transportation
- Preparatory work
- Installing transportation protection devices:
- 1. Remove the covers and keep in a safe place.
- 2. Insert all 4 sleeves.
- Notes
- 1. If water damage is caused due to a fault in our Aqua-Stop system, we will compensate domestic customers for the damage caused.
- 2. The liability guarantee is valid for the service life of the appliance.
- 3. It is a prerequisite of all warranty claims that the appliance with Aqua-Stop must have been installed and connected correctly in accordance with our instructions; this also includes a correctly fitted Aqua-Stop extension (genuine accessories).
- 4. Appliances with Aqua-Stop do not need to be supervised during operation, nor secured afterwards by turning off the tap.

Overview of programmes en
23
Drying table
Cottons/coloureds
(textiles made of cotton or linen such as underwear, T-shirts, sweaters, trousers, kitchen towels)
Dry weight in kg 0,5 ~1,0 1,0 ~ 2,0 2,0 ~ 3,0 3,0 ~ 4,0 ~ 0,5 ~ 1,0 ~ 2,0 ~ 2,5
Estimated drying time in min Adjustable drying time in min
Cup-
board dry
Aut1 <60 60 ~ 85 85 ~ 120 120 ~ 160
30 60 90 120
Extra dry Aut2 <65 65 ~ 100 100 ~140 140 ~170
Recommended
programme
Intensive Dry 5 (Auto) Intensive Dry 5 (Time)
Quilt/terry cloth
(larger or thick textiles made of cotton such as terry cloths, bed sheets, table cloths, jeans, work clothes)
Dry weight in kg 0,5 ~1,0 1,0 ~ 2,0 2,0 ~3,0 3,0 ~ 4,0 ~0,5 ~1,0 ~1,5 ~2,0
Estimated drying time in min Adjustable drying time in min
Cup-
board dry
Aut1 <70 70 ~ 95 95 ~ 130 130 ~ 170
30 60 90 120
Extra dry Aut2 <75 75 ~ 110 110 ~ 150 150 ~ 180
Recommended
programme
Intensive Dry 5 (Auto) Intensive Dry 5 (Time)
Easy-care (Textiles made of synthetic or blended fabrics such as shirts, sportswear, delicate items)
Dry weight in kg 0,5 ~ 1,0 1,0 ~ 2,0 2,0 ~ 2,5 ~ 0,5 ~ 1,0 ~ 1,5 ~ 2,0
Estimated drying time in min Adjustable drying time in min
Cup-
board dry
Aut1 <55 55 ~ 95 95 ~ 130
30 60 90 120
Extra dry Aut2 <65 65 ~ 130 130 ~ 160
Recommended
programme
Gentle Dry ‰ (Auto) Gentle Dry ‰ (Time)
± The times are approximate and refer to a normal load, standard spin programme and room tempera-
ture.
± The maximum selectable drying time is 120 min. If the laundry weighs more than 2.5 kg, select auto-
matic drying. This function is recommended to ensure good drying results and save energy. The 15-min-
ute drying programme is used to cool the laundry.