
User Manual
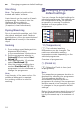

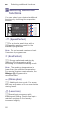
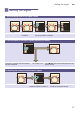

Table Of Contents
- Your new washer dryer
- Contentsen Instruction Manual and Installation Instructions
- 8 Intended use 4
- ( Safety instructions 5
- 7 Protection of the environment 6
- Y The main points in brief 7
- * Getting to know your appliance 8
- Z Laundry 12
- 1 Operating the appliance 14
- / Overview of programmes 20
- 0 Changing programme default settings 24
- \ Selecting additional functions 26
- M Setting the signal 27
- 2 Cleaning and maintenance 28
- 3 Faults and what to do about them 30
- 4 Customer service 35
- J Technical specifications 35
- [ Consumption values 36
- 5 Installation and connection 37
- 8 Intended use
- Intended use
- ( Safety instructions
- 7 Protection of the environment
- Y The main points in brief
- * Getting to know your appliance
- Z Laundry
- 1 Operating the appliance
- Operating the appliance
- Preparing the washer dryer
- Selecting the programme/ Switching on the appliance
- Adjusting the washing programme
- Adjusting the drying programme
- Loading the laundry
- Dosing and adding detergent and care product
- Starting the programme
- Childproof lock
- Reloading the laundry
- Changing the programme
- Interrupting or ending the programme
- End of the programme
- After washing/drying
- / Overview of programmes
- Overview of programmes
- Programme on the programme selector
- Drying table
- Starching
- Dyeing/Bleaching
- Soaking
- 1. Pour soaking agent/detergent into dispenser II according to the manufacturer’s instructions.
- 2. Set the programme selector to Cottons 60°C and select Start/ Reload A.
- 3. After approximately 10 minutes select Start/Reload A.
- 4. After the required soaking time, reselect Start/Reload A if the programme is to be continued or change the programme.
- Note:
- 0 Changing programme default settings
- \ Selecting additional functions
- M Setting the signal
- 2 Cleaning and maintenance
- Cleaning and maintenance
- : Warning
- Risk of electric shock!
- : Warning
- Risk of poisoning!
- Caution!
- Damage to the appliance
- Appliance housing/control panel
- Drum
- Descaling
- Cleaning the detergent dispenser
- 1. Pull out the detergent drawer. Depress the insert and remove the drawer completely.
- 2. Take out insert: using your finger, press insert upwards.
- 3. Clean the detergent dispenser and insert with water and a brush and dry.
- 4. Attach the insert and lock into position (push the cylinder onto the guide pin).
- 5. Insert detergent drawer.
- Note:
- Drain pump blocked
- : Warning
- Risk of scalding!
- 1. Turn the tap off to prevent more water from flowing in and to ensure that it is drained via the detergent solution pump.
- 2. Turn the programme selector to Ú Off. Pull out the mains plug.
- 3. Open the service flap.
- 4. Take the drainage hose out of the holder.
- 5. Remove the cover flap, draining the washing water into a suitable container. Press on the cover flap and insert the drainage hose into the holder.
- Note:
- 6. Carefully unscrew the pump cover. Clean the interior, pump cover thread and pump housing (the fan impeller in the detergent-solution pump must be able to rotate).
- 7. Reinsert and screw on the pump cover. Handle should be vertical.
- 8. Close the service flap. If required, engage the disengaged service flap beforehand.
- Note:
- Drainage hose on the siphon blocked
- Filter in the water inlet hose blocked
- : Warning
- Danger of death!
- 1. Turn off the tap.
- 2. Select any programme (except Spin 0 or Drain [).
- 3. Select Start/Reload A. Allow the programme to run for approx. 40 s.
- 4. Turn the programme selector to Ú Off. Pull out the mains plug.
- 5. Clean the filter on the tap:
- 6. Clean the filter on the back of the appliance:
- 7. Connect the hose and check for leaks.
- Air filter blocked
- 3 Faults and what to do about them
- 4 Customer service
- J Technical specifications
- [ Consumption values
- 5 Installation and connection
- Installation and connection
- Standard accessories
- Installation
- Secure installation
- Installation area
- Installing the appliance on a base or on a wooden joist ceiling
- Installing the appliance under/ between kitchen units
- Removing the transportation protection devices
- Hose and cable lengths
- Connecting the water
- Water supply
- Water drainage
- Drainage into a wash basin
- Drainage into a siphon
- Drainage into a plastic pipe with rubber sleeve or into a gully
- Alignment
- Electrical connection
- Before washing/drying for the first time
- Note:
- 1. Insert mains plug.
- 2. Turn the tap on.
- 3. Switch on the appliance.
- 4. Close the door. Do not load any laundry.
- 5. Select the Fluff Clean 90°C l programme. For AU variant, two cycles of Fluff Clean 90°C lprogramme without laundry are required to be run at initial setup, and this operation only needs to be completed once.
- 6. Open the detergent drawer.
- 7. Pour approx. 1 litre of water into dispenser II.
- 8. Add standard detergent to dispenser II according to manufacturer’s instructions for light soiling.
- Note:
- Note:
- Transportation
- Preparatory work
- Installing transportation protection devices:
- 1. Remove the covers and keep in a safe place.
- 2. Insert all 4 sleeves.
- Notes
- 1. If water damage is caused due to a fault in our Aqua-Stop system, we will compensate domestic customers for the damage caused.
- 2. The liability guarantee is valid for the service life of the appliance.
- 3. It is a prerequisite of all warranty claims that the appliance with Aqua-Stop must have been installed and connected correctly in accordance with our instructions; this also includes a correctly fitted Aqua-Stop extension (genuine accessories).
- 4. Appliances with Aqua-Stop do not need to be supervised during operation, nor secured afterwards by turning off the tap.
Changing programme default settings en
25
When the programme has started,
the preselected time is displayed
e.g.8:00h and counts down until
the programme starts. Then
the programme duration is displayed,
e.g. 2:30h
When the programme has started,
the preselected time can be changed
as follows:
1. Select Start/Reload A.
2. Select the 5 (Finish in) button
and change the Finish in time.
3. Select Start/Reload A.
0 (Spin speed)
8: The spin speed can be changed
before and during the programme (in
rpm, revolutions per minute) depending
on the progress of the programme.
Setting $ (Rinse stop = without final
drain/spin cycle), laundry remains in the
water after the last rinse cycle. The
maximum spin speed depends on the
programme and model.
Overview of programmes
5 (Drying)
@: The drying function can be
activated, deactivated and set with this
button. Washing and drying without
interruption is possible in automatic
mode only. If the programme for
individual drying is selected, automatic
drying or timed drying with a required
drying duration is available.
Notes
■ Programme selection in Intensive
Dry 5 or Gentle Dry ‰ position to
select an individual drying
programme.
Overview of programmes
The standard drying mode is Aut1.
In this mode the drying time is
automatically set according to the
amount of laundry to be dried. The
result is cupboard-dry laundry.
Drying mode can be set to Aut2 in
order to obtain an extra dry result; or
preselect the drying time which can
be specified by selecting the
5 (Drying) button.
Cupboard dry (Aut1): For single-
layer fabrics. Garments can be
folded or hung up in a cupboard.
Extra dry (Aut2): For fabrics made
of thick, multilayered items of
clothing, which need to be dried
longer. Garments can be folded or
hung up in a cupboard. Laundry
more dry than Cupboard dry.
■ Programme selection in washing
programmes and if washing and
drying is required without
interruption (only for Cottons i,
+Prewash T, Easy-Care f, Mixed
fabrics o, SuperQuick 15’ ] and
Allergy Plus ;).
1. Touch button 5 (Drying) and
activate the function Aut1 or Aut2.
2. Do not exceed the maximum loads
for drying.
Overview of programmes
3. Maximum spin speed for the
washing programme will be selected
automatically to obtain a good
drying result.