S1 Pro Multi-position PA System Owner's Guide
ENGLISH Please read and keep all safety and use instructions. Important Safety Instructions Refer to the owner’s guide (http://bosepro.link/s1docs) for more information about your S1 Pro (including accessories and replacement parts). 1. 2. 3. 4. 5. 6. 7. 8. 9. 10. 11. 12. 13. 14. Read these instructions. Keep these instructions. Heed all warnings. Follow all instructions. Do not use this apparatus near water. Clean only with a dry cloth. Do not block any ventilation openings.
Contents Overview 4 Product Overview......................................................................................................................................................................................4 Features and Benefits...............................................................................................................................................................................4 Package Contents............................................................................
Overview Overview Thank you for purchasing the Bose® S1 Pro Multi-position PA system. Whether you are performing for a small audience, hosting your own special event or entertaining at home, now you’ll always be ready to sound great. This guide provides detailed setup and operating instructions for your S1 Pro system and explains how to connect to a variety of audio sources. For additional information on using the system, including tips, techniques and frequently asked questions, please visit www.Bose.
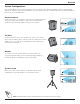
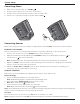
Overview System Configurations The versatile Bose® S1 Pro system operates in four unique modes. With Auto EQ, the system automatically updates to maintain optimum tonal balance for each position. Use the examples below to quickly identify the best mode for your application. Elevated Surface Position the S1 Pro on a surface. This projects sound clearly and evenly throughout the audience, and ensures that audience members enjoy the full frequency range of the system.
System Setup Bose® Connect App Download the Bose® Connect app to access additional options and features like Stereo Mode, so that you can wirelessly stream audio to a second system for even more output. Features Easily connect to and switch between multiple mobile devices with a single swipe. Configure your speakers to play in Party mode or Stereo mode. Compatible with most Apple and Android systems. Keep your speaker up-to-date with the latest software.
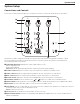
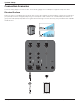
System Setup System Setup Connections and Controls The S1 Pro control panel provides the necessary connectors, controls and indicators for operation. 1 2 3 SIGNAL SIGNAL SIGNAL q w s e r a t y u o i Use Channel 1 and 2 inputs for microphones and musical instruments. Integrated ToneMatch® signal processing allows microphones and instruments to sound their best. Use Channel 3 for Bluetooth® connectivity and line-level inputs. q Signal/Clip indicator: Displays the input signal status in color.
System Setup Connecting Power 1. Make sure the power switch is in Standby ( ). 2. Plug the power cord into the connector on the S1 Pro. 3. Plug the other end of the power cord into a live electrical outlet. 4. Power on the system by turning the power switch to On ( ). 1 L NA SIG 1 L NA SIG 2 L NA SIG 2 L NA SIG 3 L NA SIG 3 L NA SIG 1 3 2 Connecting Sources Before connecting a sound source, adjust the appropriate channel Volume control fully counterclockwise.
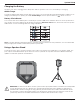
System Setup Charging the Battery Anytime your S1 Pro is plugged into AC power and the system is not in use, the battery is charging. Quick Charge Though the battery will always charge while your S1 Pro is connected to AC power, Quick Charge enables you to charge your battery more quickly. To enable Quick Charge, turn the power switch to ( ) when not in use. Battery Life Indicator The current state of the battery life is shown by the power LED, which will flash when the unit is powered on.
System Setup Connection Scenarios There are many ways to use the S1 Pro. The following pages show examples of typical setup scenarios. Elevated Surface Place the S1 Pro on a tabletop in the front of a room to give a business presentation or place it in the bed of your pickup truck for a tailgate party. Plug in a microphone and narrate over a multimedia presentation or get your friends pumped up before the game while listening to music wirelessly via your Bluetooth®-capable mobile device.
System Setup Tilt-Back Place the S1 Pro in Tilt-Back mode on the ground behind you for live musical performances. Tilting the loudspeaker onto it’s back edge creates a higher vertical coverage pattern, perfect for small audiences and passersby. Cue your backing tracks via Bluetooth® streaming and play along with a microphone and guitar.
System Setup Monitor Place the S1 Pro on its horizontal side edge to use as a floor monitor. Face it toward the performer to be used as a personal monitor or send your mix to a main PA system, then dial in your equalization and reverb preferences for your performance.
System Setup Speaker Stand Using a conventional speaker stand, you can use your S1 Pro as a PA system. Connect a microphone and give a toast or sing a song while cuing music wirelessly via Bluetooth® streaming.
System Setup General Purpose PA Use a mixer with two S1 Pro systems as a conventional PA system. The wide and consistent coverage of the system ensures that the entire audience can easily hear the performance throughout the room. Stereo Channel 1-4 1 2 3 1 2 3 SIGNAL SIGNAL SIGNAL SIGNAL SIGNAL SIGNAL L Out R Out Note: When used as a conventional PA, reverb and ToneMatch® should be turned off.
System Setup Dual-Mono/Daisy-Chain Link two S1 Pro systems together in mono by using a TRS ¼" cable. Take the line out of the primary unit and plug it into the secondary S1 Pro system. Turn the channel volume up until both units are at desired volume. 1 2 3 1 2 3 SIGNAL SIGNAL SIGNAL SIGNAL SIGNAL SIGNAL Note: On secondary units, set ToneMatch® and reverb to off and leave tone controls at center detent position.
Care & Maintenance Care & Maintenance Replacing the Battery 1. Switch the power to Standby ( ) and disconnect the S1 Pro from the power source. 2. Unscrew the two screws and remove the bottom plate. 3. Remove the battery using the pull tabs. 4. Insert the new battery, ensuring the connector pins line up appropriately. 5. Replace the bottom plate and secure it with the two screws that were removed in Step 2. 6. Plug the S1 Pro into a power source. 7.
Care & Maintenance Cleaning Your S1 Pro Clean the product enclosure using only a soft, dry cloth. If necessary, carefully vacuum the grille of the loudspeaker. CAUTION: Do not use any solvents, chemicals, or cleaning solutions containing alcohol, ammonia, or abrasives. CAUTION: Do not use any sprays near the product or allow liquids to spill into any openings. Troubleshooting If you experience problems while using this product, try the following solutions.
Care & Maintenance Problem What to do Excessive hum when daisy-chaining multiple units Make sure you're using a 1/4" TRS cable; do not use a 1/4" TS (guitar) cable. Speaker does not charge Set the power switch to On or Quick Charge and do not use the speaker while it is charging. Try charging your battery with the power switch set to On instead of Quick Charge. Move your speaker to a cooler location. Leave your speaker in Standby for several hours before trying to charge your battery again.
©2018 Bose Corporation, All rights reserved. Framingham, MA 01701-9168 USA www.Bose.com All trademarks are the property of their respective owners AM807173 Rev.