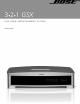
3•2•1 GSX DVD HOME ENTERTAINMENT SYSTEM 2ZQHU¶V *XLGH
Svenska Nederlands Italiano Français Svenska Nederlands Español Français Deutsch Italiano Deutsch Español Dansk English Dansk SAFETY INFORMATION Please read this owner’s guide Please take the time to follow this owner’s guide carefully. It will help you set up and operate your system properly, and enjoy all of its advanced features. Save your owner’s guide for future reference. WARNING: To reduce the risk of fire or electric shock, do not expose the system to rain or moisture.
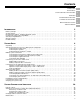
English Dansk Deutsch Español Dansk Français Deutsch Italiano CONTENTS Nederlands Español Français Svenska Italiano Nederlands Svenska CONTENTS INTRODUCTION 5 SYSTEM SETUP 8 SYSTEM CONTROLS AND INDICATORS 26 OPERATION 35 CHANGING SOURCE SETTINGS 48 CHANGING SYSTEM OPTIONS 53 MAINTAINING YOUR SYSTEM 64 TROUBLESHOOTING 66 INTRODUCTION Before you begin . . . . . . . . . . . . . . . . . . . . . . . . . . . . . . . . . . . . . . . . . . . . . . . . . . . . . . . . . . . . . . . . . . . .
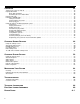
Svenska Nederlands Italiano Français Svenska Nederlands Español Français Deutsch Italiano Deutsch Español Dansk English Dansk OPERATION 35 Turning your system on and off . . . . . . . . . . . . . . . . . . . . . . . . . . . . . . . . . . . . . . . . . . . . . . . . . . . . . . . . . . . . . . . . . . Playing video DVDs . . . . . . . . . . . . . . . . . . . . . . . . . . . . . . . . . . . . . . . . . . . . . . . . . . . . . . . . . . . . . . . . . . . . . . . . . . . Basic DVD operations . . . . .
English Dansk Deutsch Español Dansk Français Deutsch Italiano Nederlands Español Français Svenska Italiano Nederlands Svenska INTRODUCTION INTRODUCTION Before you begin Thank you for purchasing the 3•2•1 GSX DVD home entertainment system, which offers superb sound, elegance, and simplicity in an advanced home audio setup.
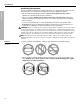
Svenska Nederlands Italiano Français Svenska Nederlands Español Français Deutsch Italiano Deutsch Español Dansk English Dansk INTRODUCTION INTRODUCTION Selecting compatible discs The DVD/CD player built into the 3•2•1 GSX media center can play the following types of discs identified by their corresponding logos: • Video DVD • Audio CD • Video CD • CD-R and CD-R/W • DVD+R, DVD-R, DVD+RW, and DVD-RW • MP3 CDs, where – All tracks were burned in a single closed session – The disc format is ISO966
English Dansk Deutsch Español Dansk Français Deutsch Italiano Nederlands Español Français Svenska Italiano Nederlands Svenska INTRODUCTION INTRODUCTION Gracenote – Music recognition technology and related data provided as part of the service contracted by Bose. IR – An acronym for infrared. Pertains to the type of remote that sends/receives commands on an infrared light beam. MPEG – A type of data compression used for audio or video storage on disc. MP3 – MPEG-1 Layer III audio.
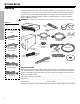
Svenska Nederlands Italiano Français Svenska Nederlands Español Français Deutsch Italiano Deutsch Español Dansk English Dansk SYSTEM SETUP Unpacking SYSTEM SETUP Carefully unpack your system. Save all packing materials, which provide the safest way to transport your system. Check to be sure your system includes the parts shown in Figure 1. If any part of the system appears damaged, do not attempt to use it. Notify Bose or your authorized Bose® dealer immediately.
English Dansk Deutsch Español Dansk Français Deutsch Italiano Nederlands Español Français Svenska Italiano Nederlands Svenska SYSTEM SETUP Selecting locations for your 3•2•1 GSX system components Note: While these guidelines are offered to help provide great system performance, you may find other placement choices that are more convenient and provide the sound you enjoy. Positioning the media center CAUTION: Do not block any ventilation openings.
Svenska Nederlands Italiano Français Svenska Nederlands Español Français Deutsch Italiano Deutsch Español Dansk English Dansk SYSTEM SETUP Positioning the speakers SYSTEM SETUP Choosing a good location for the speakers will allow you to experience the audio surround effects that your 3•2•1 GSX home entertainment system is designed to deliver. • Place the left and right speakers at least 3 feet (1 meter) apart from each other to optimize the surround sound experience (Figure 3).
English Dansk Deutsch Español Dansk Français Deutsch Italiano Nederlands Español Français Svenska Italiano Nederlands Svenska SYSTEM SETUP Positioning the Acoustimass® module • Place the module at the same end of the room as the TV and the speakers (Figure 4). • Place the Acoustimass® module within reach of the cable from the music center and an AC (mains) power outlet.
Svenska Nederlands Italiano Français Svenska Nederlands Español Français Deutsch Italiano Deutsch Español Dansk English Dansk SYSTEM SETUP Making system connections SYSTEM SETUP CAUTION: Do not plug the Acoustimass® module into an AC power (mains) outlet until all the components are connected. Connecting the Acoustimass® module to the media center Plug one end of the Acoustimass module cable into the Acoustimass Module jack on the rear of the media center (Figure 6).
English Dansk Deutsch Español Dansk Français Deutsch Italiano Nederlands Español Français Svenska Italiano Nederlands Svenska SYSTEM SETUP 2. At the other end of the speaker cable, separate the left and right speaker cords as much as necessary to reach each speaker (Figure 8). SYSTEM SETUP Figure 8 Separating left and right speaker cords 3. Plug the LEFT speaker cable into the rear jack of the left speaker (Figure 9). Plug the RIGHT speaker cable into the rear jack on the right speaker.
Svenska Nederlands Italiano Français Svenska Nederlands Español Français Deutsch Italiano Deutsch Español Dansk English Dansk SYSTEM SETUP SYSTEM SETUP Connecting the supplied antennas The rear panel of the media center provides jacks for the AM and FM antennas included with your system (Figure 10). Unwind the wires for each antenna to provide the best reception. Note: An outdoor antenna may be used in place of the supplied indoor antennas. To add an outdoor antenna, consult a qualified installer.
English Dansk Deutsch Español Dansk Français Deutsch Italiano Nederlands Español Français Svenska Italiano Nederlands Svenska SYSTEM SETUP Connecting your TV to the media center Making audio connections Note: If your TV does not have audio output jacks, see “Option B: TV (NO audio output jacks) + VCR + media center” on page 17. Otherwise, continue. 1. Connect one end of the supplied stereo cable to the TV Audio IN jacks on the rear panel of the media center (Figure 11).
Svenska Nederlands Italiano Français Svenska Nederlands Español Français Deutsch Italiano Deutsch Español Dansk English Dansk SYSTEM SETUP Connecting your TV and VCR to the media center SYSTEM SETUP There are two options for connecting your TV and VCR to the media center. • Option A: TV with audio output jacks+VCR • Option B: TV without audio output jacks+VCR Before proceeding, check your TV for audio output jacks.
English Dansk Deutsch Español Dansk Français Deutsch Italiano Nederlands Español Français Svenska Italiano Nederlands Svenska SYSTEM SETUP Option B: TV (NO audio output jacks) + VCR + media center 1. Connect one end of the supplied stereo cable to the AUX Audio IN jacks on the rear panel of the media center (Figure 13). Insert the white RCA plug into the AUX white L jack. Insert the red RCA plug into the AUX red R jack. 2.
Svenska Nederlands Italiano Français Svenska Nederlands Español Français Deutsch Italiano Deutsch Español Dansk English Dansk SYSTEM SETUP VCR considerations SYSTEM SETUP • Some combination TV/VCR units may not work with 3•2•1 GSX home entertainment systems. Please refer to your TV/VCR owner’s manual for information. • A stereo VCR is required for optimal sound performance. If your VCR has only one audio output, you have a mono VCR.
English Dansk Deutsch Español Dansk Français Deutsch Italiano Nederlands Español Français Svenska Italiano Nederlands Svenska SYSTEM SETUP Making component video connections (highest-quality video) For the highest-quality video from DVDs, you may want to use a component video connection between the media center and the TV. To do so, your TV must provide component video jacks (typically labelled Y, Pb, and Pr). Refer to your TV owner’s guide for more information.
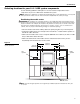
Svenska Nederlands Italiano Français Svenska Nederlands Español Français Deutsch Italiano Deutsch Español Dansk English Dansk SYSTEM SETUP Connecting digital audio devices SYSTEM SETUP Some audio devices feature a digital audio output for optimum sound performance. Use an optical digital cable or a coaxial digital cable, as appropriate, to connect this output to the digital input on the media center. You can purchase the required cables at a local electronics store.
English Dansk Deutsch Español Dansk Français Deutsch Italiano Nederlands Español Français Svenska Italiano Nederlands Svenska SYSTEM SETUP Figure 17 SYSTEM SETUP Advanced setup example: TV, VCR, and cable/satellite box Media center For future use only.
Svenska Nederlands Italiano Français Svenska Nederlands Español Français Deutsch Italiano Deutsch Español Dansk English Dansk SYSTEM SETUP SYSTEM SETUP Connecting a game console Connect the audio output of a game console to the AUX Left and Right input jacks. Connect the video output of the game console to the C (composite) Video IN jack.
English Dansk Deutsch Español Dansk Français Deutsch Italiano Nederlands Español Français Svenska Italiano Nederlands Svenska SYSTEM SETUP Installing the remote control batteries 2. Insert the two supplied AA (IEC-R6) 1.5V batteries, or their equivalent, as shown. Match the plus (+) and minus (–) marked on the batteries with the plus (+) and minus (–) inside the battery compartment. 3. Slide the battery compartment cover back into place.
Svenska Nederlands Italiano Français Svenska Nederlands Español Français Deutsch Italiano Deutsch Español Dansk English Dansk SYSTEM SETUP Connecting the power cord SYSTEM SETUP CAUTION: Do not plug the Acoustimass® module into an AC power (mains) outlet until all the components are connected. CAUTION: For dual voltage models only, be sure to set the dual voltage switch on the back of the Acoustimass module to the appropriate voltage for your area (115V or 230V) before connecting to power.
English Dansk Deutsch Español Dansk Français Deutsch Italiano Nederlands Español Français Svenska Italiano Nederlands Svenska SYSTEM SETUP Verifying your system setup 1. Check the following before you continue: • All cables are connected for the setup you chose. • The batteries were installed in the remote control. • The power cord was installed and plugged into a live AC receptacle. 2. Turn on your TV. Use the remote control that came with your TV. 3.
Svenska Nederlands Italiano Français Svenska Nederlands Español Français Deutsch Italiano Deutsch Español Dansk English Dansk SYSTEM CONTROLS AND INDICATORS Remote control • Turns the system on or off. SYSTEM CONTROLS AND INDICATORS Remote status LED Status LED: • Off (unlit) during normal operation. • On during the process of setting up the remote to control other equipment such as your TV or VCR. • Silences or restores the sound from the current source.
English Dansk Deutsch Español Dansk Français Deutsch Italiano Nederlands Español Français Svenska Italiano Nederlands Svenska SYSTEM CONTROLS AND INDICATORS Remote control – cont. • Displays the Settings menu for the current source on your TV screen or media center display. • Displays the System menu on your TV screen. • Displays the DVD menu of the currently loaded DVD disc on your TV screen. • Displays the main menu of a cable/satellite box, VCR, or PVR on your TV screen (if supported).
Svenska Nederlands Italiano Français Svenska Nederlands Español Français Deutsch Italiano Deutsch Español Dansk English Dansk SYSTEM CONTROLS AND INDICATORS Remote control – cont. SYSTEM CONTROLS AND INDICATORS • Raises or lowers the volume of the current source. • Pressing + restores muted sound from the current source. • Pressing – lowers the volume of the current source, but does not restore muted sound. • Skips to the next or previous TV channel,* CD track, or DVD chapter.
English Dansk Deutsch Español Dansk Français Deutsch Italiano Nederlands Español Français Svenska Italiano Nederlands Svenska SYSTEM CONTROLS AND INDICATORS Remote control – cont. • In Stored source, applies a negative (–) or positive (+) rating to the stored track currently playing. Pressing – immediately selects a new track. Pressing + continues playing the current track.
Svenska Nederlands Italiano Français Svenska Nederlands Español Français Deutsch Italiano Deutsch Español Dansk English Dansk SYSTEM CONTROLS AND INDICATORS SYSTEM CONTROLS AND INDICATORS Remote control – cont. Aspect ratio or Teletext On/Off control You will see one of two symbols above the Library button on your remote control. The symbol defines the function. Symbol Function When a video source is selected, changes the video aspect ratio between Normal (4:3) and Widescreen (16:9).
English Dansk Deutsch Español Dansk Français Deutsch Italiano Nederlands Español Français Svenska Italiano Nederlands Svenska SYSTEM CONTROLS AND INDICATORS Setting up your remote to control other audio/video devices Your remote can be set up to control other audio/video devices such as a TV, VCR, PVR, or cable/satellite box by entering a device code while in the setup mode. • If you can’t find the device code and want to search the system for it, see “Searching for a device code” on page 32.
Svenska Nederlands Italiano Français Svenska Nederlands Español Français Deutsch Italiano Deutsch Español Dansk English Dansk SYSTEM CONTROLS AND INDICATORS 4. Check that the LED turns off after the code is entered. If the LED blinks, the code is invalid. Try again. SYSTEM CONTROLS AND INDICATORS 5. Point the remote at your cable/satellite box and press the CBL-SAT On-Off button. If your cable/satellite box does not respond, go back to Step 2 and try other codes.
English Dansk Deutsch Español Dansk Français Deutsch Italiano Nederlands Español Français Svenska Italiano Nederlands Svenska SYSTEM CONTROLS AND INDICATORS To set up the remote to control your cable/satellite box 1. Turn on both the 3•2•1 GSX system and your cable/satellite box. 3. Alternately press Channel turns off. SYSTEM CONTROLS AND INDICATORS 2. Press and hold CBL-SAT until the remote LED is lit (about five seconds). and CBL-SAT On-Off until your cable/satellite box 4. Press Enter.
Svenska Nederlands Italiano Français Svenska Nederlands Español Français Deutsch Italiano Deutsch Español Dansk English Dansk SYSTEM CONTROLS AND INDICATORS Verifying an entered device code In case you need to check to see what code the remote is using for a particular device, do the following: SYSTEM CONTROLS AND INDICATORS 1. Press and hold a source key (TV, CBL-SAT, or AUX) until the remote LED lights (about five seconds). 2. Press the Info button. 3.
English Dansk Deutsch Español Dansk Français Deutsch Italiano Nederlands Español Français Svenska Italiano Nederlands Svenska SYSTEM CONTROLS AND INDICATORS Media center The media center has a control panel on the top, a display area to show the current status of the system, and a disc tray that opens on the front of the console. SYSTEM CONTROLS AND INDICATORS Control panel The media center has six buttons located above the display.
Svenska Nederlands Italiano Français Svenska Nederlands Español Français Deutsch Italiano Deutsch Español Dansk English Dansk OPERATION Turning your system on and off To turn power on or off: • Point the 3•2•1 remote at the media center and press On/Off. OPERATION On-Off OR • Press On/Off on top of the media center. To turn on the system and select a source at the same time: • Press Stored, CD•DVD, FM•AM, TV, CBL•SAT, or AUX on the 3•2•1 remote.
English Dansk Deutsch Español Dansk Français Deutsch Italiano Nederlands Español Français Svenska Italiano Nederlands Svenska OPERATION While playing a DVD video, the media center displays the elapsed play time and chapter number. Figure 23 DVD 0:06:11 CHAPTER 1/12 OPERATION Sample display for a DVD video Basic DVD operations • Press Pause to pause a movie. OR • Press Pause again, or press Play to resume playing a paused DVD. • Press Stop to interrupt a movie in progress. • Press Stop once.
Svenska Nederlands Italiano Français Svenska Nederlands Español Français Deutsch Italiano Deutsch Español Dansk English Dansk OPERATION Playing audio CDs Eject 1. On the 3•2•1 remote, press CD•DVD to turn the 3•2•1 GSX system on to the CD/DVD source. OPERATION 2. On the media center control panel, press Eject to open the disc tray. 3. Place the CD disc in the disc tray. Eject 4. Press Eject again to close the tray. 5. The audio CD should begin to play automatically.
English Dansk Deutsch Español Dansk Français Deutsch Italiano Nederlands Español Français Svenska Italiano Nederlands Svenska OPERATION Listening to FM/AM radio On the 3•2•1 remote, press FM-AM. If the system is off, the radio will turn on to the most recently selected station. OPERATION Tuning to a station Use the following controls to tune to a radio station. • Press FM-AM to switch between the FM and AM bands. • Press Tune to tune up the band. Press Tune to tune down the band.
Svenska Nederlands Italiano Français Svenska Nederlands Español Français Deutsch Italiano Deutsch Español Dansk English Dansk OPERATION Using the uMusic® intelligent playback system Before you can play stored music and use the uMusic® intelligent playback system, you need to store some CD tracks in your media center. To experience the impact of the uMusic playback system, you should start by storing 10 discs. OPERATION Note: Your system is designed to store tracks of regular CDs only.
English Dansk Deutsch Español Dansk Français Deutsch Italiano Nederlands Español Français Svenska Italiano Nederlands Svenska OPERATION Playing stored music • Press Stored on your remote to select the stored music source and turn on the system, if it is off. The uMusic® system will begin to play the stored music under the last-selected preset and in the last play mode used. Your media center displays information (Figure 25) about the track that is playing.
Svenska Nederlands Italiano Français Svenska Nederlands Español Français Deutsch Italiano Deutsch Español Dansk English Dansk OPERATION • Press Stop once to stop playing a selection. Pressing Play will continue the selection from where the track stopped. OPERATION • Press Stop twice. Pressing Play will start the selection from the beginning of the track. • Press Track to skip to another track. • Press Track to skip to a previous track.
English Dansk Deutsch Español Dansk Français Deutsch Italiano Nederlands Español Français Svenska Italiano Nederlands Svenska OPERATION Rating your music When you first start playing your stored music, the uMusic® system doesn’t know what you like to hear the most, so the system starts by playing tracks from your entire music library. As you spend time listening to your music and rating each track, the system learns what you like to hear.
Svenska Nederlands Italiano Français Svenska Nederlands Español Français Deutsch Italiano Deutsch Español Dansk English Dansk OPERATION Deleting stored tracks If there is a track stored in the system that you will never want to play, you can permanently delete it from your stored music collection. 1. Press System on the remote control. OPERATION 2. Select Stored CDs and press Enter. 3. Select CD# and press Enter. 4.
English Dansk Deutsch Español Dansk Français Deutsch Italiano Nederlands Español Français Svenska Italiano Nederlands Svenska OPERATION To name a preset 1. Press System. 2. Select Media Center options (Figure 28). OPERATION Figure 28 System menu – media center options 0HGLD &HQWHU 6HOHFW 0HGLD &HQWHU WR DGMXVW WKHVH V\VWHP RSWLRQV 'LVSOD\ %ULJKWQHVV 'LVSOD\ /DQJXDJH 2SWLFDO 6RXUFH 7XQHU 6SDFLQJ %RVH OLQN 5RRP &RGH X0XVLF 3UHVHWV 5HVWRUH 6HWWLQJV navigate select 3.
Svenska Nederlands Italiano Français Svenska Nederlands Español Français Deutsch Italiano Deutsch Español Dansk English Dansk OPERATION Using the Playlist Using the Playlist feature, you can create a playlist of songs for a specific purpose, such as a birthday party or holiday gathering. The Playlist can contain as many tracks as you have stored in your media center.
English Dansk Deutsch Español Dansk Français Deutsch Italiano Nederlands Español Français Svenska Italiano Nederlands Svenska OPERATION Searching through your music library Using the Library display, you can search through your music collection by genre, artist, album, or track.
Svenska Nederlands Italiano Français Svenska Nederlands Español Français Deutsch Italiano Deutsch Español Dansk English Dansk OPERATION OPERATION Rating stored music in the library display You can register a rating for any stored music found in the library by genre, artist, album, or track. First find the item in the library display. While the item is selected, press the – Rating or + Rating button on your remote. The display confirms your rating (Figure 31).
English Dansk Deutsch Español Dansk Français Deutsch Italiano Nederlands Español Français Svenska Italiano Nederlands Svenska CHANGING SOURCE SETTINGS Using the settings menus While watching a video or listening to music on your system, you can make quick adjustments that will increase your enjoyment of the program. For that purpose, each source you use with this system has its own Settings menu with features appropriate to that source. To view the settings menus 1.
Svenska Nederlands Italiano Français Svenska Nederlands Español Français Deutsch Italiano Deutsch Español Dansk English Dansk CHANGING SOURCE SETTINGS To make changes in the settings menus Whether you use your TV screen or the media center display to change settings, the same instructions apply. CHANGING SOURCE SETTINGS You can use the actions on page 49 to change back to the original (default) settings, too.
English Dansk Deutsch Español Dansk Français Deutsch Italiano Nederlands Español Français Svenska Italiano Nederlands Svenska CHANGING SOURCE SETTINGS Stored CD Settings menu To see the Stored CD Settings menu, press Stored on the remote. Then press Settings. Press Exit to remove the menu from the screen. Item Name Settings Description 1 (or last Indicates the current preset and selected) allows you to change it.
Svenska Nederlands Italiano Français Svenska Nederlands Español Français Deutsch Italiano Deutsch Español Dansk English Dansk CHANGING SOURCE SETTINGS DVD Settings menu To see the DVD Settings menu, press CD•DVD on the remote while playing a DVD video disc. Then press Settings. Press Exit to remove the menu from the screen. Item Name Settings Default Description On, Off On Optimizes the tonal balance for movies.
English Dansk Deutsch Español Dansk Français Deutsch Italiano Nederlands Español Français Svenska Italiano Nederlands Svenska CHANGING SOURCE SETTINGS TV, CBL•SAT, and AUX Settings menu The settings below affect programs on the TV, even when the source of the program is VCR, CBL/SAT, or AUX. There are no separate setting menus for these sources. Movie EQ, Range Compression and Mono Decoding appear in the menu only if Audio Processing is set to User Adjustable.
Svenska Nederlands Italiano Français Svenska Nederlands Español Français Deutsch Italiano Deutsch Español Dansk English Dansk CHANGING SYSTEM OPTIONS Using the System menu Changes to system options are typically made only once. If your system operates as you want it to, there may be no need for any changes. In some cases, however, changes are required to make the system fully compatible with the installation options you have chosen.
English Dansk Deutsch Español Dansk Français Deutsch Italiano Nederlands Español Français Svenska Italiano Nederlands Svenska CHANGING SYSTEM OPTIONS Stored CD options Press System on the remote control. A preview of Stored CD features is displayed. Press the down arrow button to move into an active display of submenus. Note: This choice is available from the System menu only when music from at least one CD has been stored in the system.
Svenska Nederlands Italiano Français Svenska Nederlands Español Français Deutsch Italiano Deutsch Español Dansk English Dansk CHANGING SYSTEM OPTIONS CHANGING SYSTEM OPTIONS Stored CD Options Settings Description Genre Identifies the type of music on the CD. Rock/Pop, Classical, Jazz, Electronica, World, Latin, Country, Reclassifies the CD as the selected music genre.
English Dansk Deutsch Español Dansk Français Deutsch Italiano Nederlands Español Français Svenska Italiano Nederlands Svenska CHANGING SYSTEM OPTIONS Using the Edit Screen The Edit Screen (Figure 37) enables you to change or replace music information provided by the system. It appears when you select a menu item that can be edited from the Stored CD options (page 55) or the Library menu (page 47).
Svenska Nederlands Italiano Français Svenska Nederlands Español Français Deutsch Italiano Deutsch Español Dansk English Dansk CHANGING SYSTEM OPTIONS To enter a space between words: Spaces are entered to the right of the last character in the text line. 1. Select Space and press Enter. 2. Select the first character of your next word and press Enter. CHANGING SYSTEM OPTIONS To enter a capital letter: The first letter of a new line of text is automatically capitalized.
English Dansk Deutsch Español Dansk Français Deutsch Italiano Nederlands Español Français Svenska Italiano Nederlands Svenska CHANGING SYSTEM OPTIONS Audio options The audio options affect the way the system sounds in your home. Note: Listening to an audio source while you change audio options can be helpful. Some changes will be immediately noticeable and therefore useful in fine tuning your selections.
Svenska Nederlands Italiano Français Svenska Nederlands Español Français Deutsch Italiano Deutsch Español Dansk English Dansk CHANGING SYSTEM OPTIONS Video options The video options affect the way the picture looks on your TV.
English Dansk Deutsch Español Dansk Français Deutsch Italiano Nederlands Español Français Svenska Italiano Nederlands Svenska CHANGING SYSTEM OPTIONS Media center options The media center options affect the general operation of the system.
Svenska Nederlands Italiano Français Svenska Nederlands Español Français Deutsch Italiano Deutsch Español Dansk English Dansk CHANGING SYSTEM OPTIONS Remote control options The Remote Control options help you set up your remote to control other audio devices that are connected to your system.
English Dansk Deutsch Español Dansk Français Deutsch Italiano Nederlands Español Français Svenska Italiano Nederlands Svenska CHANGING SYSTEM OPTIONS DVD Lock options The DVD Lock options allow you to restrict viewing of DVD videos with certain ratings. To activate this feature, you need to set a level of restriction and establish a password in the DVD Lock section of the System menu.
Svenska Nederlands Italiano Français Svenska Nederlands Español Français Deutsch Italiano Deutsch Español Dansk English Dansk CHANGING SYSTEM OPTIONS 5. Enter your four-digit password. 6. Using the down ( ) button, scroll down to Lock Discs Rated Above. 7. Press the right arrow ( 8. Press the up ( ) button to see the available settings. ) or down ( ) arrow button to find the rating you want. CHANGING SYSTEM OPTIONS 9. Press Enter or the left arrow ( ) button to save the setting. 10.
English Dansk Deutsch Español Dansk Français Deutsch Italiano Nederlands Español Français Svenska Italiano Nederlands Svenska MAINTAINING YOUR SYSTEM Cleaning Cleaning the media center • Use only a soft, dry cloth to clean the outside surfaces of the media center. • Do not use any sprays near the system. Do not use any solvents, chemicals, or cleaning solutions containing alcohol, ammonia, or abrasives. • Do not allow liquids to spill into any openings.
Svenska Nederlands Italiano Français Svenska Nederlands Español Français Deutsch Italiano Deutsch Español Dansk English Dansk MAINTAINING YOUR SYSTEM Replacing the remote control batteries CAUTION: Please dispose of used batteries properly, following any local regulations. Do not incinerate. • Slide open the battery compartment (Figure 44). • Notice the polarity markings (+ and –) inside the compartment and install the batteries accordingly. Be sure to replace both batteries.
English Dansk Deutsch Español Dansk Français Deutsch Italiano Nederlands Español Français Svenska Italiano Nederlands Svenska TROUBLESHOOTING Troubleshooting table What to do System doesn’t do anything • Make sure the unit is turned on. Try pressing the remote On-Off button and the media center On-Off button. • Make sure the Acoustimass® module cable is properly connected to the media center and the Acoustimass module.
Svenska Nederlands Italiano Français Svenska Nederlands Español Français Deutsch Italiano Deutsch Español Dansk English Dansk TROUBLESHOOTING TROUBLESHOOTING Problem What to do Radio does not work or has poor reception • • • • • • Make sure antennas are connected properly. Move AM antenna at least 20 inches (50 cm) from the media center. Adjust antenna position to improve reception. Make sure the AM antenna is in the upright position.
English Dansk Deutsch Español Dansk Français Deutsch Italiano Nederlands Español Français Svenska Italiano Nederlands Svenska TECHNICAL INFORMATION Power rating USA/Canada: 120V Maximum ambient temperature 60Hz 300W International: 220-240V 50/60Hz 300W Dual voltage: 115/230V 50/60Hz 300W Audio inputs AUX – Left, Right (analog); D (digital) CBL-SAT – L, R (analog); D (digital) TV – L, R (analog); D (digital) Optical – SPDIF digital, mapped to input 104°F (45°C) Dimensions Media center: 3¼"H x
Svenska Nederlands Italiano Français Svenska Nederlands Español Français Deutsch Italiano Deutsch Español Dansk English Dansk END USER LICENSE AGREEMENT IMPORTANT: READ CAREFULLY: This End User License Agreement (“EULA”) is a legal agreement between you, the End User (“End User” or “You”), and Bose Corporation (“Bose”) governing your use of the technology and software and data and data content belonging to Bose, its vendors and licensors (“Technology”), that is contained in this audio/ video device
13_Device Codes.fm Page 1 Wednesday, July 27, 2005 8:27 AM DEVICE CODES Finding the right device codes Using the right device codes, you can set up your new universal remote to control the video devices you want to use with your speaker system. For the remote setup procedure, see your owner’s guide. To find available codes for a device, search the listing under the appropriate device type heading.
DEVICE CODES Ardem............................ 0037, 0486, 0556, 0633, 0714 Television Aristona ......................... 0037, 0556 TV TV ART................................ 1037 A-Mark .......................... 0003 Astra .............................. 0037 Abex .............................. 0032 Asuka............................. 0217 Addison ......................... 0092, 0108, 0653, 1150 ATD................................ 0698 Admiral .......................... 0093, 0463 Atlantic ....
DEVICE CODES Conrowa........................ 0145, 0156, 0698, 1156 Contec........................... 0037, 0157, 0180, 0185, 0698 Durabrand ..................... 0003, 0171, 0178, 0180, 0463, 1034, 1463 Fujitsu ............................ 0037, 0179, 0186, 0217, 0683, 0809, 0853, 1181 Fujitsu General .............. 0217, 0683 Dynatron........................ 0037 Craig.............................. 0180 Ecco .............................. 0706 Funai..............................
TV DEVICE CODES Harley Davidson ............ 0179 Interbuy ......................... 0037, 0512 Kongque ........................ 0817 Harman/Kardon............. 0054 Interfunk ........................ 0037, 0512 Harsper.......................... 0865 Internal .......................... 0037 Konka ............................ 0037, 0282, 0587, 0628, 0632, 0638, 0703, 0707, 0714, 0754, 0817 Harvard.......................... 0180 Intervision ......................
DEVICE CODES Nansheng ...................... 0817 Palsonic ......................... 0001, 0037, 0217, 0698 Matsui............................ 0037, 0177, 0195, 0208, 0217, 0335, 0443, 0556, 0629, 0714, 1037 NAT................................ 0226 Panama ......................... 0037, 0217 National ......................... 0051, 0055, 0208, 0226, 0508 Panashiba...................... 0001 Matsushita..................... 0051, 0250, 0650 Matsuviama................... 0587 Maxent ...................
TV DEVICE CODES Pye ................................ 0037, 0556 Samsux ......................... 0039 Simpson ........................ 0186, 0187 Qingdao......................... 0051, 0208, 0226, 0817 Sandra ........................... 0217 Qualcraft........................ 0039 Sansei............................ 0451 Singer ............................ 0335, 0548, 0698, 0706, 1537 Quasar........................... 0051, 0055, 0165, 0250, 0650, 0865 Sansui............................
DEVICE CODES Videotechnic.................. 0217 ThemeScene ................. 0887 Vidikron.......................... 0054 Thompson ..................... 0625 Vidtech........................... 0019, 0178 Thomson ....................... 0037, 0335, 0560, 0625, 1447 Viewsonic ...................... 0857, 0864, 0885, 1755 Tacico ............................ 0092, 0178, 0179, 1150 Tai Yi .............................. 1150 Thorn ............................. 0037, 0335, 0512 Taishan .................
DEVICE CODES CBL Cable box ABC ............................... 0001, 0003, 0007, 0008, 0011, 0013, 0014, 0017, 0237 CBL ADB ............................... 1063, 1230, 1269 Galaxi ............................ 0008 Garrard .......................... 0153 Pace .............................. 0008, 0237, 1060, 1068, 1577, 1877 GC Electronics .............. 0056, 0207 Panasonic...................... 0000, 0008, 0021, 0040, 0107, 0375, 1488 GE.................................. 0237 Panther ..............
DEVICE CODES Thomson ....................... 1110, 1256 Arnion ............................ 1300 Time Warner .................. 1877 Asat ............................... 0200 Timeless ........................ 0040 ASCI .............................. 1334 Tocom............................ 0012, 0013 ASLF.............................. 0713 Torx................................ 0003 AssCom......................... 0853 Dish Network ................. 0775, 1005, 1170, 1505, System 1775 Toshiba ......
DEVICE CODES Gradiente....................... 0099, 0856 M vision ......................... 1557 Grundig ......................... 0173, 0750, 0847, 0853, 1150, 1291, 1330, 1335 Magnavox...................... 0722, 0724 Pace .............................. 0200, 0241, 0329, 0795, 0847, 0853, 1175, 1323, 1356, 1423, 1623 Manata .......................... 0713 Packard Bell .................. 1111 Manhattan ..................... 1017 Palcom .......................... 0299, 1161 Marantz ...............
DEVICE CODES Satelco .......................... 1232 Teleciel........................... 1043 Satplus .......................... 1100 Teleka ............................ 0750 Schaub Lorenz .............. 1214 Telestar .......................... 1099, 1100, 1251, 1334 Schneider ...................... 1206, 1251 Telesystem..................... 1251 Schwaiger ..................... 1075, 1111, 1334, 1457 Televes........................... 1214, 1300 SCS ............................... 0299 Tempo....
DEVICE CODES BBK ............................... 1224 Bel Canto Design .......... 1571 Bellagio ......................... 1004 Black Diamond.............. 0698, 0713, 0766, 0833, 0884 Elta................................. 0672, 0690, 0770, 0788, 0850, 1051, 1115 Cydectin ........................ 1074 Eltax............................... 0766 Cytron............................ 0651 Emerson ........................ 0591, 0675, 0705, 0816, 0821, 1268 D-Vision ......................... 1115 Blaupunkt ..
DEVICE CODES Hitachi ........................... 0573, 0664, 0695, 0713, 1247, 1664 Hiteker........................... 0672, 0872 Home Electronics .......... 0730 Home Tech .................... 1107, 1224 Hoyo.............................. 0665 Humax........................... 0646 Hyundai ......................... 0766, 0768, 0783, 0850 iLo ................................. 1348 Ingelen........................... 0788 Initial .............................. 0717, 0839 Limit...............................
DEVICE CODES Phonotrend.................... 0672, 0699, 0818, 1165 Sansui............................ 0695, 0768, 0784, 1695 Star Cluster.................... 0768 PianoDisc ...................... 1024 Sanyo ............................ 0670, 0695, 0873 Starlogic ........................ 1005 Pioneer .......................... 0490, 0525, 0571, 0631, 0632, 1571, 1816 Scan .............................. 0705, 0850 Starmedia ...................... 0818, 1005, 1224 ScanMagic ....................
DEVICE CODES Universal Multimedia..... 0768 Aiwa............................... 1468, 1336, 1284, 0742, 0687, 0680, 0479, 0468, 0352, 0348, 0315, 0307, 0209, 0124, 0037, 0032, 0000 Bush .............................. 0000, 0072, 0081, 0209, 0278, 0315, 0348, 0352, 0642, 0742 Akai................................ 0020, 0037, 0041, 0061, 0081, 0106, 0175, 0240, 0315, 0348, 0352, 0642 Canon ............................ 0035 Akashi............................ 0072 Carena ...........................
DEVICE CODES Dual ............................... 0000, 0041, 0081, 0278, 0348 Dumont ......................... 0000, 0081, 0104, 0105 Goodmans..................... 0000, 0020, 0037, 0062, 0072, 0081, 0209, 0278, 0343, 0348, 0352, 0637, 0642 IR ................................... 0020, 0041, 0042, 0045, 0047, 0072, 0081, 0104, 0106, 0208, 0209, 0226, 0240, 0343, 0348 Durabrand ..................... 0038, 0039 GPX ............................... 0037 Irradio ............................
DEVICE CODES Magnavox...................... 0000, 0035, 0039, 0081, 0149, 0563, 0593, 0642, 1781 Nikkai............................. 0020, 0072, 0278 Magnin .......................... 0240 Nikon ............................. 0034 Magnum ........................ 0642 Niveus Media................. 1972 Manesth ........................ 0045, 0072, 0081, 0209 Noblex ........................... 0240 Marantz ......................... 0035, 0038, 0062, 0081, 0209, 1381 Nokia .............................
DEVICE CODES Sanky ............................ 0039, 0048 Stern.............................. 0278 Sansui ........................... 0000, 0041, 0067, 0072, 0106, 0209, 0271, 0348, 0479, 1479 Strong............................ 0271 STS................................ 0042 Toshiba .......................... 1972, 1503, 1325, 1323, 1290, 1145, 1008, 0845, 0742, 0432, 0352, 0209, 0081, 0067, 0045, 0043, 0042, 0041, 0008 Sanyo ............................
DEVICE CODES DVR HDTV Digital Video Recorder (DVR) HDTV Decoder ABS ............................... 1972 Accurian ........................ 1653 Alienware....................... 1972 DirecTV .......................... 0392 CyberPower .................. 1972 Epson ............................ 1563, 1650 Dell ................................ 1972 Hisense.......................... 1535 DirecTV.......................... 0739 iLo.................................. 1535 Gateway ......................
DEVICE CODES Combination Sears ............................. 0000, 1237 Sharp............................. 0807 TV/VCR Sony .............................. 0000, 1232, 1295, 1296, 1297 TV/VCR combination Sylvaniav Toshiba .......................... 0695 TV/VCR/DVD TV/VCR/DVD combination 1781 Symphonic .................... 0000, 0593 Aiwa............................... 0000, 0468, 0479, 0680, 0687, 0742, 1336, 1468 America Action.............. 0278 Audiovox ....................... 0278 Broksonic ..
DEVICE CODES Sylvania ......................... 0675, 0000, 0593, 1593 Symphonic .................... 0675, 0000, 1593 Hughes Network............ 1142, 1442, 1443, 1444 Systems Teac............................... 0833, 1483 Humax ........................... 1176, 1427, 1568, 1670, 1675 Toshiba .......................... 0503 Hyundai ......................... 1159 Zenith ............................ 0741, 0869 JVC................................ 1170 Kathrein .........................
%RVH &RUSRUDWLRQ 7KH 0RXQWDLQ )UDPLQJKDP 0$ 86$ $0 5HY &&0