Bose 3•2•1 and 3•2•1 GS Home Entertainment Systems ® Owner’s Guide August 18, 2003 AM271966_00_V.pdf AM271966_00_V.
Safety Information English The AV3-2-1 and AV3-2-1 GS media centers are to be used only with the PS3-2-1 or PS321 powered speaker system (Acoustimass® module). WARNING: To reduce the risk of fire or electric shock, do not expose the system to rain or moisture. C A UT I O N AVIS RISK OF ELECTRICAL SHOCK DO NOT OPEN RISQUE DE CHOC ÉLECTRIQUE NE PAS OUVRIR CAUTION: TO REDUCE THE RISK OF ELECTRIC SHOCK, DO NOT REMOVE COVER (OR BACK). NO USER-SERVICABLE PARTS INSIDE. REFER SERVICING TO QUALIFIED PERSONNEL.
Contents Where to find... AM271966_00_V.pdf August 18, 2003 3 Appendix Operation . . . . . . . . . . . . . . . . . . . . . . . . . . . . . . . . . . . . . . . . . . . . . . . . . . . . . . . . . . . . . . . . . . . . . . . . . . 32 Turning your system on and off . . . . . . . . . . . . . . . . . . . . . . . . . . . . . . . . . . . . . . . . . . . . . . . . . . 32 Before you play your first DVD . . . . . . . . . . . . . . . . . . . . . . . . . . . . . . . . . . . . . . . . . . . . . . . . . . .
Contents Español English DVD-specific behavior . . . . . . . . . . . . . . . . . . . . . . . . . . . . . . . . . . . . . . . . . . . . . . . . . . . . . . 34 DVD play options . . . . . . . . . . . . . . . . . . . . . . . . . . . . . . . . . . . . . . . . . . . . . . . . . . . . . . . . . . 35 Loading and playing a CD . . . . . . . . . . . . . . . . . . . . . . . . . . . . . . . . . . . . . . . . . . . . . . . . . . . . . . 36 Basic CD operations . . . . . . . . . . . . . . . . . . . . . . . . . . . . . .
Introduction Before you begin Your system includes: • Integrated AM/FM tuner and DVD/CD player in a small console • Small, easy-to-place shelf speakers and an attractive floor-standing Acoustimass® module • Easy-to-use infrared remote control • Console input jacks for connecting other source components (such as a VCR, DSS, CD changer, or tape deck) Selecting compatible discs The DVD/CD player built into the 3•2•1 media center can play the following types of discs identified by their corresponding logos: • V
Introduction English Glossary of terms 2D – The trademarked logo for Dolby® Digital, a perceptual coding system for audio, developed by Dolby Laboratories. Dolby Digital is the most common means of encoding audio for DVD-Video. Aspect Ratio – The shape of the rectangular picture in a TV set. It is the width of the picture relative to the height. Our standard TV picture, in terminology used by that industry, is 4 units wide by 3 units high, or 4:3 (read as 4 by 3) in aspect ratio.
Introduction MPEG – a type of data compression used for audio or video storage on disc. NTSC – An acronym for National Television System Committee. The organization that developed both the American Black & White and Color television system. PAL – An acronym for Phase Alternate Line. This is one of several composite video systems. The PAL format is used extensively in Western Europe. PCM – An uncompressed, digitally coded representation of an analog signal.
System Setup Unpacking English Carefully unpack your system. Save all packing materials, which provide the safest way to transport your system. Check to be sure your system includes the parts shown in Figure 1. If any part of the system appears damaged, do not attempt to use it. Notify Bose or your authorized Bose® dealer immediately. For Bose contact information, refer to the address sheet included in the carton. WARNING: To avoid danger of suffocation, keep the plastic bags out of the reach of children.
System Setup Selecting locations for your 3•2•1 home entertainment system components Note: While these guidelines are offered to provide the best system performance, you may find other placement choices that are more convenient and provide the sound you enjoy. Placing the media center CAUTION: Do not block any ventilation openings. For reliable operation of the product and to protect it from overheating, put the product in a position and location that will not interfere with its proper ventilation.
System Setup English WARNING: Choose a stable and level surface for both speakers. Vibration can cause the speakers to move, particularly on smooth surfaces like marble, glass, or highly polished wood. If you are placing the speakers on a flat surface, be sure to attach the smaller of the two sets of supplied rubber feet to the bottom surface. You may obtain additional rubber feet (part number 178321) from Bose® customer service. To contact Bose, refer to the list of offices included in the product carton.
System Setup Figure 5 Speaker accessories UB-20 Wall Bracket UFS-20 Floor Stand UT-S20 Table Stand Additional cables To contact Bose for additional or longer cables, refer to the list of offices included in the product carton. AM271966_00_V.pdf August 18, 2003 11 English Speaker Accessories The 3•2•1 and 3•2•1 GS speakers can also be mounted on optional Bose brackets, table stands, or floor stands (Figure 5). For ordering information, refer to “Accessories” on page 46.
System Setup Placing the Acoustimass® module English Consider the guidelines below when choosing a location for the Acoustimass® module.
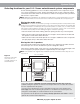
System Setup When the system setup is completed English With the speakers and media center placed as directed, you can enjoy the freedom to sit, recline, or move about in the room without missing a note. Figure 8 System placement for ideal coverage CAUTION: Be sure to read the section on making the connections before you plug in the system. AM271966_00_V.
System Setup Making the connections English The components of the 3•2•1 and 3•2•1 GS home entertainment systems are connected through the media center, using custom cables supplied with the system. The jacks on the rear of the media center are labeled (Figure 9), to help get everything hooked up right the first time.
System Setup Plug the connector labeled LEFT into the jack on the rear of the left speaker (Figure 12). 4. Plug the connector labeled RIGHT into the rear jack on the right speaker. English 3. Figure 12 Making the left and right speaker connections 7 5,*+ /()7 Note: When properly inserted, there will be a small gap between the plug and the speaker panel. Left and right speaker placement For optimal audio surround effects, be sure to place the LEFT speaker to the left of the TV as you face it.
System Setup Attaching the supplied antennas English On the rear panel of the media center there are jacks for AM and FM antennas (Figure 15). Unwind the wires for each antenna to provide the best reception. Note: An outdoor antenna may be used in place of the two that are supplied. To add an outdoor antenna, consult a qualified installer. Follow all safety instructions supplied with the antenna.
System Setup Connecting your TV to the media center Note: If your TV does not have an audio output jack, see “If your TV does not have audio output jacks” on page 21. 1. Attach one end of the supplied video cable (yellow) to the VIDEO OUTPUT jack on the back of the media center (Figure 16). 2. Attach the other end of the video cable (yellow) into one of the video input jacks on your TV.
System Setup S-video as an alternate means to connect to the TV English An S-video input jack, provided on many TVs, delivers a higher-quality TV picture than the composite video output connection shown in Figure 16 on page 17. To make this alternate connection, insert the end of an S-video cable from the TV into the S-VIDEO OUTPUT on the media center. This cable may be purchased from your Bose® dealer or a local electronics retailer.
System Setup Connecting your TV and VCR to the media center If your TV has audio output jacks If your TV has audio output jacks, you can directly route the TV audio to the 3•2•1 home entertainment system. 1. Attach one end of the supplied video cable (yellow) to the VIDEO OUTPUT jack on the back of the media center (Figure 17). 2. Attach the other end of the video cable (yellow) into one of the video input jacks on your TV.
System Setup English Selecting the correct video input on your TV In order to play a DVD, your television must be set to receive signals from the correct video input jack. Most TVs have a TV/VIDEO, INPUT, or AUX IN button for selecting the video input. When the TV is on, the words “VIDEO 1”, “VIDEO 2”, or “AUX” will usually appear in a corner of the screen to indicate which video input is currently selected.
System Setup If your TV does not have audio output jacks 1. Attach one end of the supplied video cable (yellow) into the Video Output jack on your VCR. 2. Attach the other end of the supplied video cable (yellow) to the VIDEO INPUT jack on the back of the media center. 3. Locate the AUDIO INPUT jacks on the back of the media center. Under the AUDIO INPUT heading, there are jacks labeled VIDEO 1, VIDEO 2 and AUX. 4.
System Setup English Selecting the correct video input on your TV In order to play a DVD, your television must be set to receive signals from the correct video input jack. Most TVs have a TV/VIDEO, INPUT, or AUX IN button for selecting the video input. When the TV is on, the words “VIDEO 1”, “VIDEO 2”, or “AUX” will usually appear in a corner of the screen to indicate which video input is currently selected.
System Setup Installing remote control batteries On the back of the remote, slide open the battery compartment (Figure 20). 2. Insert the two supplied AA (IEC-R6) 1.5V batteries, or their equivalent, as shown. Match the plus (+) and minus (–) marked on the batteries with the plus (+) and minus (–) inside the battery compartment. 3. Slide the battery compartment cover back into place. Note: Replace the batteries when the remote control stops operating or its range seems reduced.
System Setup English Figure 21 Advanced analog and digital connections, using S-video pass-through to the media center Media center jacks AUDIO INPUT VIDEO 2 D L VIDEO 1 L D L C VIDEO INPUT VIDEO OUTPUT C AUDIO OUTPUT L R S S R AUX AM LOOP ANTENNA ANTENNA SPEAKERS 75 1 FM OPTICAL R R D ACOUSTIMASS MODULE VIDEO INPUT C 2 1 4 3 4 5 S Cable box D S-video out VIDEO 1 L S-Video Out Audio Video Left ANT IN Right Input 1 DIGITAL AUDIO OUT Output OPTICAL Cable feed TV
System Setup Connecting recording equipment Figure 22 AUX input connections AUDIO INPUT VIDEO 2 D L VIDEO I L D L C VIDEO INPUT VIDEO OUTPUT C AUDIO OUTPUT L R S S R AUX SPEAKERS AM LOOP ANTENNA ANTENNA 75 1 FM OPTICAL R D R ACOUSTIMASS MODULE 6WHUHR FDEOH 5(&25' ,1387 / 5 9&5 RU FDVVHWWH GHFN Connecting other playback equipment Other playback components, such as an audio CD changer, can be connected to the AUX inputs on the rear panel of the media center (Figure 22).
Controls, displays, menus English Turning on the system You can turn your system on and off by pressing the On/Off button on the remote or the Power button on top of the media center. Or, you can press any source button on the remote to select the source and turn the system on at the same time. If you followed the instructions in the Setup section of this guide, you can turn on the media center by simply pressing the Video 1 button on your remote.
Controls, Displays, Menus SOURCE and MENU controls English Tunes the AM/FM radio up/down to the next higher/lower frequency. In an on-screen menu, selects the next item, up or down. Seeks forward/backward to the next strongest radio station. In an on-screen menu, changes the setting of a selected menu item. Enters submenus. Also submits custom settings, choices, or entries in conjunction with other buttons. Displays the menu of the DVD disc currently loaded in the tray, as the particular DVD allows.
Controls, Displays, Menus The advanced remote control (Supplied with the 3•2•1 GS system or the 3•2•1 system in Europe only) English If you purchased the 3•2•1 GS system, your system came with the advanced remote control which can be programmed to control your TV and/or cable/satellite box. To contact Bose for information on how to purchase the remote separately, refer to the address sheet included with the system.
Controls, Displays, Menus The media center Control panel and buttons The media center has eight buttons located on the top control panel. Their functions are also available through use of the remote control. TM Source Volume Po we r Skip/Scan Stop/Eject Turns the system on or off. Raises/lowers the volume. Pressing + unmutes the system. Moves from one source selection to the next. Selects the previous/next DVD chapter or CD track or scans to previous/next strongest radio station.
Controls, Displays, Menus TV on-screen menus English With both the TV and the 3•2•1 or 3•2•1 GS home entertainment system turned on, you can use menus that appear on the TV screen to choose among options for audio and video performance. To enter the Settings menu Before you begin, make sure you have selected the correct Video Input setting on your TV. For more information, see “Selecting the correct video input on your TV” on page 17. Make sure that the media center and the TV are both on.
Controls, Displays, Menus To change a setting Example of changing a setting English Figure 26 DVD Play Options (1 of 2) Title: 1 of 3 Chapter: 1 of 19 Title Time: 0:23:02 Time Display: Elapsed Motion Control: Play 1x Audio Track: English 2 D 5.1 ch Camera Angle: 1 of 1 More… Chooses an audio track for the current DVD.
Operation English Turning your system on and off You can turn your system on and off using the On/Off button ( ) on the remote control or the power button ( ) on top of the media center. When you turn it on with either button, the source that was played last is automatically selected. You can also press any source button on the remote to turn the system on and select the source at the same time.
Operation Basic DVD operations English If you want to: Use the remote to do this: Pause a DVD movie… Press Pause Stop a DVD movie… Press Stop Skip to the next/previous chapter… Press Chapter Repeat a chapter… Press Repeat while playing the chapter. Search through the movie backward or forward… Press and hold Scan Eject a DVD Press Stop/Eject . . up/down. or . to stop the disc. Press again to eject. AM271966_00_V.
Operation Using the Parental Control feature to restrict future play English You can restrict the playing of DVD movies by using the Parental Control feature. The 8 levels of parental control correspond with the ratings on DVDs, and are usually equivalent to standard movie ratings provided by the Motion Picture Association of America (MPAA). The levels of ratings range from 1 (unrestricted audiences) to 8 (most restricted). See DVD Rating chart below.
Operation DVD play options English Settings (DVD) DVD Play Options Settings: DVD Play Options (1 of 2) Title: Chapter: Title Time: Time Display: Motion Control: Audio Track: Camera Angle: More... Settings: DVD Play Options (2 of 2) Previous... Subtitles: While the system is in DVD mode, press the Settings button on the remote control to gain access to the options shown here.
Operation English Loading and playing a CD 1. On the remote, press the CD/DVD button. 2. At the media center, press the Stop/Eject 3. Place the audio CD in the open disc tray. 4. Press the Stop/Eject button. button to close the disc tray. The CD will start to play automatically. If it does not, press Play .
Operation Changing CD settings Selection: CD setting options: What the setting affects: Sleep Timer: Off mm:ss Track: 1 of n Track Time: h:mm:ss Moves to that time/place in the track. CD Status selection Displays information about the CD source. Audio Setup selection See Sound Adjustments page 40. System Setup selection See System Adjustments page 42. Timer not set. Set to turn system off (not the components) when time (01:00 to 90:00 minutes) expires. Chooses the CD track by number.
Operation Storing preferred stations as preset selections English For radio stations that you listen to regularly, you can assign a preset number (1-25 in the AM band and 1-25 in FM) to tune to them quickly. To store a particular station: 1. Tune to that station using the Tune, Seek, or Scan buttons on the remote. 2. Press Enter. A preset number blinks while STORE? appears on the media center display. 3. Press Enter to store the station to that blinking number.
Operation Changing AM settings AM setting options: What the setting affects: Sleep Timer: Off mm:ss Station: ---- Preset: 1 of 25 Available only if presets include an AM station AM Status selection Displays information about the AM source. Audio Setup selection See Sound Adjustments page 40. System Setup selection See System Adjustments page 42. Timer not set. Sets timer to turn off when time (01:00 to 90:00 minutes) expires. Refer to “Using the sleep timer” on page 37.
Sound Adjustments English Locating Audio Setup 1. Turn on both the media center and your TV. 2. Press the Settings button on the remote. A menu of the available settings for the current source will be displayed on your TV screen. 3. Using the Tune 4. Press the Enter button and the audio settings will be displayed for the current source. button, scroll down the list and select (highlight) Audio Setup.
Sound Adjustments –15 to +15 Decreases(–) or increases (+) the treble sound. Rooms with too few sound-absorbing furnishings, especially those with bare floors and walls, may sound overly shrill or “bright.” Lowering this setting to a negative value (–1 to –15) decreases the treble sound. Rooms with a lot of sound-absorbing furnishings, such as upholstered furniture, wall-to-wall carpet, or heavy drapes, may reduce the treble sound of your system.
System Adjustments English Locating system settings 1. Turn on both the media center and your TV. 2. Press the Settings button. A menu of the available settings for the current source will be displayed on your TV screen. 3. Using the Tune 4. Press the Enter button and the System Setup will be displayed. button, scroll down the list and select (highlight) System Setup.
System Adjustments System Setup menu Selection: Setting options: Display Language: English/French/ Spanish/etc. DVD Setup selection Video Format: NTSC PAL Video Black Level: Normal Extended English The System Setup menu lists options for how to set up the entire system. What the setting affects: Presents on-screen display menus in the selected language. Provides a selection of options, including Parental Control, for the DVD. Sets video format to the USA standard.
Reference English Taking care of your 3•2•1 or 3•2•1 GS system Caring for your system may include cleaning the system’s enclosures, cleaning your discs, and replacing the remote control batteries. Cleaning the media center • Use only a soft, dry cloth to clean the outside surfaces of the media center. • Do not use any sprays near the system. Do not use any solvents, chemicals, or cleaning solutions containing alcohol, ammonia, or abrasives. • Do not allow liquids to spill into any openings.
Reference Troubleshooting What to do System doesn’t do anything • • Make sure the unit is turned on. Make sure the power cord is inserted securely into the Acoustimass® module and plugged firmly into an operating AC wall outlet. • Be sure to select a source (CD/DVD, AM/FM, etc.). • Unplug the Acoustimass module power cord from the outlet for one minute, then reconnect it. This allows the unit to reset itself.
English Reference Problem What to do FM sound is distorted • Adjust antenna position to reduce interference. Sound is distorted • Make sure speaker cables are not damaged and the connections are secure. • Reduce the output level from any external components connected to the music center. Picture is black and white or rolling • Check the video cable connections. • Check the Video Format setting and change to appropriate setting (NTSC or PAL). See “System settings” on page 39.
Reference Technical information Dimensions USA/Canada: 120VAC, 60 Hz, 300W Media center: Dual voltage: 115/230VAC, 50/60 Hz, 300W 41/8"H x 131/4"W x 101/4"D (10.4 cm x 33.9 cm x 26.0 cm) UK/Europe: 230VAC, 50/60 Hz, 300W Australia: 240VAC, 50/60 Hz, 300W Singapore: 220VAC, 50/60 Hz, 300W Inputs English Power rating Remote control: 11/8"H x 21/2"W x 81/16"D (3.0 cm x 6.5 cm x 20.5 cm) 3•2•1 speakers: AUX, VIDEO 1, VIDEO 2: 2VRMS maximum EXTERNAL ANTENNA: 75 ohm 31/2"H x 77/8"W x 51/4"D (8.
Appendix Setup codes for cable Códigos de instalación para cable Codes de configuration pour le câble ABC............................. Appendix Ajinvision..................... Alcatel......................... Allegro......................... Americast.................... Amstrad....................... Anvision....................... Archer.......................... BT................................ Bell & Howell............... Bell South.................... Bestlink.......................
Appendix RadioShack................. Rampage..................... Recoton....................... Regal........................... Regency...................... Rembrandt.................. Runco.......................... SL Marx....................... Sagem......................... Samsung..................... Wiso............................ Zenith.......................... Zentek.........................
Appendix Setup codes for satellite Códigos de instalación para satellite Codes de configuration pour le satellite @sat............................ ABsat.......................... AGS............................ ASA............................ ASLF........................... AST............................. Aegir.......................... Akai............................. Akena........................ Alba............................
Appendix Discovery.................... Dish Network System.. DishPro....................... Diskxpress.................. Distratel....................... Ditristrad..................... Drake........................... Dream Multimedia...... Dune............................ Dynasat....................... EIF............................... EP Sat......................... Echostar...................... General Instrument...... Gold Box..................... GoldStar...................... Gooding..............
Appendix Appendix 0737 0123, 0173, 0200, 0249, 0331, 0358, 0394, 0442, 0480, 0553, 0613, 0622, 0658, 0713, 0742, 1057, 1221 KeyWest...................... 0794 Kolon........................... 0421 Kosmos....................... 0331, 0335, 0442 Kreiselmeyer............... 0173 Kuangyu...................... 0635 Kyostar........................ 0421, 0613 L&S Electronic............. 1043 LG............................... 0335, 0461, 1226 LaSAT..........................
Appendix Phonotrend................. Pioneer........................ Planet......................... Plasmatic.................... Polytron....................... Praxis.......................... Predki......................... Preisner....................... Premier........................ Prima........................... Primestar..................... ProVision..................... Profile.......................... Promax........................ Prosat......................... Proscan.....................
Appendix Telemaster.................. Telesat......................... Telestar....................... Televes........................ Televisa....................... Telewire....................... Ten Haaft..................... Thomson..................... Thorn........................... Tioko........................... Tonna.......................... Topfield....................... Toshiba....................... Appendix Triad........................... Triasat......................... Triax.........
Appendix Setup codes for television Códigos de instalación para TV Codes de configuration pour la télévision A-Mark........................ A.R. Systems............... AGB............................. AOC............................. 2003 0264 0282, 0009, 0037, 0068, 0076, 0264, 0474 Ansonic....................... 0009, 0037, 0102, 0292, 0370, 0428 Apex Digital................. 0748, 0765, 0767, 1943 Arc En Ciel................... 0196, 0399 Arcam.......................... 0216, 0217 Archer................
Appendix 0109, 0196, 0198, 0205, 0287, 0335, 0399 Brinkmann................... 0037, 0418, 0519 Brionvega.................... 0087 Britannia...................... 0216, 0217 Brockwood.................. 0019 Broksonic.................... 0236, 0463, 0003, 0426, 1905, 1911, 1929, 1935, 1938 Bruns........................... 0087 Bush............................
Appendix Elekta.......................... Elin............................. GE............................... GEC............................. GPM............................ Galaxi.......................... Galaxis........................ Gateway...................... Geloso......................... General........................ General Technic.......... Genexxa...................... Germanvox.................. Gibralter...................... Gintai........................... GoldStar..................
Appendix 0179, 0043, 1904 0054, 0078 0180, 0068 0009, 0032, 0037, 0412 0093 0451 0009, 0217 0196, 0198, 0399 0218, 0474 0179, 0039, 0009, 0036, 0037, 0211, 0218, 0235, 0283, 0355, 0487, 1908 Hisawa........................ 0282, 0218, 0400, 0455, 0610 Hit................................ 0087 Hitachi.........................
Appendix Kolin........................... AM271966_00_V.pdf August 18, 2003 Majestic....................... Manesth...................... Marantz....................... Marelli.......................... Mark............................ Maruman..................... Matsui......................... Matsushita................... McMichael................... Mediator...................... Medion........................ Megas......................... Megatron..................... Melvox........................
Appendix 0606 0037, 0374 0480 0363 0226 0037, 0087, 0191, 0213, 0247, 0320, 0327, 0349, 0363, 0370, 0411, 0418, 0505, 0554, 0556 Nesco.......................... 0179, 0247 Netsat.......................... 0037 Network....................... 0032, 0337 Neufunk....................... 0037, 0556 New Tech.................... 0217, 0343 Newave....................... 0093, 0178, 0009, 0092, 0161, 0721 Nicamagic................... 0216 Nikkai..........................
Appendix Proline......................... Proscan....................... Prosonic...................... Protech........................ SEI.............................. SEI-Sinudyne.............. SKY............................. SSS............................. Saba............................ Saccs.......................... Sagem......................... Saisho......................... Salora.......................... Sambers...................... Sampo......................... Samsung...............
Appendix 0216, 0455, 0610 0093, 0165, 0030, 0039, 0032, 0036, 0153, 0157, 0220, 0256, 0294, 0386, 0409, 0474, 0491, 0516, 0589, 0650, 0688, 0689, 0787, 0818, 1093, 1193, 1917 Shen Ying.................... 0179, 0003, 0009, 0092, 0474 Sheng Chia.................. 0093, 0236, 0179, 0009, 0033, 0474 Shintoshi..................... 0037 Shogun........................ 0019 Shorai.......................... 0179, 0294 Siarem......................... 0087, 0102, 0213, 0516 Siemens......................
Appendix Teletech Teleton........................ Vector Research.......... Vestel.......................... Vibrant......................... Victor........................... 0030 0037, 0217 0272 0250, 0053, 0036, 0160, 0376, 0650, 0653 Video Concepts........... 0098 Videologic................... 0216, 0218 Videosat...................... 0247 Videotechnic............... 0217, 0320 Videoton...................... 0356 Vidikron....................... 0054, 0242 Vidtech........................
AM271966_00_V.pdf August 18, 2003 AM271966_00_V.pdf AM271966_00_V.pdf August 18, 2003 2003 AM271966_00_V.pdf •August August 18,18, 2003 ©2003 Bose Corporation The Mountain Framingham, MA 01701 271966 Rev.