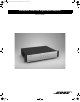
Cover_ENG_GER.
Safety Information ENG.fm Page 2 Friday, February 9, 2007 2:08 PM Safety Information Please read this owner’s guide Please take the time to follow the instructions in this owner’s guide carefully. It will help you set up and operate your system properly and enjoy all of its advanced features. Please save this owner’s guide for future reference. WARNING: To reduce the risk of fire or electrical shock, do not expose the product to rain or moisture.
Safety Information ENG.fm Page 3 Friday, February 9, 2007 2:08 PM Safety Information Important safety instructions 1. 2. 3. 4. 5. 6. 7. 8. 9. 10. 11. 12. 13. 14. Read these instructions. Keep these instructions – for future reference. Heed all warnings – on the product and in the owner’s guide. Follow all instructions. Do not use this apparatus near water or moisture. Clean only with a dry cloth. Do not block any ventilation openings.
FS_Mixer_AmplifierTOC.fm Page 4 Monday, February 12, 2007 8:49 AM Contents 1.0 Introduction .............................................. 5 4.7 System wiring ..................................................... 12 4.7.1 LINE 1-4 source inputs .............................. 12 4.7.1.1 RCA connections .......................... 12 4.7.1.2 Euroblock connections .................. 13 4.7.2 DIRECT source input ................................. 13 4.7.3 PAGE source input ....................................
1.0 Introduction.fm Page 5 Monday, February 12, 2007 8:50 AM 1.0 Introduction 1.2 Supplied with the product 1.1 The Bose® FreeSpace® DXA 2120 Digital Mixer/Amplifier Included connectors: • 3-terminal input connectors: (4) for wiring source equipment to the four Mic/Line input Euroblock jacks. • 4-terminal input connectors: (2) for wiring to the Page and Direct input jacks. • 6-terminal input connector: (1) for wiring user interfaces to the Remote input jack.
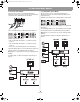
2.0 Hardware Description.fm Page 6 Monday, February 12, 2007 8:51 AM 2.0 Hardware Description 2.1 Front panel with open compartment 1 2 4 3 9 10 5 7 6 8 2.1.1 System Controls 1 LCD panel – Displays menu selections for configuring and viewing system settings. 2 Directional buttons – Navigates system menus and setting options shown on the LCD. 3 SELECT button – Confirms selections and settings in the system menus. 4 POWER LED – Blue light indicates the system is on. No light when unit is off.
2.0 Hardware Description.fm Page 7 Monday, February 12, 2007 8:51 AM 2.0 Hardware Description 2.3 Rear panel 1 3 2 4 6 5 8 7 9 13 14 2.3.1 Audio source inputs LINE INPUTS – Two unbalanced RCA audio jacks per input (summed to mono). 9 2 MIC/LINE INPUTS – Balanced Euroblock input jacks. One per input. 10 POWER OFF/ON – AC power switch. 3 MIC/LINE switch – Adjusts for the proper signal level being used with the four Euroblock input connectors.
3.0 Planning the Install.fm Page 8 Monday, February 12, 2007 8:51 AM 3.0 Operation Mode Options 3.1 Operation mode options 3.1.1 Mixer Mode Before making connections, decide how you want the sound sources distributed throughout the site. This depends on whether the area is specified for one or two zones, the kind of coverage needed, and the sources to be used. Line-level sources can be connected using the RCA jacks or Euroblock connectors. The system sums the two RCA jacks for each input to mono.
3.0 Planning the Install.fm Page 9 Monday, February 12, 2007 8:51 AM 3.0 Operation Mode Options 3.1.2 Stereo Select Mode 3.1.3 Dual Mono Select Mode Line-level sources can be connected using RCA jacks or Euroblock connectors. To connect a stereo source to RCA jacks, use either the left or right RCA jack of each INPUT. Line-level sources can be connected using RCA jacks or Euroblock connectors. The system sums the two RCA jacks for each input to mono.
4.0 Install and Wiring.fm Page 10 Monday, February 12, 2007 8:52 AM 4.0 Hardware Installation 4.1 Introduction This section provides instructions for installing and wiring the Bose FreeSpace® DXA 2120 Digital Mixer/Amplifier. CAUTION: Do not allow the chassis to exceed the maximum operating temperature of 50° C (122° F). Be aware of conditions in an enclosed rack that may increase the temperature above roomambient conditions. 4.2 Included accessories 4.
4.0 Install and Wiring.fm Page 11 Monday, February 12, 2007 8:52 AM 4.0 Hardware Installation 4.6 User interface (accessory) 4.6.1.3 Recommended cable lengths ® The FreeSpace DXA 2120 Digital Mixer/Amplifier is designed to be compatible with the following Bose® user interfaces: For one user interface Chassis • Bose® Volume Control User Interface (PC 041966) • Bose® Volume Control with A/B Select User Interface (PC 041967) For two user interfaces 4.6.
4.0 Install and Wiring.fm Page 12 Monday, February 12, 2007 8:52 AM 4.0 Hardware Installation 4.6.1.5 User interface wiring User interface connector Schematic for volume control with A/B select user interface 6-terminal input connector mounts to REMOTE jack on the chassis One volume control user interface Two volume control user interfaces 4.7 System wiring Input and Output wiring information and illustrations are provided on pages that follow.
4.0 Install and Wiring.fm Page 13 Monday, February 12, 2007 8:52 AM 4.0 Hardware Installation 4.7.1.2 Euroblock connections 4.7.2 DIRECT source input A microphone or other balanced audio source can be connected to the MIC/LINE INPUT 1-4 Euroblock terminals input using one of the following cable types. A microphone or other audio source can connect to the DIRECT INPUT jack using one of the following cable types. Source Connector MIC/LINE IN The control input requires a normally open switch.
4.0 Install and Wiring.fm Page 14 Monday, February 12, 2007 8:52 AM 4.0 Hardware Installation 4.7.3 PAGE source input A microphone or another paging source can be connected to the PAGE INPUT jack using one of the following cable types. S Notice the proper wiring for 4 ohm, 70 volt or 100 volt uses. Both 70V and 100V wiring require the use of a jumper cable, as shown. Note: Use 12 AWG (4 mm2) to 20 AWG (0.5 mm2) gauge wire for the jumper.
4.0 Install and Wiring.fm Page 15 Monday, February 12, 2007 8:52 AM 4.0 Hardware Installation 4.8 AC POWER connection 4.7.5 AUX output connection The signal and any applied processing from any of the four inputs can be output using the line-level AUX OUTPUT jack. This output can feed into another amplifier or other equipment used in the installation. AUX OUT Connector T RCA S S 4.8.
5.0 Setup.fm Page 16 Monday, February 12, 2007 8:54 AM 5.0 System Setup 5.1 System setup introduction 5.2.1 Selecting an operation mode This section provides instructions on adjusting system settings for preferred operation. To make these settings, the system must be connected to power and the POWER switch set to ON. The setting menus available depend on the mode of operation you choose. Use the right arrow button to enter the mode menu. Then use the up or down arrows to select the mode you want.
5.0 Setup.fm Page 17 Monday, February 12, 2007 8:54 AM 5.0 System Setup 5.3 Mixer Mode settings 5.3.1 A reminder: the settings process Here is an overview of common steps to follow in setting up the Mixer Mode: • For various adjustments (designated by Adj) use these steps: 1. Press SELECT to activate the Adj field. A. Choose this mode. 2. Using the up or down arrow, adjust the value. 3. Press SELECT to confirm the setting and move on. B. Set up inputs. C. Set up outputs.
5.0 Setup.fm Page 18 Monday, February 12, 2007 8:54 AM 5.0 System Setup B Mixer Input Set-up Select each Input that has a source connected (1, 2, 3, & 4). • For Input Vol Lvl • For Input Bass Adj and Input Treb Adj Adjust the value to +/-6 dB in increments of .5 dB. • For AGCEnable Choose N (no) or Y (yes). Note: AGC defaults to N. AGC is recommended for use with low-level sources (i.e. microphone with low sensitivity). C Mixer Output Set-up Select each Output to be used (1, 2, or Auxout).
5.0 Setup.fm Page 19 Monday, February 12, 2007 8:54 AM 5.0 System Setup D Mixer EQ Set-up Select each Output to be used (1, 2, or Auxout). • For Spkr EQ Move up or down to choose the EQ setting needed. An asterisk (*) marks the selection made. • For Dynamic EQ Enable Choose N (no) or Y (yes). Note: Dynamic EQ maintains tonal balance at all listening levels. The equalization adjusts automatically for the output level setting.
5.0 Setup.fm Page 20 Monday, February 12, 2007 8:54 AM 5.0 System Setup E Mixer Page In Set-up • For Page Vol Lvl • For Page Bass Adj and Page Treb Adj Adjust the value to +/-6 dB in increments of .5 dB. • For Page Enable Choose N (no) or Y (yes). • For Page Ducking Lvl Adj Adjust the value from -50 dB to 0 dB in increments of 1 dB. • For Output Lvl Adj Adjust the value to +/-20 dB in increments of 1 dB. • For Page Trig Mode Choose PTT or Auto.
5.0 Setup.fm Page 21 Monday, February 12, 2007 8:54 AM 5.0 System Setup F Mixer Direct In Set-up • For Vol Adj Adjust the value from -40 dB to +10 dB in increments of 1 dB. • For Bass Adj and Treb Adj Adjust the value to +/-6 dB in increments of .5 dB. G Mixer Master Vol Set-up • For Output Linked Choose N (no) or Y (yes). Note: Y links Output 1 and Output 2 gains for control using the Output 1 gain knob.
5.0 Setup.fm Page 22 Monday, February 12, 2007 8:54 AM 5.0 System Setup 5.4 Stereo Select Mode settings 5.4.1 Remember: for adjustments, use three steps Here is an overview of common steps to follow in setting up the Stereo Select Mode: • For various adjustments (designated by Adj), use these steps: 1. Press SELECT to activate the Adj field. A. Choose this mode. 2. Using the up or down arrow, adjust the value. 3. Press SELECT to confirm the setting and move on. B. Set up inputs. C. Set up outputs.
5.0 Setup.fm Page 23 Monday, February 12, 2007 8:54 AM 5.0 System Setup B Stereo Select Input Set-up Select each Input that has a source connected. • For Input Vol Lvl • For Input Bass Adj and Input Treb Adj Adjust the value to +/-6 dB in increments of .5 dB. • For AGCEnable Choose N (no) or Y (yes). Note: AGC defaults to N. AGC is recommended for use with low-level sources (i.e., microphone with low sensitivity). C Stereo Select Output Set-up Select each Output to be used (1/2 or Auxout).
5.0 Setup.fm Page 24 Monday, February 12, 2007 8:54 AM 5.0 System Setup D Stereo Select EQ Set-up • For Spkr EQ Move up or down to choose the EQ setting needed. An asterisk (*) marks the selection made • For Dynamic EQ Enable Choose N (no) or Y (yes). Note: Dynamic EQ maintains tonal balance at all listening levels. The equalization adjusts automatically for the output level setting.
5.0 Setup.fm Page 25 Monday, February 12, 2007 8:54 AM 5.0 System Setup F Stereo Select Direct in Set-up 25 of 36 • For Vol Adj Adjust the value from -40 dB to +10 dB in increments of 1 dB. • For Bass Adj and Treb Adj Adjust the value to +/-6 dB in increments of .5 dB.
5.0 Setup.fm Page 26 Monday, February 12, 2007 8:54 AM 5.0 System Setup 5.5 Dual Mono Select Mode settings 5.5.1 Remember: for adjustments, use three steps Here is an overview of common steps to follow in setting up the Dual Mono Select Mode: • For various adjustments (designated by Adj), use these steps: 1. Press SELECT to activate the Adj field. A. Choose this mode. 2. Using the up or down arrow, adjust the value. 3. Press SELECT to confirm the setting and move on. B. Set up inputs. C.
5.0 Setup.fm Page 27 Monday, February 12, 2007 8:54 AM 5.0 System Setup B Dual Mono Select Input Set-up Select each Input that has a source connected (1, 2, 3 & 4). • For Input Vol Lvl • For Input Bass Adj and Input Treb Adj Adjust the value to +/-6 dB in increments of .5 dB. For AGCEnable Choose N (no) or Y (yes). • Note: AGC defaults to N. AGC is recommended for use with low-level sources (i.e., microphone with low sensitivity).
5.0 Setup.fm Page 28 Monday, February 12, 2007 8:54 AM 5.0 System Setup D Dual Mono Select EQ Set-up • For Spkr EQ Move up or down to choose the EQ setting needed. An asterisk (*) marks the selection made. • E For Dynamic EQ Enable Choose N (no) or Y (yes). Dual Mono Select Page in Set-up Note: Dynamic EQ maintains tonal balance at all listening levels. The equalization adjusts automatically for the output level setting.
5.0 Setup.fm Page 29 Monday, February 12, 2007 8:54 AM 5.0 System Setup F Dual Mono Select Direct In Set-up • For Vol Adj Adjust the value from -40 dB to +10 dB in increments of 1 dB. • For Bass Adj and Treb Adj Adjust the value to +/-6 dB in increments of .5 dB.
5.0 Setup.fm Page 30 Monday, February 12, 2007 8:54 AM 5.0 System Setup 5.6 Overview of Utility Mode settings In Utility Mode, there are two global system options: Lockout and Restore Factory Defaults. Also, current system firmware and EQ versions are viewable. The Lockout option allows the system settings to be locked to prevent unwanted changes. This Lockout function can be disengaged by pressing and holding the left and right arrows simultaneously for five seconds. Lockout Off will appear.
6.0 User Interface Use.fm Page 31 Monday, February 12, 2007 8:55 AM 6.0 User Interfaces 6.1 User interface use 6.1.1.1 Mixer Mode user interface application Bose has designed two user interface controls for use with the FreeSpace® DXA 2120 Digital Mixer/Amplifier. Adjusts the volume of the OUTPUT 1 audio mix • Bose volume control user interface is for use when only volume control is required.
7.0 Trouble table.fm Page 32 Monday, February 12, 2007 9:08 AM 7.0 Troubleshooting Table No Power • Turn on power. • Make sure the power cord is plugged in. Power is on, but no sound • Make sure the source is turned on. • Verify that there is an input signal from the source. The audio input signal indicator on the front of the chassis should be green. • Check the output signal indicators on the system controls. If the LED is not lit (green), the output levels may be too low. • Check the source routing.
8.0 Reference.fm Page 33 Monday, February 12, 2007 9:08 AM 8.0 Reference 8.
E4 Back.fm Page 37 Monday, February 12, 2007 11:01 AM 36 ©2007 Bose Corporation, The Mountain Framingham, MA 01701-9168 USA AM298725 Rev.00 pro.Bose.