LIFESTYLE 235 series II ® home entertainment system Setup Guide | | | | |
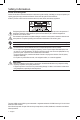
Safety Information Please read this guide Please take the time to follow the instructions in this owner’s guide carefully. It will help you set up and operate your system properly and enjoy its advanced features. Please save this guide for future reference. All Bose® products must be used in accordance with local, state, federal, and industry regulations.
Safety Information NOTES: •T he product label is located on the bottom or the back of the product. • Where the mains plug or appliance coupler is used as the disconnect device, such disconnect device shall remain readily operable. • The product must be used indoors. It is neither designed nor tested for use outdoors, in recreation vehicles, or on boats. • This product is intended to be used only with the power supply provided.
Safety Information Important Safety Instructions 1. Read these instructions. 2. Keep these instructions. 3. Heed all warnings. 4. Follow all instructions. 5. Do not use this apparatus near water. 6. Clean only with a dry cloth. 7. Do not block any ventilation openings. Install in accordance with the manufacturer’s instructions. 8. Do not install near any heat sources such as radiators, heat registers, stoves, or other apparatus (including amplifiers) that produce heat. 9.
Content Welcome Thank you ............................................................................................................ Unpacking............................................................................................................ 5 5 System Setup Control console box............................................................................................ Acoustimass® module box................................................................................ Speaker box.............
Welcome Thank you Thank you for choosing a Bose® LIFESTYLE® 235 Series II home entertainment system for your home. This guide provides step-by-step instructions for setting up your new system. There are two phases to the setup process: Physical setup phase: Placing the system components and connecting them together. Interactive setup phase: Completing your setup following the interactive steps on your TV screen provided by the UNIFY® intelligent integration system.
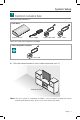
System Setup 11 Control console box What you need from box 1: From box 1: Control console Power supply Audio input cable HDMI® cable What you need from the power cord box: From the power cord box: Power cord A. Place the control console on a flat, stable surface near your TV. Control console Note: Until your system is completely installed, it may be helpful to keep the control console positioned for easy access to its rear connection panel.
System Setup B. Plug one end of the HDMI® cable into an HDMI INPUT connector on your TV. If an HDMI cable is already connected to an HDMI input on your TV, you can use this one. Just disconnect the other end. C. Plug the other end of the HDMI cable you are using into the connector labeled HDMI OUT Video to TV on the control console.
System Setup D. Plug one end of the audio input cable into the control console connector labeled Audio OUT. Make sure the flat surface with the arrow on the plug faces up. Leave the other end of the cable on the floor. You will be asked to connect it while setting up the contents of the next box. Audio OUT E. Plug the power supply output cord into the control console Power connector. Power AC power cord Power supply output cord F. Power supply Remove a power cord from the power cord box. G.
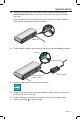
System Setup 2 Acoustimass® module box What you need for the following steps: From the power cord box: From box 2: Acoustimass module A. Power cord Place the Acoustimass module on the floor at the same end of the room as the TV. Make sure there is a live AC (mains) power outlet nearby. Acoustimass module B. Lay the module on its side and locate the connector panel.
System Setup CAUTION: DO NOT stand the Acoustimass® module on its front or back end. C. Plug the free end of the audio input cable into the Media Center connector on the Acoustimass module. Make sure the flat surface with the arrow faces the front of the module. Media Center D. Remove a power cord from the power cord box. E. Plug one end of the power cord into the AC Power connector on the Acoustimass module. Make sure you push the plug in as far as it can go. AC power F.
System Setup 3 Speaker box What you need for the following steps: Left speaker Right speaker Gemstone® ES speaker arrays Speaker cable Note: You can place system speakers on wall brackets or floor stands. To purchase these accessories, contact your local Bose® dealer or visit www.Bose.com. A. Place the speaker marked L (on the back) to the left of the TV and the other (marked R) to the right.
System Setup B. At the end of the speaker cable with two plugs, separate the cable so each plug can reach one speaker C. Select the plug labeled L and insert it into the speaker that is marked L and sits to the left of the television as you face it. D. Insert the plug marked R into the speaker to the right of your television as you face it.
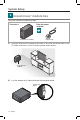
System Setup E. Plug the free end of the speaker cable into the SPEAKERS connector on the Acoustimass® module. Turn in each thumb screw until it is finger tight. Thumb screw F. Put the Acoustimass module in its final position: • Upright (BEST) or on either side (ALTERNATE). BEST ALTERNATE • With the front opening facing into the room. • At least 18 in (45 cm) from any TV to avoid magnetic interference with the TV image. Move it farther away if you still notice interference.
System Setup 4 Interactive box What you need for the following steps: Remote control with batteries ADAPTiQ® audio calibration headset IMPORTANT! Before you start, make sure your speakers and Acoustimass® module are in their final positions. Do not connect any devices to the control console at this time. The instructions provided on your TV will tell you when to do this. A. Slide the battery compartment cover off the back of the remote control.
System Setup D. Press the power button on the control console to turn on your system. Because the system is in a low power state when in standby, it takes several seconds to start. When the system status indicator changes from blinking to steady green, your system is ready to use. Status indicator Power button E. Turn on your TV. F. Using the remote that came with your TV, change the TV input to the one that is connected to your LIFESTYLE® 235 Series II home entertainment system. G.
System Setup Other Box 4 items The remaining items in Box 4 may or may not be required to set up your LIFESTYLE® 235 Series II home entertainment system. For more information on using these accessories or adding other devices to your system at another time, see the operating guide.
System Setup Applying rubber feet When placing the Acoustimass® module on bare floors, you can attach the included rubber feet to the bottom of the module for greater stability and to protect your floor. Rubber feet Bottom panel Vibration can cause speakers to move, particularly if placed on a smooth surface like glass or highly polished wood. If you are placing the center speaker on such a surface, you can attach the included rubber feet to the bottom of the speaker for greater stability.
System Setup If you have setup problems If you experience any difficulties during the setup process, such as an unrecognized device remote or a connection error, you can reactivate the interactive setup mode at any time and correct or change part of your system setup. See “Using the Setup Mode” in your system operating guide. For help in trying to resolve any problems, see the troubleshooting table in your system operating guide.
©2013 Bose Corporation, The Mountain, Framingham, MA 01701-9168 USA AM372614_00 Rev.