The Bose® Lifestyle® 30 System Owner’s Guide December 20, 2001 AM193147_03_V.
Safety Information Warning To reduce the risk of fire or electric shock, do not expose this system to rain or moisture. CAUTION RISK OF ELECTRICAL SHOCK DO NOT OPEN CAUTION: TO REDUCE THE RISK OF ELECTRIC SHOCK, DO NOT REMOVE COVER (OR BACK). NO USER-SERVICEABLE PARTS INSIDE. REFER SERVICING TO QUALIFIED PERSONNEL. CAUTION: For units with a polarized power plug, to prevent electric shock, match wide blade of plug to wide slot, insert fully.
Important Safety Instructions 1. Read these instructions – for all components before using this product. 2. Keep these instructions – for future reference. 3. Heed all warnings – on the product and in the owner’s guide. 4. Follow all instructions. 5. Do not use this apparatus near water or moisture – Do not use this product near a bathtub, washbowl, kitchen sink, laundry tub, in a wet basement, near a swimming pool, or anywhere else that water or moisture are present. 6.
English Important Safety Instructions 18. Use proper power sources – Plug the product into a proper power source, as described in the operating instructions or as marked on the product. 19. Avoid power lines – Use extreme care when installing an outside antenna system to keep from touching power lines or circuits, as contact with them may be fatal.
Contents Where to find… Setting Up Before you begin ........................................................................................................ 4 Unpack the carton ...................................................................................................... 5 Select the locations for your Lifestyle® 30 system ...................................................... 6 Connect the speakers and music center ....................................................................
Setting Up Before you begin Thank you for purchasing the Bose® Lifestyle® 30 system. This remarkably compact system is a result of advanced technology developed by years of research. Technological innovations that make the Lifestyle® 30 system possible include the smallest CD changer now available for home use and Jewel Cube® speakers, one-half the size of the previous Acoustimass® cube speakers.
Setting Up Unpacking the carton CAUTION: Remove and dispose of the three red manufacturer’s shipping screws from the bottom of the Lifestyle® music center before setting up your system. The shipping screws are for use by the manufacturer only. They are not re-installable. Carefully unpack your system. Save all packing materials for possible future use. The original packing materials provide the safest way to transport your Lifestyle® system.
Setting Up Select the locations for your Lifestyle 30 system ® When you place your speakers according to the guidelines below, a combination of reflected and direct sound provides the audio atmosphere of a home theater. You may experiment with the placement and orientation of the Jewel Cube® speakers and Acoustimass® module to produce sound most pleasing to you. For the best surround effect, adjust the speakers so you cannot identify the exact sound source.
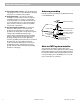
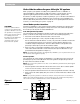
Setting Up Surround speakers The surround (rear) speakers create an area of sound around the listener. Place them in the back half of your room. Direct the cubes so that you do not pinpoint the exact location of the sound source (Figure 3). The surround cables allow the speakers to be placed up to 50 feet (15.2 m) from the Acoustimass® module. Center Figure 3 Right front Left front Speaker placement Acoustimass module 1. Place the speakers at ear height or higher, if possible. 2.
Setting Up Connect the speakers and music center CAUTION: Make sure all components are unplugged from the power outlet before you begin connecting the system. Figure 5 Speaker cable connection to the Jewel Cube speaker Once you have selected locations for your speakers and music center, connect the system. Connecting the Jewel Cube speakers to the Acoustimass module ® ® 1. Match each cable to the corresponding speaker location.
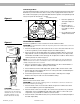
Setting Up Figure 6 Right front speaker Center speaker Left front speaker Connecting the speakers and the music center Left surround speaker Right-angle connector into AUDIO INPUT Right surround speaker AUDIO INPUT SURROUND FRONT RIGHT RIGHT LEFT CENTER LEFT OUTPUTS TO CUBE SPEAKERS Power jack Multi-pin connector into SPEAKER ZONE 1 L R TAPE IN L Audio input cable R TAPE OUT AC power pack Connecting the Acoustimass module power cord 1.
Setting Up Connecting your home theater components to the Lifestyle system ® There are many variations of equipment in a home theater. A basic home theater system might include a stereo or mono TV and stereo VCR with the Lifestyle® 30 system. Your home theater can include many other combinations of equipment, including cable TV box, laserdisc players, DVD players, CDI players, additional VCRs, and satellite decoders. Note: A mono TV only serves as a display for the video, not as a source for the audio.
Setting Up Figure 10 Music center connectors Figure 11 Connecting components through your VCR Cable TV Laserdisc VCR Video out to TV Audio out TV (2) To direct your video sound sources through your VCR If your TV is not a stereo model, or does not have the appropriate outputs, connect your stereo VCR to the music center. Use the VCR as a tuner to select other connected sound sources. See Figure 11. • Connect your home theater components to the appropriate VCR inputs.
Setting Up Other connections Use standard RCA audio cables to connect other components to your Lifestyle® system, matching the red connector to R (right), white (or black) connector to L (left). You can use a Y-adapter (available at electronics stores) to connect a mono source. However, the left and right speakers then play the same monaural sound.
Setting Up Connect the antennas The rear panel of your Lifestyle® music center provides connections for the supplied AM and FM antennas (Figure 14). Unwind each antenna. Antennas provide better reception when their wires are not bundled. Figure 14 The antenna connections AM antenna jack Coaxial (75Ω) FM antenna jack L R TAPE IN L R TAPE OUT FM antenna connections Figure 15 The FM antenna 1. Plug the FM antenna connector into the FM ANTENNA jack on the back of the music center. 2.
Setting Up Set up the remote control 1. Slide open the battery compartment on the back of the remote (Figure 17). 2. Insert 3 AA or IEC-R6 1.5V batteries, or the equivalent, as shown. Match the + and – symbols on the batteries with the + and – markings inside the compartment. 3. Slide the battery compartment cover back into place. Replace the batteries when the remote control stops operating or its range seems reduced. Alkaline batteries are recommended.
Operating Your Lifestyle® 30 System Turn on your Lifestyle 30 system ® CAUTION: Be sure the three shipping screws on the bottom of the music center have been removed before turning on the system. Plug the Acoustimass® module power cord into an AC power (mains) outlet. Then plug in the music center power pack. Note: Your speakers will not operate unless you complete all cable and power connections before turning on the music center. You are ready to enjoy your new Lifestyle® system.
Operating Your Lifestyle® 30 System The system controls Function Remote control VIDEO 1 - Selects a video sound source connected to the VIDEO 1 inputs, and turns the system on. VIDEO 1 VIDEO 2 - Selects a video sound source connected to the VIDEO 2 inputs, and turns the system on. VIDEO 2 AUX - Selects a component connected to the AUX inputs, and turns the system on. AUX CD - Selects the built-in CD changer and turns the system on.
Operating Your Lifestyle® 30 System Other music center controls The music center function keys are described on the previous page. Use the following special music center keys to tune the radio, set station presets, and scan a CD (Figure 20). TUNE / - Lowers or raises the frequency setting of the radio (stations). In CD mode, initiates a fast scan of the current CD. STORE or ERASE - Adds or removes radio station presets. For instructions, see page 20.
Operating Your Lifestyle® 30 System Listening to compact discs Using the CD changer You can load up to six compact discs at a time. Figure 22 Loading a CD CAUTION: Do not insert more than one disc into any slot. Forcing two discs into one slot could cause them to become stuck, and could damage the discs, the CD magazine, or the music center. Loading discs into the CD magazine Hold the magazine, looking at the side with the arrow. Insert up to six discs, label side up (Figure 22).
Operating Your Lifestyle® 30 System Turning the system on and choosing the CD player Press the CD key on the remote or press SOURCE SELECT on the music center until CD is selected. If the system is already on, use one of these keys to select the CD player. The CD indicator on the display lights. If a CD has been loaded, it begins to play. Note: Selecting CD turns the system on in STEREO (2-speaker) mode. Press SURROUND (5-speaker) or STEREO+CENTER (3-speaker) to change the mode.
Operating Your Lifestyle® 30 System Listening to the radio Your Lifestyle® music center has a built-in AM/FM radio. Turning the system on and choosing the radio Press AM/FM (on the remote) or SOURCE SELECT (on the music center) to turn your system on to the most recently selected AM or FM station. Selecting AM/FM turns the system on in STEREO mode. Note: If the system is on and the radio is already selected, the AM/FM key switches between AM and FM bands.
Operating Your Lifestyle® 30 System Using the system with external components Follow the instructions on pages 10-12 for connecting components. CAUTION: The magnetic field from the Acoustimass® module is not an immediate risk to your video tapes, audio tapes, and other magnetic media. However, you should not store tapes directly on or near the Acoustimass module. Turn on your component directly or by using its remote control.
Operating Your Lifestyle® 30 System Fine-tuning your system Figure 29 Bass and treble controls In most situations, following the speaker placement guidelines (see pages 6-7) provides excellent sound quality. You do not need to adjust tone settings for changes in volume, since Bose® patented signal processing technology provides a natural tonal balance over the full range of volume settings. If desired, you can further fine-tune your system as described below.
Operating Your Lifestyle® 30 System Using two listening zones Figure 30 Example of two listening zones: the Lifestyle® 30 speakers in zone 1 and Acoustimass® powered speaker system in zone 2 The Lifestyle® 30 system can direct sound from one or two sound sources to two different listening areas at the same time. Each listening area, whether a room or a group of rooms, is referred to as a zone. By adding powered speakers and a second remote, you can establish two listening zones.
Operating Your Lifestyle® 30 System Operating two listening zones Controlling the zones from the remote controls To control two zones you need to have remotes set to each zone. See instructions on page 23 for setting a second remote to zone 2. • You can select and control sources in each zone by commands from its remote control. • You can control the volume in each zone directly from its remote control. • You can turn each zone on and off directly from its remote control.
Maintaining Your Lifestyle® 30 System Changing the house code settings Each Lifestyle® remote control uses a system of matching house codes to communicate with its corresponding music center. If your remote’s commands ever conflict with those of another nearby Lifestyle® system, you can easily set a new house code for your system and its remote control(s) by following the procedures below. 1. Open the remote control battery cover and locate the miniature switches (Figure 32). 2.
Maintaining Your Lifestyle® 30 System Troubleshooting Problem What to do System does not function at all • Make sure the power connector is inserted securely into the music center, the power cord is inserted securely into the Acoustimass® module, the power pack and power cord are plugged fully into operating AC wall outlets. • Be sure to select a source (CD, AM/FM, etc.). • If the system is not responding, press STORE, ERASE, and ON/OFF (on the music center) at the same time, to reset the system.
Maintaining Your Lifestyle® 30 System Problem What to do Remote control is inconsistent or does not work • Check batteries and their polarity (+ and –). See page 14. • Operate the remote control closer to the music center. • Move the remote (or the music center) a few feet to avoid an area of “dead spots.” See note on page 17. • Make sure the audio input cable is firmly seated, uncoiled, and extended as much as possible. • Make sure the remote control and music center house codes match.
Maintaining Your Lifestyle® 30 System Taking care of your Lifestyle 30 system ® The only maintenance needed is cleaning the system and your compact discs, and replacing remote control batteries. For information on replacing the remote control batteries see “Set up the remote control” on page 14. Figure 34 Handling a CD Handling CDs Handle discs by their edges to prevent fingerprints and scratches (Figure 34). To remove stains or fingerprints from the surface of a disc, use a soft, lint-free, dry cloth.
Product Information Technical information Music center power pack power rating USA/Canada: 120V~ 60 Hz 25VA Europe: 230V~ 50 Hz 25VA Australia: 240V~ 50 Hz 25VA Dual voltage: 120V~ 60 Hz 25VA and 230V~ 50 Hz 25VA Speaker system power rating USA/Canada: 120V~ 50/60 Hz 350W Europe/Australia: 220-240V~ 50/60 Hz 350W Dual voltage: 115/230V~ 50/60 Hz 350W Music center inputs Remote control range 65 feet (20 m) Dimensions Music center 15.5" W x 8.0" D x 2.6" H (39.4 cm x 20.3 cm x 6.
Index A accessories 29 Acoustimass® module 2-9, 13, 15, 21, 22, 26, 29 adapter plug 9 AM antenna 5, 13, 26, 29 AM/FM 4, 15-17, 20, 21, 26 antenna 5, 11, 13, 26, 27, 29 audio input cable 5, 7-9, 26 AUX 11, 16, 17, 21, 23, 29 auxiliary 4 B BASS control 22 batteries 5, 14, 27, 28 C cable 5-10, 12, 26, 27 cable radio signal 13 cable TV 10 CD 4, 5, 10, 12, 15-21, 23, 26-29 CD changer 4, 16, 18, 19 CD magazine 5, 18 center speaker 6, 26 cleaning 28 compact disc 15, 18 connections 8, 9, 11-13, 26, 27 controls 2, 7
Bose® Corporation USA Bose Corporation, The Mountain Framingham, MA 01701-9168 1-800-288-BOSE (1-800-288-2673) Phone hours - ET (eastern time): Weekdays 9 a.m. to 8 p.m. Saturdays 9 a.m. to 3 p.m. Canada Bose Ltd., 1-35 East Beaver Creek Road Richmond Hill, Ontario L4B 1B3 1-800-444-BOSE (1-800-444-2673) Phone hours - ET (eastern time): Weekdays 9 a.m. to 5 p.m. European Office Bose B.V., Nijverheidstraat 8 1135 GE Edam, Nederland TEL 0299-390190 FAX 0299-390109 Australia Bose Australia, Inc.
©1999 Bose Corporation The Mountain, Framingham, MA 01701-9168 USA 193147 AM Rev.