LIFESTYLE DVD ® HOME ENTERTAINMENT SYSTEMS 2SHUDWLQJ *XLGH
Svenska Nederlands Italiano Français Svenska Nederlands Español Français Deutsch Italiano Deutsch Español Dansk English Dansk SAFETY INFORMATION Please read this guide Please take the time to follow the instructions in this guide carefully. It will help you set up and operate your system properly and enjoy all of its advanced features. Please save this guide for future reference. WARNING: To reduce the risk of fire or electrical shock, do not expose the product to rain or moisture.
English Dansk Deutsch Español Français Italiano Nederlands Svenska CONTENTS INTRODUCTION 5 SYSTEM CONTROLS 8 SYSTEM OPERATION 14 CONTROLLING EXTERNAL SOURCES 26 USING SYSTEM MENUS 32 CHANGING SOURCE SETTINGS 43 PRESENTING A NEW WAY TO PLAY 48 REFERENCE 52 INTRODUCTION 5 Welcome . . . . . . . . . . . . . . . . . . . . . . . . . . . . . . . . . . . . . . . . . . . . . . . . . . . . . . . . . . . . . . . . . . . . . . . . . . . . . . . . . . .
Svenska Nederlands Français Italiano Deutsch Español English Dansk CONTROLLING EXTERNAL SOURCES 26 ® Using your LIFESTYLE remote with other components . . . . . . . . . . . . . . . . . . . . . . . . . . . . . . . . . . . . . . . . . . . . . . . Setting the remote to control each component . . . . . . . . . . . . . . . . . . . . . . . . . . . . . . . . . . . . . . . . . . . . . . . . . For TV control . . . . . . . . . . . . . . . . . . . . . . . . . . . . . . . . . . . . . . . . . . . . . . . . . . .
English Dansk Deutsch Español Français Italiano Nederlands Svenska INTRODUCTION INTRODUCTION Welcome Thank you for purchasing a Bose® LIFESTYLE® DVD home entertainment system. Through proprietary Bose technologies and innovative LIFESTYLE® system design, this elegant and easy-to-use system delivers superior performance for both music and video programming.
Svenska Nederlands Français Italiano Deutsch Español English Dansk INTRODUCTION INTRODUCTION Audio and video terms defined A Aspect ratio – An expression for the width of the picture relative to the height and seen when as a rectangular TV image. For example, if the aspect ratio is 4:3 (read as 4 by 3), the shape of that picture is 4 units wide by 3 units high. The standard TV aspect ratios are 4:3 and 16:9. C CD-R, CD-RW – Abbreviations for Recordable (R) and ReWriteable (RW) Compact Disc (CD).
English Dansk Deutsch Español Français Italiano Nederlands Svenska INTRODUCTION INTRODUCTION M MP3 – MPEG-1 Layer III audio. This is a compressed audio format that allows the recording of many hours of music on a single CD. MPEG – An abbreviation for Moving Picture Experts Group, the !ommittee of experts from the audio, video, and computer industries involved in setting standards for compression of moving images.
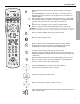
Svenska Nederlands Français Italiano Deutsch Español English Dansk SYSTEM CONTROLS Remote control buttons SYSTEM CONTROLS The advanced radio frequency (RF) remote control provided with this system works from almost anywhere inside your home, with no need to aim it in the direction of the system. ! Turns the system on and off. Selects the last used source. ! Mutes the volume for all connected speakers (main and in other rooms). ! Mutes or unmutes the volume in the current room.
English Dansk Deutsch Español Français Italiano Nederlands Svenska SYSTEM CONTROLS a b SYSTEM CONTROLS When Stored is the selected source, enters the library of stored CD tracks. Above the Library button on your remote, there is one of two symbols. Depending on which symbol (a or b, left) appears on your remote, the ! following applies: When a video source is selected, changes between a 4:3 screen display ratio and 16:9 widescreen display. This requires a TV that provides that function.
Svenska Nederlands Français Italiano Deutsch Español English Dansk SYSTEM CONTROLS SYSTEM CONTROLS Raises or lowers the volume of the current source. ! Pressing + raises the volume and unmutes the source playing (if muted) in the current room only. ! Pressing – lowers the volume. ! Stops music (except FM/AM) or video play. For DVDs and VCDs only, the system bookmarks where the disc stopped, so you can resume play there. Pressing again clears the bookmark. Pauses music (except FM/AM) or video play.
English Dansk Deutsch Español Français Italiano Nederlands Svenska SYSTEM CONTROLS a. If your remote features the bottom function as follows: symbol (above the Library button), the four buttons at the In Stored source, when used in conjunction with the number keys, plays the tracks from a specific stored CD of that number. In Cable source, makes a selection from the A list. In Stored source, plays all the tracks, if any, assigned to the playlist.
Svenska Nederlands Français Italiano Deutsch Español English Dansk SYSTEM CONTROLS Media center SYSTEM CONTROLS The disc tray and system controls are located under the front panel door of the media center. To the right of the system controls is the display window (Figure 1). CAUTION: Pressing the Open/Close button on the media center is the best way to open and retract the disc tray. DO NOT press on the tray to make it retract or exert pressure on the front of the tray while it is moving.
English Dansk Deutsch Español Français Italiano Nederlands Svenska SYSTEM CONTROLS Display window Figure 2 S T O R E D 0 : 2 2 P 1! TRACK 6/10 CD7 Sample of information that appears on the media center display ! When Settings menu items or messages appear in the display, they may scroll to reveal! information that does not fit in the two lines available. Light indicators Library Shows when the Stored music library is selected (Figure 3).
Svenska Nederlands Français Italiano Deutsch Español English Dansk SYSTEM OPERATION Initial pointers to get you started Scanning the following tips may prove worthwhile before using your system. SYSTEM OPERATION Note: For information on how to set the remote to operate other components, refer to “Using your LIFESTYLE! remote with other components” on page 26. To turn on your system • Press the On/Off button on the remote control. • Or, press the media center On/Off control.
English Dansk Deutsch Español Français Italiano Nederlands Svenska SYSTEM OPERATION To adjust what you hear or see • To correct sound problems (unexpected boominess, harshness, thinness, or reverberation) take time to run the ADAPTiQ® audio calibration program, if you have not done so. • For lasting adjustment to system operation (for audio, video, media center, remote control, or DVD lock), use the System menus.
Svenska Nederlands Français Italiano Deutsch Español English Dansk SYSTEM OPERATION Here’s how to begin: 1. Place the first CD into the disc tray of the media center and close the tray. SYSTEM OPERATION 2. Press the Store button, located on the media center control panel. • During this process, the media center displays the message CD STORING and shows what percentage of the task is completed. • To interrupt or stop the storing activity at any time, simply open the disc tray.
English Dansk Deutsch Español Français Italiano Nederlands Svenska SYSTEM OPERATION Repeat a selection… while the track or whole CD you want to repeat is! playing as a Whole CD, CD#, Library, or Playlist! selection. SYSTEM OPERATION Search backward or forward… and hold. Find out about what’s playing... to see the track data on the TV screen. ! To close the screen, press .! Search for a particular CD… and choose to search by:! Genre, Album, Artist...! as it applies to the CD you want to hear.
Svenska Nederlands Français Italiano Deutsch Español English Dansk SYSTEM OPERATION With CDs already stored in the system, use the preset you prefer to get started: 1. Press Stored on your LIFESTYLE® remote. SYSTEM OPERATION 2. Check the media center display to see which play mode is selected. • If it says UMUSIC, you are ready to listen and enjoy. • If it says ENCORE, CD#, PLAYLIST, or WHOLE CD, press uMusic on the remote to get the system out of the special play mode. 3. Just listen for a while.
English Dansk Deutsch Español Français Italiano Nederlands Svenska SYSTEM OPERATION To delete tracks from the Playlist: • While listening to music in the Playlist, press and hold Playlist as the track you want to remove plays. • To use the Playlist again for a different purpose, you may want to remove all the tracks listed there now. To do that quickly, press System on the remote, move over to Media Center and into that menu to get to the uMusic Preset Action item.
Svenska Nederlands Français Italiano Deutsch Español English Dansk SYSTEM OPERATION 2. Use these actions to move around and make selections from the display or the screen: • Press the left, right, up, or down arrows to get to the option you want. SYSTEM OPERATION • Press Enter to confirm your selection and move back to the attributes column. • Repeat these steps for each change you want to make. • Press Exit to leave the Music Library. 3. Choose from new options that appear as you make a selection.
English Dansk Deutsch Español Français Italiano Nederlands Svenska SYSTEM OPERATION 4. Insert a DVD into the tray (label side up). Be sure the DVD is clean. If not, refer to! “Protecting and caring for your system” on page 55. 5. On the media center, press the Open/Close button again to retract the disc tray. You may need to press Play more than once. On most DVDs, the option to play the main feature is just one of several on-screen selections offered. Note: Not all DVDs offer the same features.
Svenska Nederlands Français Italiano Deutsch Español English Dansk SYSTEM OPERATION Using DVD parental controls The parental control feature of your LIFESTYLE® system allows you to restrict access by ! locking any DVD movies that you find inappropriate for members of your family. SYSTEM OPERATION Before you can use this feature, you need to choose a password and a level of restriction (matched to movie rating levels) as found in the System menu.
English Dansk Deutsch Español Français Italiano Nederlands Svenska SYSTEM OPERATION . Repeat a CD… again. Cancel repeat… a third time. Note: For information on the quick adjustments you can make to CD settings, refer to “CD settings options” on page 45. Instructions on how to enter the menu to make these changes are available in “Where to find the list of options” on page 43. Using the radio Press FM/AM to select the radio tuner.
Svenska Nederlands Français Italiano Deutsch Español English Dansk SYSTEM OPERATION Note: Assigning a preset number to a station will replace any previous assignment to that number. To remove a station preset: SYSTEM OPERATION 1. Tune to the preset number you want to remove. 2. On the remote control, press and hold the 0 number button until the message PRESET: ## ERASED appears briefly on the media center display. Removal is then complete. To reassign a preset to a different station: 1.
English Dansk Deutsch Español Français Italiano Nederlands Svenska SYSTEM OPERATION To set the timer: On both the media center display and the TV on-screen menu, the same actions apply: 1. Press the Settings button on the LIFESTYLE® remote to enter the source Settings menu. Figure 9 Sleep timer symbol in the source Settings menu 3. Move right into the options list and up to the delay time you want, from 10 to 90 minutes.
Svenska Nederlands Français Italiano Deutsch Español English Dansk CONTROLLING EXTERNAL SOURCES Using your LIFESTYLE! remote with other components CONTROLLING EXTERNAL SOURCES You can control most brands of external components – such as TVs, cable/satellite boxes, and VCR/DVRs – using your LIFESTYLE® remote control. After you make the proper menu selections for each component you want to control, the LIFESTYLE® remote serves as a ! universal remote for most of your component operations.
English Dansk Deutsch Español Français Italiano Nederlands Svenska CONTROLLING EXTERNAL SOURCES 5. Identify the TV brand: • From the list of options that appear, select TV Brand (Figure 11). • Move right into the list of brands and up or down to locate the brand of your TV. • Press Enter to select the brand.
Svenska Nederlands Français Italiano Deutsch Español English Dansk CONTROLLING EXTERNAL SOURCES Figure 12 Changing the TV Power 1;3(- CONTROLLING EXTERNAL SOURCES 01#?-B(/5 01#?-B(/#'+"+.@5 01#%@E(*+#<"+;-5 G;3(@*/((2#919@5 1;3(-#6-22(*+-/5 1;3(-#&)"*H#7(:()5 %.+->"+;* 01#9(+(*+(3 =#= =#= 6->E-2(2+ I-/>") 0A(#F(3;"#6(2+(/#*"2#+./2#,-./#01#-2# ".+->"+;*")),#BA(2(:(/#,-.#@()(*+#"#:;3(-#@-./*(4 navigate 8. select Notice the TV Power Status: • TV Detected means the installed TV sensor is working.
English Dansk Deutsch Español Français Italiano Nederlands Svenska CONTROLLING EXTERNAL SOURCES 3. Choose the device code: • From the menu options on the left, select CBL• SAT Code. • Move right to select the first code. • When you have chosen the right code, press Enter. • Press System or Exit to leave the System menu. When you complete these settings, you can use CBL• SAT On/Off to turn on your cable or satellite source, and use other LIFESTYLE® remote buttons to operate it.
Svenska Nederlands Français Italiano Deutsch Español English Dansk CONTROLLING EXTERNAL SOURCES When you complete these settings and select VCR as the source, you can now use the VCR On/Off button and press Play, Pause, or Stop and Seek to control your VCR or other video recorder. On some DVRs, pressing Shuffle and Repeat buttons will allow you to skip backward or forward quickly.
English Dansk Deutsch Español Français Italiano Nederlands Svenska CONTROLLING EXTERNAL SOURCES Make this selection from the Remote Control options in the System menu. Opposite the TV Control option, select from multiple options the one you want to use as channel selector. Then press System or Exit to leave the menu.
Svenska Nederlands Français Italiano Deutsch Español English Dansk USING SYSTEM MENUS Properties that you can adjust Adjustments to system properties are typically those you make only once. If your system already operates just as you want, there is no need to make such adjustments. However, for some installation options, changes to the System menu may be required. This is simply to make the system fully compatible and convenient for your setup.
English Dansk Deutsch Español Français Italiano Nederlands Svenska USING SYSTEM MENUS How to make changes Making adjustments to system properties in this menu is similar to changing the settings for a source. •Move around and make choices by using the selection buttons shown. •Move right to see a preview of features under each property. Note: When activated, the screen changes from a preview of features to a list of the specific options you may choose to alter for that property.
Svenska Nederlands Français Italiano Deutsch Español English Dansk USING SYSTEM MENUS USING SYSTEM MENUS Genre Rock/Pop, Classical, Jazz, Identifies the type of music on the CD. Electronica, World, Latin, Country, Reclassifies the CD for the type of music genre selected.
English Dansk Deutsch Español Français Italiano Nederlands Svenska USING SYSTEM MENUS Use the LIFESTYLE® remote control up, down, left, and right arrows to get to a character, and press Enter to select it. Each time you press Enter, the selected character appears in the text line. When you are finished, move to the Done box at the top right and press Enter to leave the Edit Screen, or press Exit to leave the System menu. 1. Move down to the Erase bar. 2.
Svenska Nederlands Français Italiano Deutsch Español English Dansk USING SYSTEM MENUS Audio options Press System on the LIFESTYLE® remote control. When you see a preview of audio features, you can press the Enter button to move into the active list of audio options. Figure 17 Preview of audio features USING SYSTEM MENUS Audio '()(*+#%.3;-#+-#"3K.@+#+A(@(#@,@+(>#-E+;-2@5 &"@@#6->E(2@"+;-2 0/($)(#6->E(2@"+;-2 %.3;-#?/-*(@@;2O J2E.
English Dansk Deutsch Español Français Italiano Nederlands Svenska USING SYSTEM MENUS ADAPTiQ® Off No ADAPTiQ audio calibration performed. (On Uses ADAPTiQ system adjustments established using Disc 2. Erase) Eliminates the ADAPTiQ system adjustments* when this selection is followed, within 5 seconds, by pressing the Erase button on the media center control panel. Video options Press System on the LIFESTYLE® remote control.
Svenska Nederlands Français Italiano Deutsch Español English Dansk USING SYSTEM MENUS Widescreen DVDs Video Connector (See Note on page 37.) Modified DVD video reformats, as needed, to fit a 4:3 TV screen. (Unmodified) DVD video does not reformat automatically. Composite, S-VIDEO System works with composite and/or S-video TV connection. (Component) System works with component TV connection. USING SYSTEM MENUS Video Black Level TV Video Format Normal Screen black level generally appropriate for TVs.
English Dansk Deutsch Español Français Italiano Nederlands Svenska USING SYSTEM MENUS Digital Audio Output Original No processing applied for signals sent to rear panel digital audio jacks. PCM Increases digital audio compatibility with other devices. Tuner Spacing 1 Selected preset. (2, 3, 4, 5, 6, 7, 8, 9) Edit name Selection of this item brings up an editing screen for naming or renaming preset selected in the option above. Clear Playlist Removes all track selections from the system playlist.
Svenska Nederlands Français Italiano Deutsch Español English Dansk USING SYSTEM MENUS USING SYSTEM MENUS VCR Device -- Identifies what type of device is connected to the VCR input. VCR, DVR, Cable/DVR, Satellite/DVR, DVD/DVD recorder, DVD/DVR, TV/DVD VCR Brand -- Identifies the device brand for the LIFESTYLE® remote to control. Brand name VCR Code -- Identifies the IR code that works with your VCR device. -- Identifies which type of device is connected to the AUX input.
English Dansk Deutsch Español Français Italiano Nederlands Svenska USING SYSTEM MENUS Default settings (Options) Active list of options Effect of this setting _ _ _ _ Establishes a four-number code to restrict access to movies with certain ratings. Confirm Password (appears only when ! a password is created or changed) _ _ _ _ Verifies the four-number password. Enter Password (appears only after ! a password is created) _ _ _ _ Allows access to movies with certain ratings.
Svenska Nederlands Français Italiano Deutsch Español English Dansk USING SYSTEM MENUS For example, by choosing a Parental Control Setting of 4, you restrict access to videos ! rated above PG-13. Videos with ratings above that may be viewed only after entering the password. Your password also prevents others from changing the parental control setting without ! permission.
English Dansk Deutsch Español Français Italiano Nederlands Svenska CHANGING SOURCE SETTINGS Quick adjustments as you watch or listen Quick changes to whatever system source is playing are easy to make when you press the ! Settings button on the LIFESTYLE® remote control. You can boost the system center channel volume or hear audio from five instead of two of the system speakers, for example.
Svenska Nederlands Français Italiano Deutsch Español English Dansk CHANGING SOURCE SETTINGS How to change the settings In the Settings menu on the media ! center display or on the TV screen, ! move around and make changes! by using the selection buttons shown. On the display or the screen, the same actions apply: CHANGING SOURCE SETTINGS • Press the left, right, up, or down arrows to get to the option you want.
English Dansk Deutsch Español Français Italiano Nederlands Svenska CHANGING SOURCE SETTINGS Stored CDs settings options To get into the Stored CD Settings menu, you must have CD tracks stored in the system. Select Stored as the source. Stored CDs Set to Features (Options) Setting effect Play mode (Indicator) uMusic Adjusts automatically as play mode or preset (Library, Encore, selections change. CD#, Playlist, Not adjustable in the Settings menu.
Svenska Nederlands Français Italiano Deutsch Español English Dansk CHANGING SOURCE SETTINGS DVD settings options To see the DVD Settings menu, you must insert a DVD into the disc tray before you select the source. Three features (shown in italic type below) appear in the DVD menu only if you have set Audio Processing to User Adjustable in the Audio options of the System menu.
English Dansk Deutsch Español Français Italiano Nederlands Svenska CHANGING SOURCE SETTINGS Tuner settings options (FM or AM radio) There are different settings menus for AM and FM. You can adjust the settings differently for each. Two of the attributes below are available only when the tuner is set to FM. FM (or AM) Set to Features 2-3-5 Speakers Center Channel Output Mode (FM-only feature) RDS Info (FM-only feature and available only outside the U.S.
Svenska Nederlands Français Italiano Deutsch Español English Dansk PRESENTING A NEW WAY TO PLAY What makes this LIFESTYLE! system uniquely yours The CDs you have amassed over the years are an expression of your taste in music. The ones you play on a regular basis provide a window into your style and moods. And the tracks you most enjoy when feeling tired, exuberant, social, or soulful exemplify these moods.
English Dansk Deutsch Español Français Italiano Nederlands Svenska PRESENTING A NEW WAY TO PLAY • Using the log pages at the back of this guide is one way to track the order of the CDs you store. Or you can rely on the system Library to keep the list for you. • Allow the system a little time to learn the choices you would make. But don’t worry, this “DJ” is a fast learner. • After the tracks on a CD are stored, any of them can be deleted. You can do this in the ! System menu, under Stored CDs.
Svenska Nederlands Français Italiano Deutsch Español English Dansk PRESENTING A NEW WAY TO PLAY How the uMusic™ intelligent playback system works for you We know that the time spent sorting through CDs to locate the tracks you prefer simply delays your listening pleasure. Now, almost instantaneously, the uMusicTM system can do that job for you: finding and playing what you most want to hear.
English Dansk Deutsch Español Français Italiano Nederlands Svenska PRESENTING A NEW WAY TO PLAY Take advantage of the system intelligence As it stores and processes the tracks from your CDs, this system draws information about the tracks from internal music databases. This data includes the name of each track, performing artist, style of music (genre), and other meaningful information that helps characterize the music you enjoy.
Svenska Nederlands Français Italiano Deutsch Español English Dansk REFERENCE System maintenance Changing batteries is the only regular maintenance required. However, switches inside the remote battery case can be changed, as needed (to select a ! new house code, for example). Similar changes may be required for any additional remotes, purchased for use in other rooms. Note: For further information on switch settings refer to “Changing remote control switch settings” below.
English Dansk Deutsch Español Français Italiano Nederlands Svenska REFERENCE Using the media center: 1. Lift the media center door and press the All Off button. 2. Press and hold the Enter button. Your current house code will appear in the media center display window in the form of four rectangles, which represent the positions of switches 1 through 4: HOUSE CODE: Switches 1 - 4 down = 0 0 0 0 (current house code) 3.
Svenska Nederlands Français Italiano Deutsch Español English Dansk REFERENCE Setting up a second room with sound Your LIFESTYLE® DVD home entertainment system can direct sound to more than one room at the same time. What’s more, it can direct the audio from two different sound sources (such as CD, AM/FM tuner, TAPE, or AUX) to these rooms through two independent audio streams.
English Dansk Deutsch Español Français Italiano Nederlands Svenska REFERENCE Bose® link remote switch settings These settings apply only to remote controls with battery compartment switches.* • House code switches (1, 2, 3, and 4) must match those on your main remote. • Consider your choices for Switch 5: Change the switch so the expansion room shares the audio stream heard in the main room (A).
Svenska Nederlands Français Italiano Deutsch Español English Dansk REFERENCE Figure 27 Handling and cleaning a disc REFERENCE Troubleshooting Problem What to do System doesn’t do ! anything • Make sure the power connector is inserted securely into the media center, the power cord is inserted securely into the Acoustimass® module, and the power pack and power cord are fully plugged into operating AC wall outlets. • Be sure to press a source button (CD/DVD, AM/FM, etc.
English Dansk Deutsch Español Français Italiano Nederlands Svenska REFERENCE Problem What to do No sound from ! surround speakers • Select 5-speaker mode. • Increase the Surround setting for the source being played. • Make sure the video sound source is stereo- and surround-encoded, and the component used (TV, VCR, DVR, etc.) is stereo. Surround speakers ! are too loud • Decrease the Surround setting for the source being played.
Svenska Nederlands Français Italiano Deutsch Español English Dansk REFERENCE REFERENCE Problem What to do A CD or DVD does not play correctly • Check the disc for scratches, fingerprints, smears, or dirt. See “Protecting and caring for your system” on page 55. FM sound is distorted • Adjust antenna position to reduce interference. FM sound is noisy! in surround mode • Weak FM stations will produce static in the surround speakers.
English Dansk Deutsch Español Français Italiano Nederlands Svenska REFERENCE Accessories For information on speaker mounting brackets and stands, additional remote controls, and connecting additional Bose® powered loudspeakers, contact your Bose dealer or call Bose Customer Service. See the address and phone number list included with your system. Technical information Media center power pack power rating USA/Canada: 120V 0.55A 50/60Hz 33VDC 1.1A 0.30A 50/60Hz 33VDC 1.1A Dual voltage: 115/230V 0.
Svenska Nederlands Français Italiano Deutsch Español English Dansk REFERENCE END USER LICENSE AGREEMENT REFERENCE IMPORTANT: READ CAREFULLY: This End User License Agreement (“EULA”) is a legal agreement between you, the End User (“End User” or “You”), and Bose Corporation (“Bose”) governing your use of the technology and software and data and data content belonging to Bose, its vendors and licensors (“Technology”), that is contained in this audio/video device (“System”).
English Dansk Deutsch Español Français Italiano Nederlands Svenska Dolby and the double-D symbol are trademarks of Dolby Laboratories. Manufactured under license from Dolby Laboratories. Confidential unpublished works. 1992-1997 Dolby Laboratories. All rights reserved. This product contains one or more programs protected under international and U.S. copyright laws as unpublished works. They are confidential and proprietary to Dolby Laboratories.
English Español Français STORED CD LOG Note: Using a pencil here will make it easier to revise the log as needed.
STORED STORED S CD TORED S L CD TORED OGS L CD TORED OGS L CD TORED OGS L CD TORED OGS L CD TORED OGS L CD TORED OGS L CD TORED OGL CD OGL CD OGLOG English CD# Español Français Album Title Artist/Composer 6WRUHG&'/RJ IP Optional Notes
STORED STORED S CD TORED S L CD TORED OGS L CD TORED OGS L CD TORED OGS L CD TORED OGS L CD TORED OGS L CD TORED OGS L CD TORED OGL CD OGL CD OGLOG 6WRUHG&'/RJ IP Optional Notes Artist/Composer Album Title CD# Français Español English
STORED STORED S CD TORED S L CD TORED OGS L CD TORED OGS L CD TORED OGS L CD TORED OGS L CD TORED OGS L CD TORED OGS L CD TORED OGL CD OGL CD OGLOG English CD# Español Français Album Title Artist/Composer 6WRUHG&'/RJ IP Optional Notes
6 %RVH &RUSRUDWLRQ 7KH 0RXQWDLQ )UDPLQJKDP 0$ 86$ $0 5HY 1 &&0