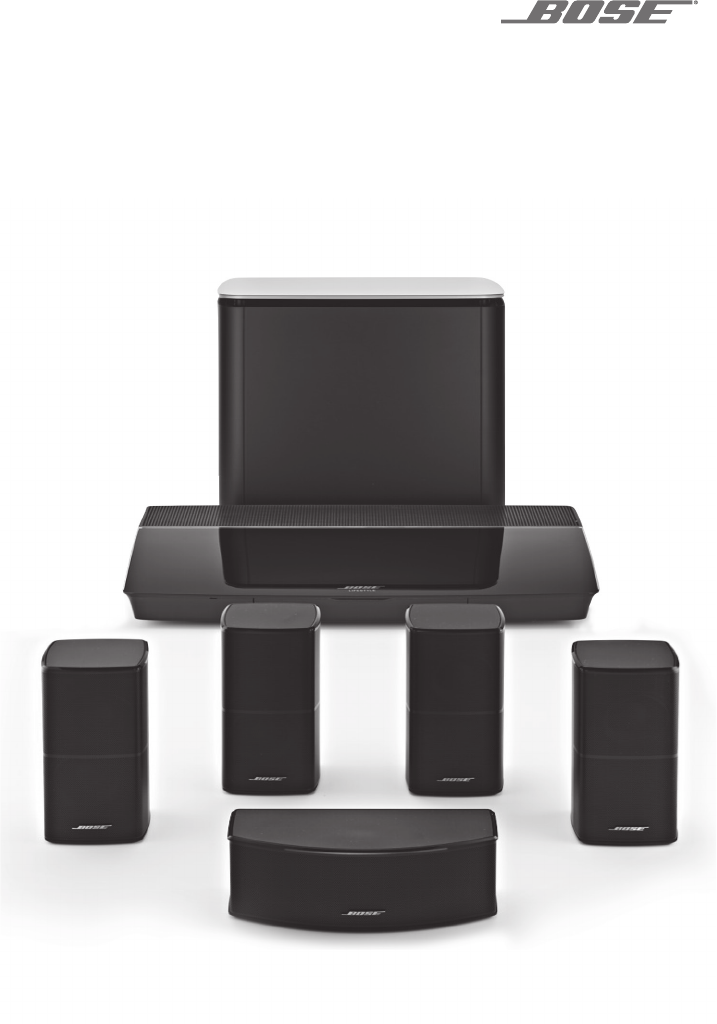
LIFESTYLE 600 ® HOME ENTERTAINMENT SYSTEM BRUGERVEJLEDNING • BEDIENUNGSANLEITUNG G E B R U I K E R S H A N D L E I D I N G • K ÄY T T Ö O H J E M A N U A L E D I I S T R U Z I O N I • K E Z E L É S I Ú T M U TAT Ó B R U K E RV E I L E D N I N G • P O D R Ę C Z N I K U Ż Y T KOW N I KA M A N U A L D O P R O P R I E TÁ R I O • B R U K S A N V I S N I N G
I M P O R TA N T S A F E T Y I N S T R U C T I O N S Please read and keep all safety and use instructions. Important Safety Instructions 1. 2. 3. 4. 5. 6. 7. 8. 9. 10. 11. 12. Read these instructions. Keep these instructions. Heed all warnings. Follow all instructions. Do not use this apparatus near water. Clean only with a dry cloth. Do not block any ventilation openings. Install in accordance with the manufacturer’s instructions.
R E G U L AT O R Y I N F O R M AT I O N NOTE: This equipment has been tested and found to comply with the limits for a Class B digital device, pursuant to Part 15 of the FCC Rules. These limits are designed to provide reasonable protection against harmful interference in a residential installation. This equipment generates, uses, and can radiate radio frequency energy and, if not installed and used in accordance with the instructions, may cause harmful interference to radio communications.
R E G U L AT O R Y I N F O R M AT I O N Please complete and retain for your records The serial and model numbers are located on the side of the carton. Serial number: ___________________________________________________________________________________ Model number: ___________________________________________________________________________________ Please keep your receipt with your owner’s guide. Now is a good time to register your Bose product. You can easily do this by going to http://global.Bose.
CONTENTS Getting Started Unpacking.............................................................................................................................. Layer 1............................................................................................................................. Layer 2............................................................................................................................ Layer 3 ..............................................................................
CONTENTS Bluetooth® Technology Pairing a device..................................................................................................................... Pairing a device with NFC................................................................................................... Controlling your connected mobile device from the remote control.......................... Connecting to a paired device...........................................................................................
CONTENTS Appendix A: installation reference Front console panel.............................................................................................................. 34 Front Headphones/AUX input.................................................................................... 34 Front HDMI™ input........................................................................................................ 34 Back console panel..............................................................................
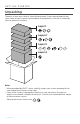
G E T T I N G S TA R T E D Unpacking The parts of your new Lifestyle® Home Entertainment System are packaged in four layers, some of which contain multiple boxes of components. Each box is marked by icons to indicate its contents. Layer 1 Layer 2 Layer 3 Layer 4 Notes: • When prompted by UNIFY® setup, carefully unpack your system according to the icons referenced in the on-screen steps.
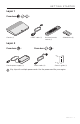
G E T T I N G S TA R T E D Layer 1 From box : Console (1) HDMI™ cable (1) Universal remote control (1) AA batteries (4) Layer 2 From box : Console power supply (1) From box Power cords (4) : Owner’s guide (1) May ship with multiple power cords. Use the power cord for your region.
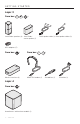
G E T T I N G S TA R T E D Layer 3 From box : Jewel Cube® speakers (4) Jewel Cube® center speaker (1) Front speaker cable (1) Rear speaker cables (2) AC-2 adapters (5) From box : Wireless receivers (2) From box ADAPTiQ® headset (1) Layer 4 From box : Acoustimass® wireless bass module (1) 10 - ENGLISH : Screwdriver (1) IR emitter (1)
G E T T I N G S TA R T E D Placement guidelines To avoid interference, keep other wireless equipment 1 – 3 ft. (0.3 – 0.9 m) away from the system. Place your system outside of and away from metal objects and away from other audio/video components and direct heat sources. Component Recommended placement Console • Place the console near your components. The recommended placement is near your TV. • Do NOT place the TV or any other components on top of your console.
G E T T I N G S TA R T E D Sample system placement 12 - ENGLISH
SETTING UP THE SYSTEM UNIFY® system overview The UNIFY intelligent integration system guides you through the initial process of setting up and configuring your system. It helps you choose the correct cables and inputs and programs the Bose® remote control to operate your connected devices. Note: Before you begin, make sure you have one hour set aside for system setup. Menu item What you can do Language Change the language of the on-screen display. ADAPTiQ® Start the ADAPTiQ audio calibration process.
SETTING UP THE SYSTEM UNIFY® setup The following steps are part of the initial UNIFY setup process: Step Objective Pair the remote control Connect the system's remote control to the console. Choose language Select your language from the on-screen list. Connect to network Select and connect to your home Wi-Fi network. Software update Update system software to provide the most current functionality. Wired speakers Connect the front speakers to the console.
U S I N G T H E R E M OT E CO N T R O L Remote control overview The Bose® advanced RF (radio frequency) remote control works from anywhere in your room without requiring you to aim the remote control at the console. The remote control's display is an essential part of your Lifestyle® experience. It guides you through your sources and system settings. Note: The Bose remote control does not control functions specific to devices that are connected to the front HDMI™ input.
U S I N G T H E R E M OT E CO N T R O L Using the SOURCE button The button is used to switch between connected sources. Access sources using the navigation pad on your remote control. Function buttons The red, green, yellow and blue buttons on the remote control correspond with the color-coded function buttons on your cable/satellite box or teletext functions. • Cable/satellite box functions: refer to your cable/satellite box owner’s guide.
U S I N G T H E R E M OT E CO N T R O L The OPTIONS menu The OPTIONS menu displays a list of functions that let you adjust certain system settings. The number of items that appear in the OPTIONS menu depends on which source is currently selected. Regardless of the source, you have access to the OPTIONS menu. Note: The OPTIONS menu is only accessible through your system’s remote control after pressing the MORE button . To activate the OPTIONS menu: 1. Press on your remote control. 2.
S E T T I N G U P S O U N DTO U C H ® The SoundTouch® app lets you set up and control SoundTouch® from your smartphone or tablet. Using the app, your smart device acts as a remote for your system. From the app, you can manage your SoundTouch® settings, add music services, explore local and global Internet radio stations, set and change Presets, and stream music. New features are added periodically.
S E T T I N G U P S O U N DTO U C H ® Adding the system to an existing SoundTouch® account If you have already set up SoundTouch® on another system, you do not need to download the SoundTouch® app again. 1. On your smartphone or tablet, select the SoundTouch® icon to open the app. 2. Select EXPLORE > SETTINGS > Add or reconnect system. The app guides you through setup. Connecting the system to a new network If your network information changes, add your system to your new network.
U S I N G T H E S O U N DTO U C H ® A P P After you set up the SoundTouch® app, you are ready to stream music and personalize your Presets. Getting help global.Bose.com/Support/LS600 This website provides access to the owner support center, which includes: owner’s manuals, articles, tips, tutorials, a video library and the owner community where you can post questions and answers. In-app help The In-app help provides information on using SoundTouch®. 1.
P E R S O N A L I Z I N G YO U R P R E S E T S How Presets work You can personalize six Presets to your favorite streaming music services, stations, playlists, artists, albums or songs from your music library. You can access your music, at any time, with a simple touch of a button using the SoundTouch® app on your smartphone or tablet. What you need to know • You can set Presets from the app and your remote control. • You cannot set Presets to a Bluetooth® stream. Setting a Preset 1.
B LU E T O OT H ® T E C H N O LO G Y Bluetooth® wireless technology lets you stream music from mobile devices, such as smartphones, tablets and laptops. Before you can stream music from a mobile device, you must pair the mobile device with the console. Choosing your pairing method You can pair your mobile device with the console using Bluetooth wireless technology or Near Field Communication (NFC).
B LU E T O OT H ® T E C H N O LO G Y Pairing a device with NFC 1. With your system powered on, unlock your device and turn on the B luetooth® and NFC features. Refer to your device owner’s guide to learn more about these features. 2. Gently tap the NFC touchpoint on your mobile device to the area above the Bose® logo on the top of your Lifestyle® console. Your mobile device may prompt you to accept pairing.
B LU E T O OT H ® T E C H N O LO G Y Connecting to a paired device You can stream audio from a device to your console. 1. Turn on the Bluetooth® feature on your device. 2. On your remote control, choose the Bluetooth source through the menu. The console connects to the last device that streamed music to the system. 3. On the device, play music. If you can’t stream audio from a paired device The system may have lost the connection to the device.
A D VA N C E D F E AT U R E S Disabling Wi-Fi® capability Disabling Wi-Fi® also disables the Bluetooth® feature. 1. Press and hold your console's indicator blinks. 2. Release the button until the system status button. Re-enabling Wi-Fi® capability Re-enabling Wi-Fi® also re-enables the Bluetooth® feature. Your system's Wi-Fi® automatically re-enables upon restarting the system.
G E T T I N G S Y S T E M I N F O R M AT I O N System status indicators The front of the console has an LED indicator that shows system status. The LED glows according to system state.
G E T T I N G S Y S T E M I N F O R M AT I O N Acoustimass® wireless bass module LED indicator Indicator activity System state Blinking amber Ready to pair Solid white Connected to the console Solid amber (dim) Disconnected from the console Blinking white Downloading system software update Blinking red Firmware error - contact Bose® customer service Wireless receiver LED indicator Indicator activity System state Blinking amber Ready to pair Solid white Connected to the console Solid amb
CARE AND MAINTENANCE Cleaning Do not allow liquids to spill onto the system or into any openings. • Clean the exterior of the system with the provided cleaning cloth or another soft, dry cloth. • Do not use any sprays near the system. • Do not use any solvents, chemicals or cleaning solutions containing alcohol, ammonia or abrasives. • Do not allow objects to drop into any openings. Customer service For additional help using the system: • Visit global.Bose.
T R O U B L E S H O OT I N G If you experience problems with your home entertainment system: • Make sure that all system components are connected to an AC (mains) outlet. • Secure all cables. • Check the state of system status indicators (see page 26). • Move the system away from possible interference (wireless routers, cordless phones, televisions, microwaves, etc.). • Verify the system is within the recommended range of wireless router or mobile device for proper operation.
T R O U B L E S H O OT I N G Symptom Solution No sound from the system • Increase the volume. Cannot complete network setup • Select the correct network name and enter password (case sensitive). • Connect to the network using an Ethernet cable. • Restart your modem and router. Cannot complete SoundTouch® setup • Connect the mobile device and the system to the same Wi-Fi® network. • Enable Wi-Fi on the mobile device you are using for setup. • Test your internet connection.
T R O U B L E S H O OT I N G Symptom Solution The wireless receiver status LEDs are solid amber (dim) • Follow the on-screen troubleshooting prompts. Sound is distorted • Cycle through and test different sources. • Reduce the volume output level from any devices connected to the control console. • Make sure the audio input cable from your source device is connected and not damaged. • If you have not previously run ADAPTiQ®, select ADAPTiQ® from the UNIFY® menu (see page 13).
T R O U B L E S H O OT I N G Symptom Solution Cannot play Bluetooth® audio On your system: • Pair a mobile device using the Bluetooth SOURCE screen. • Clear the system’s pairing list using the SoundTouch® app: -- In the Bluetooth source, press the MORE button your remote. on -- Select CLEAR LIST. • Try pairing a different mobile device. On your mobile device: • • • • Disable and re-enable the Bluetooth feature. Remove the system from the Bluetooth menu. Pair again.
T R O U B L E S H O OT I N G 5. Place the three IR beads into the cabinet housing your device or directly in front of the device itself. 6. Test the responsiveness of your remote. If problems still exist, reposition the IR beads and test again. Unable to pair the Acoustimass® wireless bass module with the console If you are unable to pair the bass module with the console, you can also connect the module to the soundbar using a 3.5 mm stereo cable (not provided).
A P P E N D I X A : I N S TA L L AT I O N R E F E R E N C E Front console panel The front of the console has the following inputs: • Headphones • HDMI™ input These inputs appear in the menu as AUX (Front) and HDMI (Front) when a device is connected. They can be used to connect digital cameras, video cameras, media players and your preferred mobile device. Front Headphones/AUX input You can use this 3.
A P P E N D I X A : I N S TA L L AT I O N R E F E R E N C E Connecting an AC-2 adapter Your system comes with AC-2 adapters used to connect the front and rear speaker wires to your speakers. Use this step when it is referenced to set up your system. 1. Using the screwdriver, turn the screws to the left (counterclockwise) to loosen the wire terminals. 2. Insert the red, stripped end of the two-pin cable marked + into the red + terminal. 3.
A P P E N D I X A : I N S TA L L AT I O N R E F E R E N C E Installing the front speakers UNIFY® guides you through the initial installation of your front speakers during the “Wired speakers” step (see page 14). If you are moving your system but have already completed setup, refer to the following instructions in order to reassemble the rear portion of your home entertainment system. CAUTION: Do not connect your speakers while your console is connected to an AC (mains) adapter.
A P P E N D I X A : I N S TA L L AT I O N R E F E R E N C E Connecting the front speakers to the console 1. Connect the AC-2 adapters to the bare ends of the speaker wire. See “ Connecting an AC-2 adapter” on page 35. 2. Insert the adapter connected to the wire marked L+ into the speaker on the left of your TV. 3. Insert the adapter connected to the wire marked R+ into the speaker on the right of your TV. 4. Insert the adapter connected to the wire marked C+ into the center speaker. 5.
A P P E N D I X A : I N S TA L L AT I O N R E F E R E N C E Installing the rear speakers UNIFY® guides you through the initial installation of your rear speakers during the “Wireless speakers” step (see page 14). If you are moving your system but have already completed setup, refer to the following instructions in order to reassemble the rear portion of your home entertainment system.
A P P E N D I X A : I N S TA L L AT I O N R E F E R E N C E Identifying switch settings on wireless receivers Your rear speakers connect to wireless receivers to communicate with the console. The receivers come preset to a left and right channel out of the box. You can use the switch on the front of the receiver to adjust the channel settings. 1. Confirm that the switch on one wireless receiver is set to L (left). 2. Confirm that the switch on the other wireless receiver is set to R (right).
A P P E N D I X A : I N S TA L L AT I O N R E F E R E N C E Connecting the rear speakers to power 1. Connect one end of the power cord into your wireless receiver. 2. Plug the other end of the power cord into an AC (mains) outlet. 3. Repeat steps 1 and 2 to set up your other speaker. Making a wired connection to the rear speakers You can also hard wire your rear speakers through the use of an adapter kit (sold separately). To purchase the kit, contact your local Bose® dealer or visit www.Bose.
APPENDIX B: SYSTEM MAINTENANCE Replacing the remote control’s batteries Replace all four batteries when there is a noticeable decrease in range or when you see the console LED indicator blink red (see page 26). 1. Slide open the battery compartment cover on the back of the remote control. 2. Install four AA (IEC LR6) 1.5V batteries. Match the + and – symbols on the b atteries with the + and – markings inside the compartment. 3. Slide the battery compartment cover back into place.
©2016 Bose Corporation, The Mountain, Framingham, MA 01701-9168 USA AM781533 Rev.