The Bose® Personalized Amplification System™ Family of Products Owner’s Guide 70 “A Mark of Quality” www.bose.
Safety Information Please read this owner’s guide English Dansk Please take the time to follow the instructions in this owner’s guide carefully. It will help you set up and operate your system properly and enjoy all of its advanced features. Please save this owner’s guide for future reference. WARNING: To reduce the risk of fire or electrical shock, do not expose the system to rain or moisture.
Important Safety Instructions 1. Read these instructions. 3. Heed all warnings. 4. Follow all instructions. 5. Do not use this apparatus near water. 6. Clean only with a dry cloth. 8. Do not install near any heat sources, such as radiators, heat registers, stoves or other apparatus (including amplifiers) that produce heat. 11. Only use attachments/accessories specified by the manufacturer. 16.
Información de seguridad Lea esta guía del usuario Dedique el tiempo que sea necesario para seguir las instrucciones de esta guía del usuario cuidadosamente. Le ayudará a configurar y utilizar correctamente el sistema y a disfrutar de todas sus funciones avanzadas. Guarde la guía del usuario para utilizarla como material de referencia en el futuro. ADVERTENCIA: Con el fin de reducir el riesgo de descargas eléctricas, no exponga el sistema a la lluvia o la humedad.
Informations de sécurité Veuillez lire cette notice d’utilisation Prenez le temps de lire attentivement les instructions de cette notice d’utilisation. Elles vous seront précieuses pour installer et utiliser correctement votre système et vous aideront à tirer le meilleur parti de sa technologie. Conservez cette notice d’utilisation pour référence ultérieure. AVERTISSEMENT : Afin de limiter les risques d’incendie ou d’électrocution, n’exposez pas l’appareil à la pluie ou à l’humidité.
Contents Where to find... Setup . . . . . . . . . . . . . . . . . . . . . . . . . . . . . . . . . . . . . . . . . . . . . . . . . . . . . . . . . . . . . . . . . . . . . . . . Before you begin . . . . . . . . . . . . . . . . . . . . . . . . . . . . . . . . . . . . . . . . . . . . . . . . . . . . . . . . . . . Unpacking . . . . . . . . . . . . . . . . . . . . . . . . . . . . . . . . . . . . . . . . . . . . . . . . . . . . . . . . . . . . . . . .
Setup Before you begin English Dansk Thank you for purchasing one of the Bose® Personalized Amplification System™ family of products. This new revolutionary technology brings the benefits of the intimate acoustic concert to amplified performances. Benefits for musicians • Quick and easy setup – The Personalized Amplification System™ product is easy to carry and can be set up in minutes, not hours.
Setup Unpacking English Dansk Your Personalized Amplification System™ products are delivered to you in two cartons. One carton contains the PS1 power stand, AC power cord, R1 remote control with cable, protective plug, Owner’s and Quick Setup guides, PS1 carrying bag, CD-ROM, and a spare fuse. The other carton contains the L1 Cylindrical Radiator™ loudspeaker and carrying bags (Figure 1).
Setup English Dansk Placing the product in the right location for your performance Before you start to assemble this product, it is a good idea to find the best location for it. WARNING: The completed unit weighs about 60 lb. Moving the completely assembled unit is not recommended. Deutsch Español Dansk Placing the PS1 power stand in the right location is an important step in the process of setting up this product to create your own individualized sound.
Setup Product assembly 4. Connect the R1 remote control to the PS1 power stand. Plug the R1 remote control cable into either end of the remote. Plug the other end into the Remote jack on the PS1 power stand. Deutsch Español Dansk WARNING: The completed unit weighs about 60 lb. Moving the completely assembled unit is not recommended. English Dansk 1. Place the PS1 power stand on the floor.
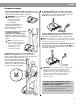
Setup English Dansk Disassembly WARNING: Before disassembly, turn the power off and then remove the AC power cord and all other cables from the PS1 power stand. Français Svenska Nederlands Español Français Deutsch Italiano Deutsch Español Dansk Remove the top L1 Cylindrical RadiatorTM loudspeaker section Place one foot on the PS1 power stand to support your back. Firmly grasp the top section with one hand.
Setup Connecting a B1 bass module to the PS1 power stand (optional) English Dansk The % %DVV 0RGXOH $PS 287 jack on the PS1 power stand can adequately drive one or two B1 bass modules. B1 bass modules can be placed on the floor vertically or horizontally. Up to four modules can be stacked when placed horizontally (Figure 1). CAUTION: Do not connect more than two B1 bass modules to the B1 Bass Module (Amp 3 OUT) jack on the PS1 power stand.
Setup Connecting two B1 bass modules English Dansk Connect the first B1 bass module to the PS1 power stand as shown in “Connecting one B1 bass module.” Insert one end of the second B1 bass module cable into the unused jack on the rear panel of the first B1 bass module. Insert the other end of the cable into one of the jacks on the rear panel of the second B1 bass module. Note: Use only the supplied (blue) B1 bass module 4-wire cable to connect B1 bass modules to the PS1 power stand.
Controls, Indicators and Connections Deutsch Español Dansk English Dansk Channel 1/2 connections and controls Français Deutsch Italiano Input ..........................................Combination XLR (mic) or ¼-inch phone connector unbalanced (line) input. Inserting a male XLR connector sends the input signal to a balanced microphone preamplifier.
Controls, Indicators and Connections Deutsch Español Dansk English Dansk Channel 3/4 connections and controls Line IN ....................................... ¼-inch phone connector unbalanced line input Svenska Nederlands Italiano Français Svenska Nederlands Español Français Deutsch Italiano Level 0 to 12 .............................
Controls, Indicators and Connections Power amp patch, bass, remote and AC power connections English Dansk Deutsch Español Dansk Amp 1 IN............................................. Amplifier 1 input jack Amp 2 IN............................................. Amplifier 2 input jack Français Deutsch Italiano Used only when an L1 Cylindrical Radiator™ loudspeaker is NOT installed in the PS1 power stand. Amp 3 IN............................................. Amplifier 3 input jack All Amps IN ................
Controls, Indicators and Connections English Dansk R1 remote control features CH1 CH2 0 -12 +12 Deutsch Español Dansk 0 -12 Français Deutsch Italiano -12 +12 +12 0 MID 0 -12 0 HIGH -12 0 LOW +12 +12 -12 +12 LEVEL SIG / OL 0 SIG / OL 0 12 12 MASTER Nederlands Español 0 12 CH1/CH2 HIGH -12 to +12 ...............Cuts (-) or boosts (+) high-frequency sounds CH1/CH2 MID -12 to +12 .................Cuts (-) or boosts (+) mid-frequency sounds CH1/CH2 LOW -12 to +12............
Operating Instructions English Dansk Producing individualized sound This product will produce sound whether it is properly adjusted or not. However, if you take a few moments to follow a simple startup procedure, you can optimize the sound for a superior presentation based on your performance style and preferences. Deutsch Español Dansk Unless you make big changes in how you perform, this is typically a one-time event. 1. Set all Trim and Level controls on the PS1 power stand to zero (0). 2.
Operating Instructions English Dansk Using an effects processor IMPORTANT: When using an effects processor, determine and use the proper connection method (serial or parallel) for your application. Some effects MUST be hooked up in serial. Serial connection method Deutsch Español Dansk With the serial method, the complete signal is routed directly into one or more effects processors. Serially connected effects processors are connected in a chain and the signal is processed sequentially.
Operating Instructions Using a serial effects connection with the PS1 power stand Insert the TRS plug into the Channel 1 Insert jack on the PS1 power stand. 2. Connect the ¼-inch mono plug (labeled “send”, “ring”, or “right”) to the input of the effects processor. 3. Connect the other ¼-inch mono plug (labeled “return”, “tip”, or “left”) to the output of the effects processor. 4. Adjust the effects level and mix of the effects processor. Deutsch Español Dansk 1.
Operating Instructions Using parallel effects connection with the PS1 power stand Français Deutsch Italiano Deutsch Español Dansk English Dansk Note: Connecting an effects unit in parallel requires one ¼-inch unbalanced (instrument) cable, one mono ¼-inch phone (M) to dual mono ¼-inch phone (F) “Y” cable adaptor, and one TRS split “insert” cable (with a ¼-inch TRS connector on one side and two mono ¼-inch phone connectors on the other). 1.
Troubleshooting English Dansk If you experience problems while using this product, try the following solutions. If you still can’t solve the problem, please call the Bose® Live Music Product and Technical Support Team direct at 877-335-2673 to arrange for service.
Problem What to do No mid/high sounds heard from the L1 Cylindrical Radiator™ loudspeaker • Make sure L1 Cylindrical Radiator™ loudspeakers are firmly seated in their connectors. • Make sure connections are not bent or broken. • Try cleaning the contacts on the L1 Cylindrical Radiator™ loudspeakers with electronic contact spray cleaner. System momentarily mutes • This is a feature of the PS1 power stand that allows the user to hear that internal when changing presets or changes have been made.
Troubleshooting R1 remote control is not working • Try a different 7-pin cable for the R1 remote control. • Make sure the R1 remote control cable is firmly seated in the jack on the remote and the PS1 power stand. • Try resetting the PS1 power stand: Turn the PS1 power stand off, wait 30 seconds, and turn back on.
Technical Information Mechanical English Dansk Dimensions • PS1 power stand: 26.0 W x 26.0 D x 5.0 H (66 cm x 66 cm x 12.7 cm) • L1 Cylindrical Radiator™ loudspeaker (each section): 3.5 W x 4.0 D x 43.0 H (8.9 cm x 10.5 cm x 109.2 cm) • R1 remote control: 2.8 W x 5.6 D x 1.6 H (7.1 cm x 14.1 cm x 4.0 cm) Deutsch Español Dansk • B1 bass module (optional): 10.3 W x 18.0 D x 15.3 H (25.0 cm x 45.7 cm x 38.0 cm) Weight • PS1 power stand: 35 OE (16 kg) • Lower L1 Cylindrical Radiator™ loudspeaker: 16.
English Dansk Deutsch Español Dansk Français Deutsch Italiano Nederlands Español Français Svenska Italiano Nederlands Svenska 26
Svenska Nederlands Italiano Français Svenska Nederlands Español Français Deutsch Italiano Deutsch Español Dansk English Dansk
©2005 Bose Corporation, The Mountain, Framingham, MA 01701-9168 USA 263976 AM Rev.03 CCM-001549 www.bose.