
Specifications

15
Setup
Shared bass setup
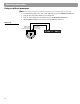
In a shared bass configuration (Figure 9), the musicians can use all the available bass power.
Based on the previous example, a shared bass configuration could be set up for the bass
player and the drummer. This involves inputting the drums and bass to the master power
stand on channels 1 and 2 and driving a full base configuration with a second power stand.
You may want to select an appropriate preset for input channels 1 and 2, or set up an exter
-
nal mixer for drums if more elaborate mixing is needed.
The primary power stand would be placed somewhere between the bass player and the
drummer and the bass would sit somewhere near all this and the primary power stand’s two
bass modules.
The Cylindrical Radiator™ loudspeaker would distribute the upper harmonics of the bass and
drums. This shared configuration would use eight bass modules and be quite suitable for
very aggressive playing in night clubs and moderate concerts for up to 200 people.
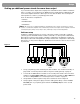
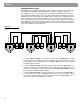
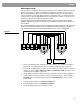
Figure 9
Shared bass block diagram
1. Set up your primary power stand using two bass modules. See “Product assembly” on
page 9 and “Connecting a bass module to the power stand (optional)” on page 11.
2. Connect all six additional bass modules to the second power stand. Connect two bass
modules each to the Amp 1 OUT, Amp 2 OUT, and Bass/Amp 3 OUT jacks. See
“Con-
necting two bass modules” on page 12.
3. Group the bass modules together. They can be stacked as shown in Figure 6 (page 12).
4. Using a typical ¼-inch phone plug connection cable (guitar cable), connect the Bass
Line OUT jack on your primary power stand to the All Amps IN jack on the second
power stand.
5. Connect the bass guitar to the Channel 1 Input jack.
6. Connect the drum mixer to the Channel 2 Input jack.
7. Select an appropriate preset for channels 1 and 2.
Primary power
stand
Slave power
stand
Bass modules
Bass Line OUT
All Amps IN
Bass/Amp 3 OUT
Amp 2 OUT
Amp 1 OUT
Ch 1 Input
Ch 2 Input
Bass guitar preamp
or direct box
Drum
mixer
Bass/Amp 3 OUT