
Operation Manual


Table Of Contents
- Introduction
- Welcome
- Product overview
- Controls and indicators
- Connection panel
- System Setup
- Unpacking
- Removing/attaching the cover
- Mounting options
- Connecting the T1 to an L1TM model II power stand
- Connecting the T1 to an L1 model I power stand
- Connecting the T1 ToneMatchTM audio engine power supply (optional)
- Connecting the T1 to your computer
- Operating Instructions
- Optimizing input gain and output volume
- Using the Master volume control
- Muting a channel
- Muting channel effects
- Reading the T1 display
- Using the T1 rotary selector
- Editing the sound of a channel
- Selecting a ToneMatch™ preset
- Adjusting zEQ
- Adjusting Para EQ
- Using compressor/gate functions
- Using the KickGate
- Using modulation effects
- Adding delays
- Adding reverb
- Routing input signals to the Aux output
- Using the tuner
- Using global functions
- Selecting a type of reverb
- Using the Prefs utilities
- Loading and saving scenes
- Sharing a scene
- Bose scenes
- Factory Settings
- Singer/Songwriter
- DJ/Playback
- Drums and Bass
- The Works scene
- Factory Settings
- Care & Maintenance
- Cleaning
- Limited Warranty and Registration
- Accessories
- Troubleshooting
- Technical information
3
INTRODUCTION
SvenskaItalianoFrançaisEspañolDeutschDanskEnglish Nederlands
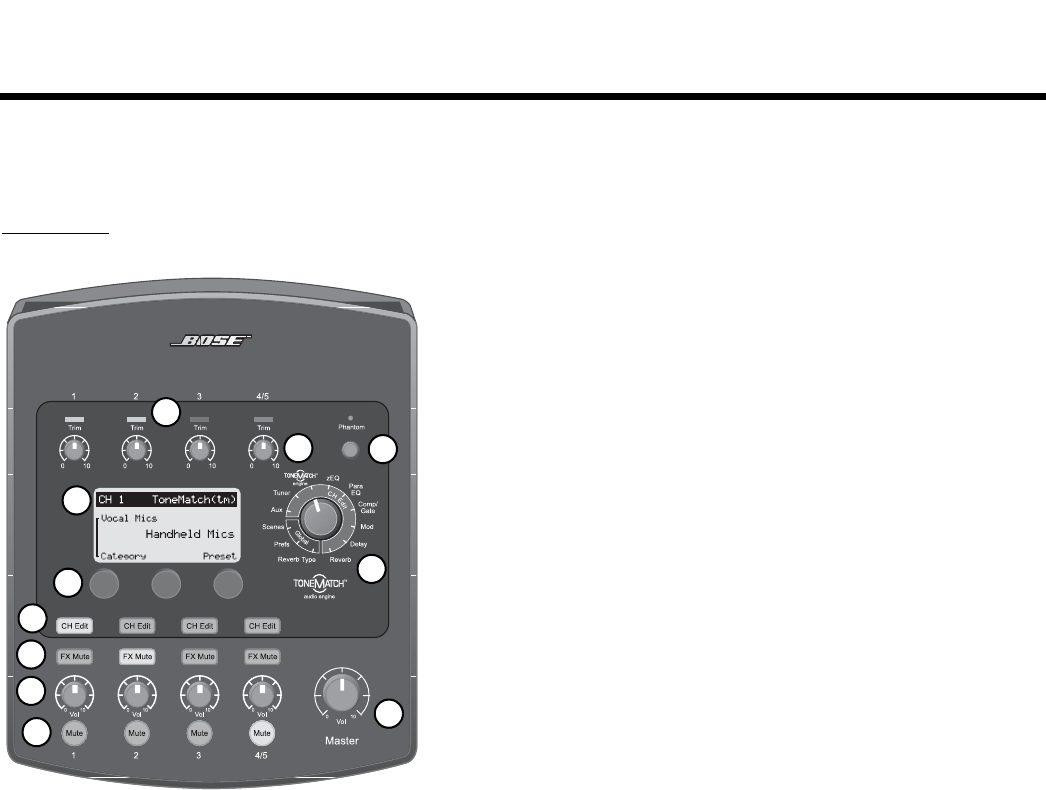
Controls and indicators
The control panel provides all the necessary controls and indicators for operation.
Figure 2
Top panel
1. Input signal/clip LEDs (1-4/5) – Displays the input signal status in
color: Green indicates the presence of an input signal, yellow indicates
a signal near clipping, and red indicates clipping.
2. Trim controls (1-4/5) – Adjusts the input sensitivity for the respective
channel.
3. Phantom power switch – Applies +48V power to input channels 1-3.
A red LED indicates that phantom power is on.
4. T1 rotary selector – Allows access to both global and channel-
related parameters, which are adjusted using the editing controls.
5. MASTER volume control – Adjusts the overall output level.
6. Mute buttons (1-4/5) – Silences the audio output for the respective
channel.
7. Volume controls (1-4/5) – Adjusts the volume level for the respective
channel.
8. FX mute buttons (1-4/5) – Bypasses the Mod, Delay, and Reverb
effects on the selected channel.
9. CH Edit buttons (1-4/5) – Selects the channel you want to modify
using the T1 rotary selector and display-related editing controls.
10. Editing controls – These three rotary/push-button controls allow you
to select or adjust items/values appearing on the display.
11. Display – Provides function menus and system status information.
1
2
3
4
5
6
7
8
9
10
11