
Operation Manual


Table Of Contents
- Introduction
- Welcome
- Product overview
- Controls and indicators
- Connection panel
- System Setup
- Unpacking
- Removing/attaching the cover
- Mounting options
- Connecting the T1 to an L1TM model II power stand
- Connecting the T1 to an L1 model I power stand
- Connecting the T1 ToneMatchTM audio engine power supply (optional)
- Connecting the T1 to your computer
- Operating Instructions
- Optimizing input gain and output volume
- Using the Master volume control
- Muting a channel
- Muting channel effects
- Reading the T1 display
- Using the T1 rotary selector
- Editing the sound of a channel
- Selecting a ToneMatch™ preset
- Adjusting zEQ
- Adjusting Para EQ
- Using compressor/gate functions
- Using the KickGate
- Using modulation effects
- Adding delays
- Adding reverb
- Routing input signals to the Aux output
- Using the tuner
- Using global functions
- Selecting a type of reverb
- Using the Prefs utilities
- Loading and saving scenes
- Sharing a scene
- Bose scenes
- Factory Settings
- Singer/Songwriter
- DJ/Playback
- Drums and Bass
- The Works scene
- Factory Settings
- Care & Maintenance
- Cleaning
- Limited Warranty and Registration
- Accessories
- Troubleshooting
- Technical information
OPERATING INSTRUCTIONS
26
EnglishDeutschEspañolFrançaisItalianoNederlandsSvenska Dansk
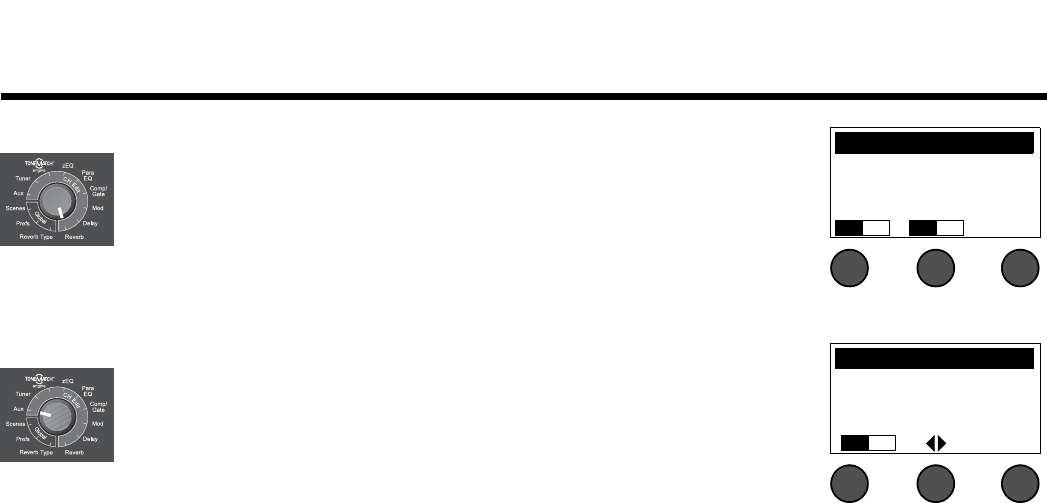
Adding reverb
The Reverb function applies a user-adjustable amount of reverb to the selected chan-
nel. To select the type of reverb, see “Selecting a type of reverb” on page 27.
Note: To bypass the Reverb effects, press the Mix button. Press it again to activate.
1. Rotate the Mix button to adjust the desired mix of dry signal to wet signal
(reverb-processed).
2. Rotate the Bright button to equalize the high frequencies of reverb applied to the
selected channel.
Routing input signals to the Aux output
The Aux function allows you to route signals from one of three tap points to the Aux
output for various signal processing, recording, and sound reinforcement applications.
The signal level is adjustable for each of the three available tap points:
Note: To mute the Aux output, press the Level button. Press it again to unmute.
1. Rotate the Level button to adjust the signal level of the selected channel.
2. Rotate the Tap button to scroll through the tap menu and highlight the desired
tap point.
Dry: After Preamp..........The completely dry (no processing) signal is routed directly from the preamp stage.
Pre: With EQ & FX.........The signal is routed from the preamp stage with applied processing.
Post: After Fader...........The signal is routed after the Channel volume control with applied processing.
3. Press the Select button to select the tap point, or press the Cancel button to exit with no change. The name
of the currently selected tap point appears in bold type.
CH 1 Reverb
Mix Bright
50% 50%
CH 1 Aux Output
Level Tap
50% Dry