4-154-584-15(2) FM/AM Clock Radio Operating Instructions ICF-CL75iP/ICF-CL70 ©2009 Sony Corporation US
Owner’s Record The model number and the serial number are located on the bottom. Record the serial number in the space provided below. Refer to them whenever you call upon your Sony dealer regarding this product. Model No. ICF-CL75iP/ICF-CL70 Serial No. ________________________________ For customers who purchased this product in the USA Please register this product on line at http://www.sony.com/productregistration.
Important Safety Instructions Notes on LCD screen 1) 2) 3) 4) 5) 6) 7) • The displayed image on the screen is not identical in picture quality and colors with the printed image because phosphor methods or profiles differ. Please regard the displayed image as just a reference. • Do not press against the LCD screen. The screen may be discolored and that may cause a malfunction. • Exposing the LCD screen to direct sunlight for long periods may cause malfunctions.
About this Operating Instructions • The example illustrations and images are of the ICF-CL75iP, therefore may appear different from illustrations, images and screen indicators that actually appear on your clock radio. • “Note” indicates cautions and limitations relevant to the correct operation of this unit. • “Tip” indicates information that is useful to know. • The figures in parentheses indicate the reference page for details on operation.
Table of Contents Features............................................ 6 Identifying the parts ........................ 8 Screen indicators .......................................10 Getting started Checking the supplied items........ 11 Connecting the AM antenna and AC power cord (mains lead) ... 11 Setting the clock............................ 12 Using this unit Basic operations............................ 14 Home and Option menu ............................14 Adjusting the volume .......................
Features This unit is multifunctional FM/AM clock radio with 7.0 inch LCD screen. As well as playing your favorite music and video, you can also set a photo as wallpaper, etc. You can listen to your favorite music, watch a video or view a slideshow at bed time and set your favorite alarm sound for when you wake up. Furthermore, when you insert iPod into the docking tray, you can operate iPod via this unit or iPod directly (ICF-CL75iP only).
Playback function (19, 20) • iPod, iPhone, memory card, internal memory, or USB device can be used to play back music and video (functions of iPod & iPhone are only for ICF-CL75iP). • You can listen to music with album artwork on the screen. • 1 W × 1 W front speakers can be used to listen to sounds. • You can save contents into the 1 GB internal memory. Note • You cannot display the album artwork of iPod or iPhone on this unit. • You cannot display the cover photo for WMA content.
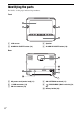
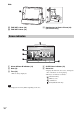
Identifying the parts For details, see the pages indicated in parentheses.
Top K SNOOZE/BRIGHTNESS button (14, 17) • > PRESET+/B (Right): You can set the tuning to minus and tune into a station by its preset. You can select the relevant menu items. Press and hold to fast forward. • Operation procedure indicates with v/V/b/B on the control button in this manual. L Microphone (18) M OFF x ALARM RESET button N SLEEP button (19) O ALARM SET button (16) P HOME button (14) Q BACK/iPod MENU button (ICF-CL75iP)/ BACK button (ICF-CL70) • Return to the previous menu screen.
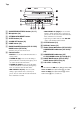
Side Y TIME SET A lever (16) Z TIME SET B lever (16) wj Docking tray for iPod & iPhone (22) (ICF-CL75iP only) Screen indicators A Alarm A/Alarm B indicator (16) D SLEEP timer indicator (19) B Date (13) E Status bar C Time (13) • Time is always displayed. Note • The displayed screen may differ depending on the area. 10US • Displays the file name, the source, and elapsed time of the music or movie playing.
3 Getting started Connecting the AM antenna and AC power cord (mains lead) 1 2 Remove only the loop part from the plastic stand. Set up the AM loop antenna. Getting started Push down and hold the terminal clamp and insert the cord. Checking the supplied items Make sure that the following items are supplied: • FM/AM Clock Radio (1) • AM loop antenna (1) • Operating Instructions (this manual) (1) • Warranty (1) (In some countries or regions, the warranty is not supplied.
Getting started Note • The unit’s ATS (Automatic Time Set) function automatically keeps the correct time and never requires resetting. In some countries or regions, ATS (Automatic Time Set) function is not available. • You can use this unit and the AC power cord (mains lead) in any country or region where the power supply is within 100 V to 240 V AC, 50 Hz/60 Hz. Tip • You may change the time zone in some countries or regions. For details on setting the time zone, refer to “Time zone.
Getting started x Auto DST (Auto Summer Time) This unit automatically adjusts for daylight savings time (summer time) by the default setting. [ ] is displayed from the beginning of daylight savings time (summer time) and disappears at the end of daylight savings time (summer time) automatically. Note • In some country or region, [Auto DST] (Auto Summer Time) is not available. • Displayed menu item differs depending on the country or region.
Using the Option menu This function is useful for changing the current setting easily while using any function by pressing the OPTION button. Using this unit Basic operations x Option menu list This section describes basic operations of the unit.
Changing the clock display type 1 Press the DISPLAY button repeatedly. • Changes the clock display type cycles as shown below. 1 Press the RADIO BAND button (ICFCL75iP) or the RADIO button (ICFCL70) to turn on the radio. • Displays the radio screen. 2 3 4 Press the RADIO BAND button (ICFCL75iP) or the BAND button (ICF-CL70) and select the FM/AM band. Select a frequency with v/V. Using this unit The clock display has four variations.
Deleting a preset 1 2 Using the timer function Select the desired preset number with b/B. Press the OPTION button and select [Delete preset]. The dual alarm function allows you to use two individually set alarms. For each alarm, you can set a favorite sound, or use an originally recorded sound with a selected photo display. • Confirmation screen appears, the selected preset is deleted. Improving the reception FM: Extend the FM wire antenna fully to increase reception sensitivity.
x Alarm Sound Select your favorite alarm sound with v/V. This unit is equipped with 7 alarm modes listed below. FM Radio Sets the preset FM station. AM Radio Sets the preset AM station. Deactivating the alarm setting Press the OFF x ALARM RESET button to deactivate the alarm. The alarm will sound again at the same time the next day. Note Sets the buzzer. Music Sets the desired music. Nature Sound* Sets 5 types of nature sounds preinstalled in the internal memory on this unit.
x To record voice Fun Wake-up A Select You can wake up by your original voice and a photo as an alarm. If you want to set an alarm to “Fun Wake-up”, refer to “Setting an alarm” on page 16. Good morning! and press the ENTER button. • Confirmation screen appears. B Select [Yes] with b/B and press the ENTER button. • When recording starts, record into the microphone. Note • Maximum recording time is 10 seconds. If you want to stop during recording, select x.
Using the sleep timer You can easily set the sleep timer by pressing the SLEEP button repeatedly. Each time you press the SLEEP button, the duration (in minutes) changes as follows: 90 60 30 20 10 Importing files 1 OFF Insert a memory card firmly into the slot with its label side facing toward you or connect a USB device to the rear of this unit. Tip Using this unit 120 Enjoying music, video and photos • [SLEEP] appears on the screen when the sleep timer is set.
Note • For details on memory cards you can use with this unit, see “About the memory cards” (26). • Do not disconnect the AC power cord (mains lead) from the wall outlet (wall socket) during the operation. The file may be damaged. • Remove a memory card from the slot or disconnect the USB device from the USB connector in the opposite direction from which it was inserted. Deleting files 1 2 3 4 Press the HOME button. Select [General Settings] and select [Delete files], then press the ENTER button.
Note • Check supported file formats beforehand, refer to “Specifications” on page 31. • You cannot display the cover photo for WMA content. • Photos are used only for the background photo (wallpaper). The background photo cannot be played back. • To change the background photo (wallpaper), press the OPTION button to bring up [Option] menu, then [Select background photo]. • You can select from 6 pre-installed photographs in the internal memory as wallpaper. You can enjoy music, etc.
iPod nano 2nd generation (aluminum) iPod nano 1st generation iPhone Note • iPod shuffle is not available on this unit. • Sony cannot accept responsibility in the event that data recorded to iPod is lost or damaged when using iPod connected to this unit. • iPod 4th generation (color display) cannot play photo. iPod 5th generation (video) iPod 4th generation (color display) Playing iPod You can play music or video from iPod by connecting to this unit.
3 Attach the adapter for your iPod/ iPhone. Note Universal dock adapter For iPhone qg For iPhone 4 ql • If you are using an iPhone, iPhone 3G, iPhone 3GS or iPhone 4, attach the supplied universal dock adapter for iPhone, iPhone 3G, iPhone 3GS or iPhone 4 before connecting. The adapter number, qs, qg or ql, is shown on the underside of the supplied universal dock adapters. qs is for the iPhone, qg is for the iPhone 3G & iPhone 3GS and ql is for the iPhone 4. Check the adapter number before use.
Additional information General Settings 1 2 3 Press the HOME button. Select [General Settings] and press the ENTER button. Select each of the settings as follows: x Language Setting Select the language to be displayed with v/V. x Photo Setting Select the display mode for photo with v/V/b/ B. Display mode Full screen mode The entire photo is displayed. Fit to screen* The photo size fits in the unit screen. Slide show ON* Plays the slideshow. OFF Cancels the slideshow.
x Format Formatting deletes all the music, video and photo files to free up space in the internal memory. Note x Delete files You can delete selected files in the internal memory. Refer to “Deleting files” on page 20. x Unit information Display the information of this unit. Should any problem persist after you have made the following checks, consult your nearest Sony dealer. The power cannot be turned on. • Insert the power plug properly. Cannot hear sound from this unit. • The volume is set too low.
There is no sound from iPod (ICF-CL75iP only). About the memory cards • Make sure iPod is securely connected. • Adjust the volume. iPod cannot be operated with this unit (ICF-CL75iP only). “Memory Stick” media • Make sure iPod is securely connected. iPod cannot be charged (ICF-CL75iP only). • Make sure iPod is securely connected. “Memory Stick” media are a compact, portable IC recording medium with a large data capacity.
When using a “Memory Stick Micro” media with the clock radio, always insert it into an M2 adaptor. *4) “M2” is an abbreviation for “Memory Stick Micro” media. In this section, “M2” is used to describe “Memory Stick Micro” media. *5) Data reading/recording that requires “MagicGate” copyright protection cannot be performed. “MagicGate” is the general name of a copyright protection technology developed by Sony using authentication and encryption.
SD memory card The SD memory card slot of the clock radio allows you to use the following: • SD memory card*1 • miniSD card, microSD card (An adaptor is necessary.)*2 • SDHC memory card*3 • MMC standard memory card*4 We do not guarantee proper operations for all types of SD memory cards and MMC standard memory cards. *1) The clock radio has been demonstrated as operable with an SD memory card with a capacity of 2 GB or smaller.
Replacing the battery Precautions 1 2 3 4 5 Keep the AC plug connected to the wall outlet (wall socket), remove the screw that secures the battery holder at the back of the unit using a screwdriver. Open the battery holder. Replace a new battery in the battery holder with the + side facing up. Close the battery holder and secure it with the screw. Additional information • Play the unit on the power source specified in “Specifications.
Note on the alarm in the event of a power interruption In the event of a power interruption, the alarm will work until the battery is totally discharged. However, certain functions will be affected as follows: • The backlight will not light up. • If the alarm mode is set to any mode other than buzzer, it will change to buzzer automatically. • If a power interruption occurs while the alarm is sounding, the alarm will stop. • If the alarm is not stopped, the alarm will sound for about 5 minutes.
Specifications x Alarm section Alarm numbers: Dual Weekend Alarm: Every day/Work day/Week end Snooze: 10 minutes intervals up to 1 Hour Fun Wake up (Wake up Photo and recording voice): Numbers: 3 Maximum recording time: 10 sec. x Section for iPod (for ICF-CL75iP only) DC out: 5 V MAX: 500 mA x General LCD Size: 7 inch/WVGA (800 × 480) Brightness: 4 steps (Hi, Mid, Lo, Night mode) Speaker: ¢31.3 mm (1.
This unit includes a preinstalled Sony Lithium battery (CR2032) as back-up power source for the clock, which is preset to EST (Eastern Standard Time) at the factory. And this battery is considered part of the product.