The Wave/PC™ Interactive System Owner’s Guide April 12, 2001 PDF259774_00
Safety Information WARNING: To reduce the risk of fire or electric shock, do not expose the Wave/PC™ system to rain or moisture. As with any electronic product, use care not to spill liquids into any part of the Wave/PC unit. Liquids can cause a failure and/or a fire hazard. Keep the remote control lithium battery away from children. It may cause a fire or chemical burn if mishandled. Do not recharge, disassemble, heat above 100˚C (212˚F), or incinerate. Dispose of used battery promptly.
Safety Information 1. Read these instructions – for all components before using this product. 2. Keep these instructions – for future reference. 3. Heed all warnings – on the product and in the owner’s guide. 4. Follow all instructions. 5. Do not use this apparatus near water or moisture – Do not use this product near a bathtub, washbowl, kitchen sink, laundry tub, in a wet basement, near a swimming pool, or anywhere else that water or moisture are present. 15.
Safety Information Information about products that generate electrical noise If applicable, this equipment has been tested and found to comply with the limits for a Class B digital device, pursuant to Part 15 of the FCC rules. These limits are designed to provide reasonable protection against harmful interference in a residential installation.
Contents System Setup . . . . . . . . . . . . . . . . . . . . . . . . . . . . . . . . . . . . . . . . . . . . . . . . . . . . . . . . . . . . . . . . . . . . . 6 Before you begin . . . . . . . . . . . . . . . . . . . . . . . . . . . . . . . . . . . . . . . . . . . . . . . . . . . . . . . . . . . . 6 Installing the Wave/PC™ system hardware . . . . . . . . . . . . . . . . . . . . . . . . . . . . . . . . . . . . . . . . . 7 Installing the Wave/PC application software . . . . . . . . . . . . . . . . . . . . .
System Setup Before you begin Thank you for purchasing the Bose® Wave/PC™ interactive system. This system combines the power of your computer with the benefits of award-winning patented acoustic waveguide speaker technology to provide an entirely new way to listen to music. The Wave/PC system gives you one-touch access to your favorite AM/FM or Internet radio stations, music files, and your entire music collection in one easy-to-use package.
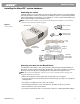
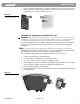
System Setup Installing the Wave/PC™ system hardware Unpacking the carton Carefully unpack your system (Figure 1) and save all packing materials. The original packing materials provide the safest way to transport your Wave/PC system. If any part of the product appears damaged, do not attempt to use it. Notify Bose® Customer Service immediately. (See phone number listings on the inside back cover.) Note: Find the serial number on the bottom of the Wave/PC unit.
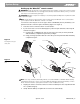
System Setup Setting up the Wave/PC™ remote control WARNING: Keep the remote control battery away from children. It may cause a fire or chemical burn if mishandled. Do not recharge, disassemble, heat above 100˚C (212˚F), or incinerate. Dispose of used battery promptly. CAUTION: Danger of explosion if battery is incorrectly replaced. Replace only with the same or equivalent type.
System Setup 5. Use the supplied mounting strip if you want to attach the remote to a surface in your listening room. Peel off the protective backing to stick one piece to the back of the remote and the other to the selected surface (Figure 4). Figure 4 Installing the mounting strip for the remote control S instrucee operatin g tio batteryns for types to be u of sed Installing the 9V battery in the Wave/PC™ unit WARNING: Keep the battery away from children.
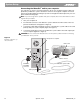
System Setup Connecting the Wave/PC™ unit to your computer This step tells you how to connect the Wave/PC unit to your computer using the cable supplied with your Wave/PC system. Illustrations of the two most typical computer connection panels are provided (Figure 6 and Figure 7). Refer to the figure that best represents your computer and the following steps. Note: If you are using stereo speakers with your computer, disconnect them before continuing with this procedure. 1. Turn your computer off. 2.
System Setup Figure 7 Rear panel of computer Example 2: Wave/PC™ system connections Audio plug DIN socket Audio output jack Serial data port DIN connector Serial data port (DB9) connector Wave/PC system cable Connecting the power cord to the Wave/PC unit 1. Plug the small end of the power cord into the power jack on the back of your Wave/PC unit (Figure 8). The connector is shaped to fit in only one direction. Line up the flat edge of the plug with the flat edge on the side of the jack. 2.
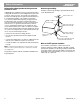
System Setup Connecting the external FM antenna FM radio reception is improved by connecting the supplied FM antenna to the external antenna connector on the back of the Wave/PC™ unit (Figure 9). Note: If you are not using the FM dipole antenna, the power cord serves as an antenna.
System Setup Note: If the Next button is not available, check to see if your computer’s hard drive has at least 200 MB of free storage space. 8. In the AM/FM station tables dialog box you can choose to install station tables for the entire US (occupies an additional 150 MB of disk space) or just your local area. Select one and click Next. Setup proceeds to install the software and related components. 9. Select one of the restart options.
System Setup 16. In this step, the setup program searches your hard drive for any music files you may already have: A. Select the types of music files to include in your search. You can select MP3 or WAV. By default, only MP3 is selected. B. Specify the minimum file length. When importing files, you may want to exclude short files containing operating system or game sounds. By default, the search process ignores files less than 20 seconds long. C. Specify the folders or directories to search.
System Overview The Wave/PC™ system controls You can find controls for your Wave/PC interactive system in three locations: • The Wave/PC software application window – This is the main user interface for the Wave/PC system. It provides you with the controls you need to play and record CDs, create your own playlists, and maintain your music library. For more details, see “Wave/PC™ application window” on page 16.
System Overview Wave/PC™ application window Figure 10 shows you the Wave/PC application window and describes the features and controls. Controls can also be accessed using right-click menus. Right-click anywhere in the blue background of the window to open these menus. Figure 10 2 The Wave/PC application window 3 4 5 6 7 1 8 9 10 1 Music source selection buttons – Selects the CD, AM, FM, Web Radio, or Music Files music source.
System Overview Wave/PC™ remote control You can use the Wave/PC remote control (Figure 11) to operate some of the basic functions included in the Wave/PC system application window. Aim the remote control at the front of the Wave/PC unit and press the button for the function you want. The remote normally works up to 20 feet (6.1 m) in front of the radio, and six feet (1.8 m) from either side.
System Overview The audio from a Web Radio station is delivered over an Internet connection. While using an Internet connection, you can experience delays, periodic drop-outs and even disconnection. This can affect the quality and continuity of Internet audio broadcasts. The ability of your Wave/PC system to play and record CDs, or play music files, is limited by the capabilities of your computer hardware and software components.
System Overview The Wave/PC™ system monitor The Wave/PC application software includes a program called the Wave/PC Monitor which was installed during the software installation process. This program runs in the background whenever your computer is on and enables the computer-generated audio to play through your Wave/PC unit. A status icon (Figure 13) for this program appears in the portion of the Windows Task bar where the clock is located.
Operating the CD Player/Recorder Playing an audio CD The Wave/PC™ interactive audio system can play any audio CD. Whenever you insert a CD into your computer’s CD-ROM drive, the Wave/PC system automatically selects the CD player (Figure 14) and begins playing the CD. When the Wave/PC system plays a CD for the first time, and you have an Internet connection, the application automatically links your computer to a free Internet database service, called CDDB, and downloads CD track information.
Operating the CD Player/Recorder Playing tracks from the music finder window The music finder gives you great flexibility in playing single or multiple music selections. • To start playback: Double-click the first title you want to play, or select the first title and click the Play/pause ( ) button. • To play only a single track: Select the title and click the Play Selection button. • To play a consecutive list of tracks: Select the first track you want to play.
Operating the CD Player/Recorder Recording an audio CD In addition to playing CDs from your computer’s CD-ROM drive, you can record and save them as music files on your computer’s hard drive. When you insert a CD into your computer’s CD-ROM drive, the Wave/PC™ software prepares itself to record all tracks on the CD. It indicates this by placing a check mark next to each track title in the music finder window (see the Record column in Figure 16).
Operating the CD Player/Recorder Recording CDs when disconnected from the Internet If your computer is disconnected from the Internet and you insert a CD into the CD-ROM drive, the track titles are numbered because CDDB information cannot be downloaded. However, you can record the CD and get CDDB information the next time you go on the Internet. The next time you connect to the Internet, select the CD player, insert any CD and click the Get Track Info button.
Operating the CD Player/Recorder Setting CD player/recorder setup options To access the CD player/recorder setup options (Figure 18) and change the configuration, click the Setup button and click the CD tab. After selecting the options you want, • Click the OK button to save your settings and close the setup window, or • Click the Cancel button to close the setup window without saving any changes, or • Click the Help button to open the on-line help information window.
Operating the CD Player/Recorder By default, when you insert an audio CD into your computer’s CD-ROM drive, the Wave/PC™ system automatically switches to the CD mode and starts playing the CD. To disable automatic playing, remove the check next to “Automatically play CDs when inserted.” Normally, when the Wave/PC system plays a CD for the first time, the Wave/PC application downloads detailed information for that CD from the CDDB website.
Operating the CD Player/Recorder Select “Record using error correction” to decrease the probability of audio errors during recording. The Wave/PC™ application can test your CD-ROM drive to determine its digital audio extraction speed and tell you whether or not it can support simultaneous record and playback. To test your CD-ROM drive: 1. Insert the Wave/PC installation disk in your CD-ROM drive. 2.
Listening to Music Files Selecting the Music Files player The Music Files player gives you one-touch selection of any MP3 or WAV file stored on your computer’s hard drive. To select the Music Files player (Figure 20), click the Music Files button on the Wave/PC™ application window, or press the File button on the remote control to start playing music recorded on your hard drive.
Listening to Music Files Navigating the music finder The music finder makes it easy for you to view your music database and find the music you want to hear. The music database is organized into a hierarchy of views (Figure 21) to group your music into logical collections.
Listening to Music Files Sorting lists in the music finder window You can sort the list in the music finder window by column heading in ascending or descending order. Click on a column heading and you’ll see a small triangle appear on the right-hand side of the heading. The sorting order is indicated by the direction of the triangle. Click the heading again to change the sorting order.
Listening to Music Files To find and play all the music of a certain type (jazz, rock, etc.): 1. Click the Types button. A list of music types is displayed in the music finder. 2. Enter the music type name (or part of the name) in the Search box. As you type, the music finder will reduce the number of displayed music types to only those that contain the string of characters entered in the Search box. 3. Select the music type and click the Play Selection button.
Listening to Music Files Maintaining your music library To help you create and maintain your music library, the Wave/PC™ application provides the capability to add and delete files, and edit the music finder database.
Listening to Music Files Creating your own music playlists Open the Playlist Editor by clicking the Edit Playlists button in the Music Files player mode. The playlist editor window is divided into two views (Figure 23). The lower view displays the music files finder and the upper view displays your playlists in a tree view.
Listening to Music Files Setting the Music Files player setup options To access the Music Files player setup options (Figure 24) and change the configuration, click the Setup button and click the Music Files tab. After selecting the options you want, • Click the OK button to save your settings and close the setup window, or • Click the Cancel button to close the setup window without saving any changes, or • Click the Help button to open the on-line help information window.
Listening to Music Files Normally, the Wave/PC™ application monitors your hard drive for new music files and adds them to the Wave/PC database. If you do not want this to happen automatically, remove the check mark beside “Automatically check for new music files.” If this box is not checked, you will need to click the Scan hard drive for music button to search for new music files. When new music files are found they are automatically added to the database (default setting).
Listening to Music Files To scan your hard drive for supported music files and add them to the music finder database: 1. Click the Scan hard drive for music… button. The dialog box shown in Figure 27 opens. 2. Select the types of music files to include in your search. You can select MP3 or WAV. By default, only MP3 is selected. 3. Specify the minimum file length. When importing files, you may want to exclude short files containing operating system or game sounds.
Listening to Web Radio Stations Selecting the Web Radio mode The Web radio mode (Figure 28) allows you to listen to a variety of Internet audio broadcast stations. To listen to a Web radio station, click the Web Radio button. A list of Internet stations is displayed in the station finder window. When you select the Web radio mode, the last station you listened to starts playing. You can add, edit, or delete stations as you wish. Note: To listen to Web radio, you need to have an active Internet connection.
Listening to Web Radio Stations Reading the connection status In the Web radio mode, you will experience a delay between when you select a web station and when you hear it. The connection status appears in the lower right corner of the information window (Figure 28).
Listening to Web Radio Stations Deleting a Web Radio station 1. In the Wave/PC™ Web Radio mode, select a station in the station finder. 2. Click the Delete Station button. 3. When the delete confirmation box (Figure 30) appears, click Delete. Figure 30 Web Radio delete confirmation box Editing the information of a Web Radio station This function is enabled only for user-entered stations. 1. In the Web Radio mode, select the station to edit in the station finder. 2. Click the Edit Station button.
Listening to Web Radio Stations Setting Web radio setup options To access the Web radio setup options (Figure 32) and change the configuration, click the Setup button and click the Web radio tab. After selecting the options you want, • Click the OK button to save your settings and close the setup window, or • Click the Cancel button to close the setup window without saving any changes, or • Click the Help button to open the on-line help information window.
Listening to AM/FM Radio Stations Selecting the AM/FM radio Selecting AM/FM radio (Figure 33) allows you to listen to your local AM/FM broadcast stations using the tuner in the Wave/PC™ unit. To find a radio station, click the AM or FM button and a list of your local radio stations is displayed in the station finder. These stations were downloaded during installation according to the ZIP code you entered.
Listening to AM/FM Radio Stations Adding a new AM/FM radio station Tune to the station you want to add and click the Add Station button. The Add Radio Station dialog box (Figure 34) opens, prompting you to enter information about the radio station. Enter the information and click OK to create a new station in the station finder, or click Cancel to close the box without creating a new entry. Note: You must fill in the Station ID or Name field in order to create a new entry in the station finder.
Listening to AM/FM Radio Stations Setting presets to play AM/FM radio stations You can assign up to six presets for the AM and FM radio modes. There are three ways to set presets: • Drag and drop – Find and select a radio station in the station finder. Drag the station out of the finder window and drop it onto any preset button. When the preset is stored, the station identification appears on the preset button and it begins to play automatically.
Listening to AM/FM Radio Stations The station database that was built on your hard drive during software installation was determined by the ZIP code you entered. The selections you make in the Local Zip code and Country drop lists are used by the Bose Wave/PC web site to determine which stations to download when you request an update.
General and Internet Setup Options Setting general setup options To open the General setup window (Figure 38) and change the configuration, click the Setup button and click the General tab. After selecting the options you want, • Click the OK button to save your settings and close the setup window, or • Click the Cancel button to close the setup window without saving any changes, or • Click the Help button to open the on-line help information window.
General and Internet Setup Options The Language drop list allows you to view the Wave/PC™ application in another language. The Calibrate Volume Control button is available if your Wave/PC unit is connected to the serial port of your computer. Clicking this button calibrates system volume levels so that the output level from the AM/FM tuner is approximately the same as from the CD, Web Radio, and Music Files sources.
General and Internet Setup Options • If your computer is not part of a network, select the default setting “No HTTP proxy.” • If your computer is part of a network and you already use a browser to access the Internet, select “Use my browser proxy settings.” • If your computer is part of a network and you do not use a browser, select “Manual proxy settings.” The Register product button is provided for registering your product or updating your registration information.
Using the Wave/PC™ Unit Controls The Wave/PC™ unit control panel The button panel functions are defined in Figure 40. You must use the control panel to change the clock and alarm settings, to select the Sleep feature time, or to select any component connected to the AUX input. The control panel On/Off and Volume buttons have raised ridges to help you locate these frequently used buttons.
Using the Wave/PC™ Unit Controls Clock display mode Figure 41 shows you the display indicators of the clock display. To view the AM/FM station frequency while in the clock mode, press both Tuning buttons at the same time.
Using the Wave/PC™ Unit Controls Setting the clock time Normally, the Wave/PC™ software keeps the radio clock synchronized with the clock in your computer. If you choose to disable this option in the General setup menu, you can set the clock using the Wave/PC unit’s control panel. Press and hold the Clock Set button and use the Tuning up and down buttons to change the clock time.
Using the Wave/PC™ Unit Controls Waking to a preselected AM/FM station Select ALARM or ALARM 2. Press and hold Alarm Set, and then press one of the six station Presets buttons (you can change between AM and FM if needed). To clear the preset, press and hold Alarm Set and press the button for that preset again. Stopping the alarm Press the On/Off button (or the stop ■ button on the remote). The indicators remain lit.
Making External Input/Output Connections Connecting an external audio source to the Wave/PC™ unit R L AUX IN You can use the Wave/PC unit as extension speakers for an external audio source, such as a tape or CD player. Connect the external source to the right and left AUX IN jacks (Figure 43). Most audio cables are color coded. Match the red plug to the R (red) jack and the black or white plug to the L (white) jack. For cable information, see “Input connection details” on page 52.
Making External Input/Output Connections Input connection details Audio cables for connecting external components to the Wave/PC™ system are available at electronics stores, or by calling Bose® Customer Service. Connection at source Wave/PC connection Source Cable Portable CD or tape player One miniplug-to-stereo Headphone jack AUX IN jacks audio cable For best sound, set R L AUX IN the player volume control to approximately 3/4 of maximum volume.
Reference Cleaning the Wave/PC™ unit Use only a dry cloth to clean the outside of the Wave/PC unit. If necessary, you may use a soft-bristled attachment to gently vacuum the front of the radio. Do not use any solvents, chemicals, or cleaning solutions containing alcohol, ammonia, or abrasives. Do not allow liquids to spill into any openings on the radio. If liquids get into the product, turn the radio off. Call Bose® Customer Service as soon as possible to arrange for service.
Reference Troubleshooting If you need additional help in solving problems, contact: Bose Customer Service, 1-800-851-2673 You can also request technical support using the Wave/PC™ system application. Click the Setup button and click on the Internet tab. Click the Tech Support button and follow the instructions.
Reference Table 1: General Troubleshooting Problem What to do No computer sounds until Wave/PC™ system application is launched. Re-install the Wave/PC software application. The Wave/PC system application window looks strange. Colors are not smooth and the information window contains blocks. Go to the Control Panel of your computer. Open the display properties and change the color setting (if supported) from 256 to a greater color depth.
Reference Table 3: Web Radio troubleshooting Problem What to do I cannot connect to any stations. I keep getting “Cannot connect to server” messages. • Make sure you have an active Internet connection. • Open RealPlayer and go to View, Preferences. Click the “Transport” tab and click “Auto Configure.” When finished, close RealPlayer®. If problem persists, contact Bose Customer Service. I cannot connect to some stations. • Try connecting at another time.
Reference Table 4: CD troubleshooting Problem What to do Information downloaded from CDDB is 1. for another CD. 2. Click the Setup button and click on the CD tab. Deselect the “Use first match for CD track info” option. 3. Click the OK button and then click the Get Track Info button. CDDB should provide all matches available. 4. Select the appropriate match from the list. When playing a CD, I always get the message “Unknown Artist” followed by “CDDB service not available.
Reference Table 5: Music Files troubleshooting Problem What to do I inserted a CD with music files and then scanned for music, but the files did not appear in the Music Finder. Files cannot be directly imported from a CD. To import these files: 1. Play the CD from the CD display screen. 2. Copy the files to the hard drive and then scan the hard drive for music files. While playing a music file I try to delete You cannot delete a file that is currently being played.
Glossary B Bit rate – The digital representation of an audio signal expressed in bits per second (bps). The bit rate often determines the quality and size of an MP3 file. Higher bit rates create larger but better-sounding files. The most common bit rate for MP3 is 128kbps. This gives you near-CD quality at about a 10:1 compression ratio. Browser – A short name for your Internet browser. C CDDB – An on-line repository of audio CD information provided by CDDB, Incorporated.
Glossary S Station finder – A Wave/PC™ software feature that allows you to find an AM/FM broadcast radio station in the database. Streaming – A name given to the media that allows you to play audio or video directly from the Internet, without first saving it to your hard drive. Its main advantage is that you can start listening to your selections right away, without having to wait for a file to finish downloading. Two popular streaming formats are Real Audio and SHOUTcast. U URL – Uniform Resource Locator.
Index A acoustic waveguide 6 ALARM 48, 49 ALARM 2 48, 49 alarm check 49 Alarm Mode 49 Alarm Off 17 Alarm Set 49 AM 17, 47, 48 AM/FM 17 AM/FM radio 40 adding a station to 41 controls 40 deleting a station from 41 editing a station in 41 setting presets for 42 setup 42 application window 15 automatic dimming 48 automatic play 25 automatic shutoff 49 AUX 17, 47, 48 AUX IN jacks 51, 52 B backup battery power 9, 48, 50, 53 battery (9V) installation 9 battery (9V) replacement 53 battery (remote control) installa
Index U unit control panel 15 unmute 17 unpacking 7 V VOL 48 Volume 17, 18, 47 W wakeup time 17, 47, 48 warranty 53 warranty card 7, 53 Wave/PC™ unit 12/24 hr.
Bose Corporation USA & Canada Service Bose Corporation, The Mountain Framingham, MA 01701-9168 1-800-851-2673 World Wide Web www.bose.
©2001 Bose Corporation The Mountain, Framingham, MA 01701-9168 USA PDF259774_00 JN10648 April 12, 2001