page 506CA In-Dash AM/FM CD Receiver Congratulations on your purchase of a CONTENTS 2 Installation 4 Using the Detachable Front Panel 4 Disc Notes 6 Operation 6 Features and Controls 7 General Operation 8 Radio Operation 8 CD Operation 8 AUX In Operation 9 Wiring Diagram 9 Specifications 10 Troubleshooting In-Dash CD Receiver.
Installation Notes: - Choose the mounting location where the unit will not distract the driver. - Before finally installing the unit, connect the wiring temporarily and make sure it is all connected properly and the unit and the system works properly. - Use only the parts included with the unit to ensure proper installation. The use of unauthorized parts can cause malfunctions. - Consult with your nearest dealer if installation requires the drilling of holes or other modifications to the vehicle.
7. Reconnect the wire harness and the antenna and be careful not to pinch any wires or cables. 8. Slide the unit into the sleeve until it locks into place. 9. To further secure the unit, use the supplied metal strap to secure the back of the unit in place. Use the supplied hardware (Hex Nut (M5mm) and Spring Washer) to attach one end of the strap to the mounting bolt on the back of the unit. If necessary, bend the metal strap to fit your vehicle's mounting area.
Using the Detachable Front Panel Removing the Front Panel 1 . Press the release REL button (1) on the front panel . 2 . Pull off the front panel . Precautions when handling 1. Do not drop the front panel. 2. Do not put pressure on the display or control buttons when removing or installing the front panel. 3. Do not touch the contacts on the front panel or on the main unit body. It may result in poor electrical contact. 4.
process). 3. Depending on the recording status, conditions of the disc and the equipment used for the recording, some CD-Rs/CDRWs may not be played on this unit. For more reliable play back: A. Use CD-RWs with speed 1x to 4x and written with speed 1x to 2x. B. Use CD-Rs with speed 1x to 8x and written with speed 1x to 2x. C. Do not play a CD-RW which has been written for more than 5 times. C. Handling and Cleaning - Dirt, dust, scratches and warped discs may inhibit playback.
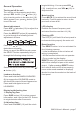
Operation Features and Controls Front panel : 18 2 19 4 R C 9 1 ST 17 SEL I 10 14 MON 15 13 3 11 Rear of front panel : 506CA User’s Manual - page 6 12 6 5 7 8 16
General Operation Turning on/off the unit Turn on the unit by pressing any button (except REL button (1) or button (4)) or by inserting a disc in the disc slot (18). When system is on, press button (2) to turn off the unit. Sound adjustment Press VOL / button (10) to adjust the volume level. Press the SELECT button (9) repeatedly to cycle through the following sound adjustment choices: Press VOL / button (10) to adjust the desired sound quality.
Radio Operation Switching to radio mode Press MODE button (13) to select radio mode. The radio mode appears in the display together with the memory band and frequency. Selecting the frequency band Press BAND button (8) to select the desired band. The reception band will change between FM and AM . Stereo/Mono Press MONO button (16) to select mono or stereo mode. Tune button Rotate TUNE button (17) to select a broadcasting station. CD Operation Switching to CD mode 1.
Red to RCA R CH L CH White to RCA ANTENNA Socket Wiring Diagram Specification 1. GENERAL Power Supply Requirements DC 12 Volts, Negative Ground Chassis Dimensions 178(W)x160(D)x 50(H) FM Frequency Coverage : 87.5-107 . 9 MHz IF : 10.7 MHz Sensitivity (S/N=30dB) : Tone Controls - Bass (at 100 Hz) ±14 dB - Treble (at 10 kHz) ±14 dB Maximum Output Power: 4x40 watts Current Drain : Stereo Separation : AM Frequency Coverage : 4µV >20dB 530-1710 KHz 10 Ampere (max.) IF : 2.
Trouble Shooting Before attempting to troubleshoot a problem, first make sure that all wiring is done properly. If problems persist after you have made an effort to troubleshoot using some of the ideas below, see a qualified mobile audio technician. The car ignition switch is not on. If the power supply is connected to the car accessory circuits, but the engine is not moving. switch the ignition key to “ACC”. There is already a disc in the Remove the disc in the player, player. and then put a new one.