MR2180UA OWNER’S MANUAL Mobile Audio System y PLL Synthesizer Stereo Radio y CD/MP3/WMA Player y RBDS Operation y Automatic Memory Storing y Preset Equalization y Electronic Shockproof (ESP) Function y USB Interface y Auxiliary Input Function y Remote Control 1
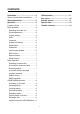
CONTENTS Installation ........................................... 3 USB operation .....................................9 Disc notes............................................10 Remote control....................................11 Specification........................................12 Trouble shooting.................................13 Take out screw before installation ......... 3 Wiring Connection .............................. 4 Operation.............................................
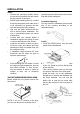
INSTALLATION Notes: y Choose the mounting location where the unit will not interfere with the normal driving function of the driver. y Before finally installing the unit, connect the wiring temporarily and make sure it is all connected up properly and the unit and the system work properly. y Use only the parts included with the unit to ensure proper installation. The use of unauthorized parts can cause malfunctions.
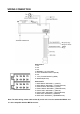
WIRING CONNECTION (A) Connector A 1. N.C. 2. N.C. 3. N.C. 4. MEMORY +12V (YELLOW) 5. AUTO ANTENNA OUTPUT (BLUE) 6. N.C. 7. +12V (TO IGNITION KEY) (RED) 8. GROUND (BLACK) Connector B 1. REAR RIGHT SPEAKER (+) (VIOLET) 2. REAR RIGHT SPEAKER (-) (VIOLET/BLACK) 3. FRONT RIGHT SPEAKER (+) (GRAY) 4. FRONT RIGHT SPEAKER (-) (GRAY/BLACK) 5. FRONT LEFT SPEAKER (+) (WHITE) 6. FRONT LEFT SPEAKER (-) (WHITE/BLACK) 7. REAR LEFT SPEAKER (+) (GREEN) 8.
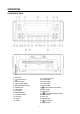
OPERATION LOCATION OF KEYS 1. EQ button 2. (power) button 3. Remote sensor 4. Liquid crystal display 5. BND/LOUD/ENT button 6. AS/PS button 7. DISP button 8. PTY button 9. MOD/SW button 10. AF/MUTE button 11. TA button 12. 6 DIR+ 13. 5 DIR- 14. 1-6 preset buttons 15. 4 SHF button 16. 3 RPT button 17. 2 SCN button 18. 1 PAU button 19. tune/seek/track up button 20. VOL- button 21. SEL button 22. tune/seek/track down button 23. VOL+ button 24. Disc slot 25. Reset button 26. Eject button 27.
OPERATION BASIC OPERATION 3)TA SEEK/ALARM Use the VOL+/- buttons (23&20) to set TA SEEK or TA ALARM. Traffic announcements TA SEEK: With activated TA function the unit searches for a station with traffic announcements. TA ALARM: No automatic station search. The unit sounds a beep tone if no traffic information is received and NO TP/TA is displayed. SEEK PI is displayed if the selected station does not transmit an RBDS signal.
OPERATION “MANUAL” appears on the display, the manual tuning mode is selected. If both buttons have not been pressed for several seconds, it will return to seek tuning mode and “AUTO” appears on the display. ESP FUNCTION The unit can be shockproof about ten seconds. REMOTE SENSOR Point the remote control handset to the remote sensor (3). Press the function keys on the handset to control the system.
OPERATION REPEATING TRACKS Press RPT button (16) to continuously repeat the same track. Press it again to stop repeat. When playing MP3/WMA disc, press and hold RPT button (16) to repeat all tracks in the current directory. Press it again to exit this mode. / button (22&19), the Then press unit will search the program automatically. If there is a corresponding program searched, the unit will play the program.
OPERATION played by pressing BND/LOU/ENT button. BND/LOU/ENT button (5) to start playing the track. 3) DISPLAY INFORMATION Press DISP button (7) to show the following information, such as the clock, ID3 TAG (if available: song title, directory name, artist name, other contents…) (FOR WITH MP3 ID3 FUNCTION VERSION ONLY) and other information. Searching Directory or File Name Press AS/PS button (6) for two times. It enters into “Searching Directory or File Name” in Digital Audio CD.
OPERATION operation may cause file loss. And our company assumes no responsibility for this. C. Notes on MP3 files (MP3 Version Only): 1. The disc must be in the ISO9660 level 1 or level 2 format, or Joliet or Romeo in the expansion format. 2. When naming a MP3 file, be sure the file name extension is “.MP3”. 3. For a non-MP3 file, even though the file name extension is “.MP3”, the unit cannot recognize it. DISC NOTES A. Notes on discs: 1. Attempting to use non-standard shape discs (e.g.
REMOTE CONTROL 1. VOL+: Volume Up Button (Character Select (A, B~8,9,0, _,-,+) For MP3/WMA Operation) 2. : Power ON/OFF Button 3. SEL: Sound Mode Select Button (Character Shift Right For MP3/WMA Operation) : Tune/Seek Down Button 4. TUNE/SKIP 5. DISP: Display Button 6. VOL-: Volume Down Button (Character Select (A,B~8,9,0, _,-,+) For MP3/WMA Operation) 7. 1 PAU: Pause Button 8. 1-6: Preset Buttons 9. 4 SHF: Shuffle Button 10.
SPECIFICATION GENERAL Power Supply Requirements : DC 12 Volts, Negative Ground Chassis Dimensions Tone Controls - Bass (at 100 Hz) - Treble (at 10 kHz) Maximum Output Power Current Drain : 178 (W) x 160 (D) x 50 (H) : ±10 dB : ±10 dB : 4x80 watts : 15 Ampere (max.) CD PLAYER Signal to Noise Ratio Channel Separation Frequency Response : More than 55 dB : More than 50 dB : 40Hz – 18 kHz RADIO IF Sensitivity (S/N=30dB) Stereo Separation FM 87.5 to 107.9 MHz (USA) 87.5 to 108 MHz (Europe/Asia) 10.
TROUBLE SHOOTING Before going through the checklist, check wiring connection. If any of the problems persist after checklist has been made, consult your nearest service dealer. Symptom Cause Solution The ignition switch is not on. If the power supply is connected to the car accessory circuits, but the engine is not moving, switch the ignition key to “ACC”. The fuse is blown. Replace the fuse. Presence of CD disc inside the player. Remove the disc in the player, then put a new one.