
Full Product Manual


Page 9
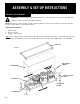
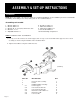
Step 2: Remove all loose parts included in the container, e.g. hardware box.
Step 3: Use scissors or a knife to cut and remove the straps securing the parts to the beam or tank assembly, including
fenders, wheels, tongue assembly, log tray assemblies, then put aside these parts for assembly.
NOTE: DO NOT remove the strap securing the hydraulic hoses assemblies to the beam at this time, until you do the
assembly procedure of the hoses.
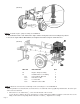
Step 4: Use scissors or a knife to cut and remove the straps securing the engine / pump assembly to the crate bottom,
and then place aside carefully for assembly.
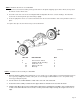
Step 5: Use a pry bar or claw hammer to remove the plywood splinters securing the beam and tank assemblies on the
crate bottom. Take out the two heavy assemblies.
NOTE: Due to the weight / size of the two assemblies, it’s recommended two or more adults to assist lifting and moving
the two assemblies. Lifting tools as hoist, crane, jack, etc. are recommended, too.
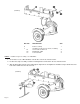
Step 6: Inspect all component assemblies, parts and accessories according to the packing list attached in this manual
(Page 31). Make sure all items listed in the packing list are included, and of no shipping damage.
If any parts are damaged or missing, please call our customer service department at 1-800-780-2677 for
assistance.
NOTE: DO NOT discard the packing materials until you have carefully inspected and satisfactorily operated the tool.
Page 12