This radio is equipped with the most advanced "TOUCH SENSE PANEL", so that it is easy and convenient to use while driving. Tips Tips; Here are some tips to show you how easy it is to use this touch sense panel: Using a very light touch on the radio panel will activate that feature. You will not need to "PRESS" hard on the panel to make this radio change features. The power button along with some of the buttons that have dual functions, will need to be "TOUCHED" from 2 to 3 seconds to make the change.
1. INSTALLATION Before finally installing the unit, connect the wiring temporarily and make sure it is all connected up properly and the unit and system work properly. Use only the parts included with the unit to ensure proper installation. The use of unauthorized parts can cause malfunctions. Consult with your nearest dealer if installation requires the drilling of holes or other modifications of the vehicle.
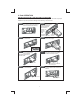
Removing the unit a a. Frame b. Insert fingers into the groove in the front of frame and pull out to remove the frame. (When re-attaching the frame, point the side with a groove down wards and attach it.) c. Insert the levers supplied with the unit into the grooves at both sides of the unit as shown in figure until they click. Pulling the levers makes it possible to remove the unit from the dashboard. b c Trim Plate Installation: Push the trim plate against the chassis until it is fitted.
2. DETACHABLE CONTROL PANEL (D.C.P.) Removing The Detachable Control Panel (D.C.P.). PANEL RELEASE BUTTON 1. Turn the power off 2. Press the D.C.P. release button 3. Remove the D.C.P. Attaching the DCP 2 A B 1. Attach the panel at the right side first, with point B on the main unit touching point A on the D.C.P. (As shown on the diagram). 2. Then press the left side of D.C.P. onto the main unit until a “click” sound is heard. CAUTION DO NOT insert the D.C.P from the left side. Doing so may damage it.
3.
4.
5. iPod OPERATION INSTALLING iPod INTO THE BUILT-IN iPod DOCKING Always follow the below steps to install the iPod into the docking station. Incorrect or improper installation may cause permanent damage to the docking or the iPod unit. Step 1 Step 5 Once the stick is completely pulled out, user should see the iPod connector, and user can connect the iPod to the connector Press toward this as shown in this step. lock switch Press down the button as indicated below to unlock the iPod docking.
REMOVE iPod FROM THE BUILT-IN iPod DOCKING To take out the iPod from the docking station, user can first detach the front panel, and repeat step 1 to step 8 to take out the iPod & return the iPod docking inside the unit’s cabinent. Step 1 Step 5 Once the stick with the connected iPod is completely out, user should push on the locking buttons on the both sides of the iPod connector to release the iPod as Press toward this lock switch indicated in the picture, and remove the iPod unit.
iPod FULL CONTROL / OPERATION This unit is equipped with iPod Ready function which allow end user to have direct control of the iPod on the front panel control button and display iPod song information on the unit's LCD display. Please read below for more details operation.
1) 2) 3) 4) 5) Playlist Artist Album Song Genre Once selected the desire searching method, within 10 second press the AUDIO button as confirm & access into the searching mode, then turn the rotate encode volume knob to navigate thru the Album or Artist or Song contained in the iPod. Press the AUDIO button to confirm & play the selected song. During the searching mode, press AS/PS as quick move back to the last upper level of Album, Playlist, Genre, etc.
6. BASIC OPERATIONS 3) PANEL RELEASE BUTTON (REL) Press this button to remove the control panel. 1) POWER ON/OFF BUTTON ( ) Press POWER button or any other button on the front of the radio to turn the unit on. Press POWER button again to turn the unit off. MUTE BUTTON (MUTE) Press the mute button momentarily to mute the audio volume, and "Mute" will flash in the display. Press the mute button again to restore volume to the previous setting.
7. MENU OPERATION 22) MENU FUNCTION LIST (SYS MENU) Press SYS MENU to access the menu. will appear in the display momentarily. Navigate the menu by pressing SYS MENU momentarily to move forward to the next option. The menu can also be navigated by using the Tuning Up or Tuning Down Button to move to the next or previous option. Once the desired option appears in the display, adjust that option by rotating the volume control within 5 seconds. The following options are adjusted through this menu feature.
8. AUDIO OPERATION Audio Menu Press “AUDIO” button to access the Audio Menu. User can navigate thru the Audio Menu items by pressing the “AUDIO” button repeatedly, or by pressing the Tuning Up or Tuning Down Button. Once the desired menu item appears on the display, adjust that option by using the Volume Up or Down button within 5 seconds. The following menu items can be adjusted as described above. The unit will automatically exit the Audio Menu after five seconds of inactivity.
9. TUNER OPERATION 7) BAND BUTTON (BAND) Press BAND to change between FM bands and AM(MW)bands. 20-21) TUNING UP/DOWN BUTTON ( ) Manual Tuning Press the Up Tuning or Down Tuning button for more than 3 seconds to move the radio frequency number up or down one step. Auto Seek Tuning Press the Up Tuning or Down Tuning button for less than 3 seconds to move to next station automatically. 12-17) PRESET STATIONS BUTTONS Six numbered preset buttons store and recall stations for each band.
10. RDS OPERATION RDS functions The unit is equipped with the following RDS function: - AF Alternative Frequencies CT Clock Time EON Enchanced other Network PI Program identifications PS Program service name PTY Program Type REG Regional Change TA Traffic Announcement TP Traffic program 1. AF Function By pressing AF button < 3 seconds to select AF ON/OFF. “AF ON” or “AF OFF” will show & remain on the LCD segment for 5 seconds..
11. MP3/WMA MUSIC FILES OPERATION OPERATION 12) PAUSE BUTTON Press the pause button to suspend file play. Press the pause button again to resume file play. 20-21) FILE SELECT Press the Up Tuning or Down Tuning button ( ) for less than one second to advance to the next file, The selected file number will appear on the display. Press and hold the Up Tuning or Down Tuning button ( ) for more than one second to fast forward or fast reverse through the file. File play starts when the button is released.
Entering File and Folder Names Names using the code list characters are the only file names and folder names that can be entered and displayed. Using any other character will cause the file and folder names to be displayed incorrectly. The unit recognizes and plays only files with the MP3/WMA extension. A file name entered with characters not on the code list may not play correctly. Writing Files into a Media When a media containing MP3/WMA data is loaded, the unit checks all data.
FILE/FOLDER PLAY There are three different play methods as following: File/Folder Intro play: Press M2 button more than 3 seconds during playing MP3/WMA file for “intro play” all files of the current folder. Intro play should restart from the first song of the current folder, after all files in the current files have been intro-played. To disable current folder “intro play”, long press M2 button more than 3 seconds Press M2 button less than 3 seconds is “intro play” all files on the media device.
12. USB OPERATION The unit can support USB Host Function. It can playback MP3 and WMA Audio format which are stored into USB Memory Stick or USB interface Music Player. Please read below before you start the operation of USB HOST Function.
13. MEMORY CARD OPERATION The unit can support playback MP3 and WMA Audio format which are stored into SD and MMC Memory Card . Please read below before you start the operation of Memory Card.
14. MUSIC FILES TRANSFERRING Thanks for the most useful and convenient files transferring function of this unit, user can easily transfer music files between USB Stick, SD or MMC Memory card.
TRANSFER MP3 OR WMA MUSIC FILES BETWEEN MEDIA DEVICES Select a device by mode button and playback the music file need to be transfer: 1. Long press the COPY button to activate the transfer mode. 2. The LCD will display as default, Rotate the encoder volume knob to navigate thru > for selection of the storage media. 3. Once selected the storage media, Press AUDIO button as confirmation to start the record to this selected media.
15. MUSIC FILES ERASING You can erase files from the USB Stick or Memory Card. Please read below for the details operation of this function: ERASABLE MEDIA USB Stick and Memory Card. ERASING MUSIC FILES ON THE MEDIA There are THREE different methods for erasing files; 1.Erase while the Music File is playing. Long press BAND button to activate the ERASE mode The LCD will display Short Press the AUDIO to enter into the ERASE mode. Once enter into the erase mode.
Short Press the AUDIO to enter into the ERASE mode Once enter into the erase mode. User can rotate the encoder to select “ ” to confirmthe erase or rotate the volume knob to select “ ” to cancel the ERASE mode. If no further button is press within a 5 second time out. The unit automatically resume to the previous mode. Once the “ ” is displayed on the LCD, press the AUDIO button to final confirm to erase the selected music file.
16. FILES MANAGER The advance “File Management.” System of this unit can help to well you organize all the music files just like a PC . Please read below for details: FOLDERS MANAGEMENT This unit will automatically self-create the below default folders onto any USB /SD / MMC media device, once these devices are inserted into the unit.
17.
18. SPECIFICATIONS MEDIA SECTION USB Host Memory Card Host 1.1 compatibles 2.0 Support Type of Memory Card SD and MMC RADIO SECTION FM Frequency Range Intermediate Frequency Usable Sensitivity Stereo Separation S/N Ratio 87.5-108Mhz 87.5-107.9Mhz 10.
19. TROUBLE SHOOTING Before going through the check list, check wiring connection. If any of the problems persist after check list has been made, consult your nearest service dealer. Symptom No power Cause Solution The car ignition is not on. If the power supply is properly connected to the car accessory terminal, switch the ignition key to “ACC” The fuse is blown. Replace the fuse. Volume is in minimum. Adjust volume to a desired level. Wiring is not properly connected. Check wiring connection.
4 10 R - 02 0896