Please take the time to read this manual before contacting us for help! 1 INTRODUCTION Congratulations on purchasing the Partheus Software GT Manager. This software allows you to control your Boss GT-3, GT-5, GT-6, GT-8 or GT-10 multi-fx pedals from your PC.
CONTENTS The document contains the following sections: 1 2 Introduction Installing and Registering the Software 3 4 5 Setting up the Hardware Getting Started General Features 6 7 8 Patch Files Patch Editor Data Transfers 9 10 11 12 Preset Files Text and Zip Files Settings - Connections Settings 13 The Menus – control panel 14 The Menus – patch files 15 The Menus – text files 16 The Menus – zip files 17 EQ Adjust Add-in 18 System Editor A B C “It Doesn’t Work” Un-install Details Add-in Interface CO
2 INSTALLING AND REGISTERING THE SOFTWARE INSTALLATION Save the file you downloaded on your PC’s hard disk. You need to have administrator privileges to be able to install GT Manager (unless you are running Windows 98). You also need administrator privileges to enter the registration information after installation. Fresh installation Click or double-click (depending on your Windows settings) on the downloaded file to run the installation. Upgrading from version 1.0.
to have administrator privileges to be able to enter the registration data (unless you are running Windows 98). Finally, exit and then re-start GT Manager to complete the registration. HOW DO I GET SEVERAL LICENCES? If you want to have GT Manager running on several PCs, then simply copy the email into GT Manager on each PC. You can transfer the email between PCs by saving it as a plain text file, and then using a floppy disk or CDR or memory stick etc.
3 SETTING UP THE HARDWARE MIDI CONNECTIONS Unless you are using the GT-10 USB connection, first make sure you have a soundcard with MIDI output or some other MIDI interface unit! If your soundcard has the MIDI connections on the gameport (a 25-way Dconnector), then you will need an adapter. Try and get an adapter that includes an “opto-isolator” in the MIDI input. This is required to meet the MIDI specification, but some adapters don’t include it as it adds cost to the adapter.
For the GT-6, GT-8 and GT-10, use the SPDIF socket (phono) to connect to the PC’s SPDIF input (usually phono). Although you can buy “special” SPDIF cables, a standard audio grade phono cable should be perfectly adequate. This gives the highest quality stereo signal to the PC since the connection is digital. For the GT-10, use the USB connection. This also gives the highest quality stereo signal to the PC since the connection is digital.
4 GETTING STARTED BASIC PROGRAM SETTINGS So you’ve installed the software and connected your effects pedal, now we can start. In GT Manager, under the Tools and Settings menu, select Connections . GT Manager shows the available MIDI input and output ports. Normally, the software will have found the right settings for you, but check that the input and output port settings are correct. The Device ID and EXP / CTL CC numbers default to the same as the default settings in the GT- .
So where did the system data go? All the system data is kept in a separate file, and stored in either the same folder on your PC that GT Manager is installed in on old versions of Windows, or in the “All Users\Application Data” area on Windows NT / XP / Vista. This way, you only have one copy of your system data on your PC. You can of course make a copy of this file if you want, using Windows Explorer. You might want to do this, just in case you need to undo some changes later on.
5 GENERAL FEATURES This section tells you about some of the useful features that GT Manager has that are not covered in other sections of this guide. USERNAME AND EQUIPMENT SET-UP You can tell GT Manager your name, and describe your basic equipment set-up. This information is included in any patch files you make. This is useful if you have different sets of patches for different equipment set-ups, and is also useful if you are going to share your patches with other people.
6 PATCH FILES This section tells you how to manage your patch files. The patch editor is explained in the next section. ABOUT THE PATCH FILE WINDOW The left side of the window lists the patches. Any in light grey are the defaults for that patch location – this is not actually stored in the file. Note that the colour settings can be altered so that these presets are not shown, so you may just see empty “boxes”. You can scroll the list up or down with the scrollbar, or using the mouse wheel.
Info button Click on this to show further information about the patch. This includes the name of the person who created it and who last saved it, and the associated date/times. It also shows the equipment setup notes that are stored in the patch file (this is the same for all patches in the file). Globals button Click on this to show the globals settings. These are stored in the patch file HR button This is only visible if the selected patch is using custom Harmonist settings.
HOW DO I SELECT A PATCH? To select a patch that is in the patch file, left-click it once. The summary panel on the right of the window will be updated, and the patch data will be sent to the GT- . The patch data is not stored in the GT- at this point, and none of your patches have been overwritten. The data has in fact been sent to a temporary memory area. This is the same as when you select a patch on the GT- – you get a copy of the patch in the temporary memory area in the effects pedal.
Drag & drop works the in a similar way as it does in Explorer: Normal Ctrl Shift Shift+Ctrl Same file Different file Move Copy Move Swap Copy Copy Move Swap The first and second patches can be in the same or different patch files. If you drag onto a window that is partly underneath another one, it comes to the top so you can see it properly.
See also the patch pop-up menu item below. CAN I RE-SIZE THE WINDOW? Yes. Click and drag the border of the window. You cannot make the window smaller or wider than the default size, but you can make it taller so that you can see more patches at once. GT Manager remembers the last size you set, and uses this for any new patch file windows. PATCH POP-UP MENU If you right-click on a patch, a pop-up menu appears giving you quick access to common things you might want to do.
CAN I HIGHLIGHT SPECIFIC PATCH CATEGORIES? For the GT-10, click on the Filter button on the toolbar, or select Show category… from the View menu. This opens the window shown here. Select the categories to show, and which to “hide”. You can rename the user categories from here by right-clicking on the name and entering a new one. Press the Esc key to cancel the rename Remember that changes to the user category names apply to all patches – this is a global setting.
7 PATCH EDITOR The picture here shows the preamp for the GT-8 - HOW DO I OPEN THE EDITOR? First select the patch by left-clicking on it. Then double-left-click the patch to open the editor. Alternatively, click on the effect box in the right hand pane (where it shows which effects are on/off etc) to open the editor and go straight to that effect. HOW DO I SELECT AND VIEW EFFECTS? This works the same way as the GT- . Click on the effect button for the effect you want to see.
and then click on the Assign button. The “light” in the Assign button will be on if any of the individual assigns are on. The assign select panel underneath shows which assigns are on by putting a red background under the assign name/number. HOW DO I SELECT SUB-EFFECTS? For effects that are in groups (like MOD on the GT-3 and GT-5, or FX2 on the GT-6 and GT-8), a list of the sub-effects is shown in a panel underneath the effects buttons. This has selection boxes next to each sub-effect name.
to go to the previous control, and CTL 2 to go to the next control (a long press on either pedal reverses the direction). The EXP pedal is used to move the control knob. So you can now adjust patch parameters using your feet – leaving your hands free to carry on playing. Whilst this feature is activated, the normal functions of the CTL and EXP pedals are switched off.
WHY ARE SOME KNOB VALUES “OFF”? For some effects, not all the controls are relevant. For example, in the Harmonist, if you select 1-voice, then the controls for voice 2 are all turned off. On the GT- , you will find that these are not listed when you scroll through the effect parameters. CAN I RE-SIZE THE WINDOW? No, the editor window size is fixed. All the controls for editing an effect fit into the window.
8 DATA TRANSFERS HOW DO I TRANSFER TO THE PC? From the File and Windows menu, select Load (bulk dump) . On your effects pedal, go to MIDI Bulk Dump (the dialog box reminds you how to do this), select the first and last patches as the start and end points. Start the transfer from the GT- . If you have changed the GT- System data (for example the custom settings) then you should select “System” as the starting point. This will then update the copy of the system data on your PC.
You can put the GT- in Bulk Receive either before or after you select Load One from the Edit menu. HOW DO I TRANSFER TO THE GT- ? If you only want to transfer one patch, then simply select it. GT Manager sends the patch data to the GT- . You can then save the data in any patch location (see below). For the GT-3, GT-5, GT-6 and GT-8, if you want to transfer all the patches in the file, first put the GT- into Bulk Receive mode. Next, select Bulk send to GT-3 (for GT-3 files) from the File menu.
9 PRESET FILES HOW DO I ACCESS THE PRESETS? The GT- include patches beyond the user-programmable locations that are fixed. You can open a patch file containing all these presets. The file window looks very similar to the normal patch file window. From the GT System data Presets menu, select GT-3 Presets , GT-5 Presets , GT-6 Presets , GT-8 Presets . or GT-10 Presets . You can click on these patches to select them in the same way as for a normal patch file.
10 TEXT AND ZIP FILES TEXT FILES You can open and save text files from the File Save As… menus. Open and File Save or File You can’t change the text in the file, but you can copy it and then paste it into other programs if you want. To do this, select the text you want to copy, then right-click on the text, and choose Copy from the pop-up menu. When converting between patch formats, if there are conversion problems then GT Manager will open a text window.
11 SETTINGS - CONNECTIONS This section describes the various parts of the MIDI connections display… Click on Tools and Settings and then click on Connections . MIDI INPUT PORTS This lists all the MIDI inputs on your PC. GT Manager will have selected the first one in the list when you first ran the program, or if you are using the GT-10’s USB connection, it will select that automatically.
If you select a MIDI output that is a synthesiser on your soundcard, then no data is sent to the GT- . You will not hear anything either, as the MIDI data does not include any music information. LIST ALL PORTS Shows all output ports – this will usually include software synths etc; use this if your actual output port isn’t listed otherwise. LOG MIDI IN AND MIDI OUT MESSAGES Enabling these will make GT Manager write all Midi activity into a text window. You don’t normally need to enable either of these.
MIDI IN CHANNEL This needs to match the MIDI Tx channel set in the GT- . If you get it wrong, then the GT Edit function won’t work. You can set GT Manager to accept input on any MIDI channel (Omni mode), in which case it doesn’t matter what the MIDI In Channel setting is. This is ok if you don’t have any other devices connected to the MIDI input. MIDI OUT CHANNEL This needs to match the MIDI Rx channel set in the GT- .
12 OTHER SETTINGS This section describes the other Settings. There are three parts – “User info”, “Folder & File” and “Colour scheme”. USER INFO SETTINGS Click on Tools and Settings and then click on User info . Enter your username as information about your equipment setup. This information is included in each patch file that you create. This is a useful reminder to yourself if you have different patches for different setups, and is also useful to other people if you share your patch files with them.
FOLDER & FILE SETTINGS Click on Tools and Settings and then click on Folder & File . DEFAULT FILE LOCATION You will probably want to keep all your patch files in the same folder on your PC. Set this folder here, then when you do a File Open or File Save As…, the folder will be set automatically. You can always change to a different folder in the File Open or File Save As… dialogs.
COLOUR SCHEME SETTINGS Click on Tools and Settings and then click on Colour scheme . PANEL SHADING This allows you to set your own colour preferences for the panels (default is blue). PATCH “BOX” STYLE This allows you to set your own colour preferences. If you don’t like the default colour, click on the patch boxes to change the colour for each style of patch box. The usual windows colour dialog is shown.
TASK PANEL STYLE You can change the visual appearance of all the control panel (the panel with the buttons for File and Windows , Tools and Settings etc. The default setting is “Office 2003”. KEEP MAIN PANEL ON TOP This keeps the main control panel on top of other windows so you don’t lose it. MENU & TOOLBAR STYLE You can change the visual appearance of all the menus and toolbars. The default setting is “Office 2003”.
13 SYSTEM SETTINGS This section describes the System Settings. There are three parts – “Presets”, “System Data” and “System Configuration”. “Presets” allows you to view the preset patches, as described in section 9. “System Data” allows you to edit the system settings for the GT- , as described in section 19. “System Configuration” allows you to keep up to 5 sets of system data. Normally, you can leave this on Configuration 1.
14 THE MENUS – CONTROL PANEL This section lists all the menu commands in the main control panel, with a brief description of what each one does. FILE AND WINDOWS : FILE New GT-3 GT-5 GT-6 GT-8 GT-10 F3 F5 F6 F8 F10 Opens a new GT-3, GT-5, GT-6, GT-8 or GT-10 file. The file lists all the default (preset) patches, but will in fact contain no data. Open… Ctrl-O Opens an existing file. This can be a patch file (*.syx), a text file (*.txt) or a zip file (*.zip).
TOOLS AND SETTINGS : TOOLS Check for updates Retrieves information about the latest software versions from our website, and lists what is available. An Internet connection is required for this. Registration Enter registration Allows you to copy your purchase confirmation email from Kagi into GT Manager to fully activate the software. This must be done within 10 days of purchase. Registration Registration Restore from backup disk Restores the registration data from a removable disk that you made before.
GT-8 Presets GT-10 Presets Opens up the chosen presets window listing all the patches that are not usermodifiable. You can only have one of these open. Although you can’t modify these patches, you can copy them into a normal patch file. System Data GT-3 System Data GT-5 System Data GT-6 System Data GT-8 System Data GT-10 System Data Opens up the system data editor add-in (you can also do this from the add-in list). HELP AND INFO : HELP Contents Opens the contents page of the help file for GT Manager.
15 THE MENUS – PATCH FILES FILE Save Ctrl-S Saves the current file. Save As… Saves the current file, asking you for a new filename first. Revert Discards all changes made to the file since it was last saved. Bulk send to GT-3 (or GT-5, GT-6, GT-8, GT-10) This does a bulk transfer to the GT- . The menu changes depending on the format of the patch file in the current window. You need to have the GT- in Bulk Receive mode for it to accept the data. Close Closes the current file.
Un-delete… Shift-Del Shows a list of patches deleted from the file so you can choose which ones to put back again. Rename… Crtl-R This allows you to rename the selected patch. Insert patch Moves all patches from the selected one along one position. If there is data in the last patch in the file, it will be deleted. Insert bank Moves all the patches from the selected one down one bank. Any patches in the last bank of the file are deleted. Load one Loads the selected patch from the GT- .
TOOLS This is a list of the available add-ins that work on patch data. GT Manager is supplied with the “EQ Adjust” add-in as standard. Add Ins… Shows you a list of compatible add-ins and their version numbers. Convert to text Converts the selected patch to text. The text is shown in a new text window. Convert file format to GT-3, GT-5, GT-6, GT-8, 0GT-10 Converts the whole patch file to the selected format.
16 THE MENUS – TEXT FILES FILE Save Ctrl-S Saves the current file. Save As… Saves the current file, asking you for a new filename first. Print Ctrl-P Prints the text file to the default printer. The current version of GT Manager does not let you change the printer settings. Close Closes the current file. If you have made any changes, GT Manager asks you if you want to save the file first. VIEW Theme Sets the visual theme for the menu and toolbar for text file windows.
17 THE MENUS – ZIP FILES FILE Close Closes the current file. VIEW Theme Sets the visual theme for the menu and toolbar for text file windows. Toolbar Hides or shows the toolbar. (only on the toolbar) Hides or shows the menus.
18 EQ ADJUST ADD-IN The EQ Adjust add-in allows you to adjust the EQ effect settings, and also the SubEQ settings in the MOD/FX2 effect, provided the MOD/FX2 effect is not being used for something else. You can activate the GT Edit function to adjust the Q, Frequency and Gain controls. This works in the same way as described above for the patch editor.
ADJUSTING THE SETTINGS Adjust the sliders by dragging in the appropriate direction. You can also left-click or right-click on the sliders value text to increment or decrement the value. CONTROLLING THE GRAPH Select which graph lines to display by clicking the buttons in the display control box. “EQ+SEQ” shows the combined response of EQ and Sub-EQ. “Orig” shows the original response corresponding to the effect settings when you opened the EQ Adjust add-in, before you made any adjustments.
PRECISE MEASUREMENTS If you click on the graph, EQ Adjust shows you the actual cut/boost values for EQ, SEQ and EQ+SEQ at the frequency you clicked at. A FINAL WORD ON EQ The graph shown by EQ Adjust is believed to be pretty close to what the GT- actually do. Remember, there are other effects in the GT- that can have a big impact on the overall tone, such as the PreAmp effect. EQ Adjust does not show you the response of the various preamps and preamp tone controls – this is much more complex.
19 SYSTEM EDITOR The System Editor allows you to edit the global system data from your GT- . First of all, make sure you have transferred this data from the GT- to the PC as part of a patch file transfer (bulk dump). GT Manager will save this system data on your PC automatically in a separate file to any patch data. The pictures below are mostly for the GT-10. The GT-3, GT-5, GT-6 and GT-8 displays are a bit different due to the differences between the effects units.
MIDI
SYSTEM PREAMP These are the settings for the “system preamp” which overrides all the patch preamp settings if the GT-8 or GT-10 is set to system preamp mode (see the first screen of system data above). This is only available on the GT-8 and GT-10. These are the MIDI settings. Currently, the MIDI map settings are not modifiable in the System Editor.
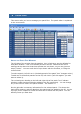
HARMONIST For the Harmonist, there are 29 user-defined scales. You can display scales 1 to 16 or 14 to 29 by clicking on the checkboxes. To modify any of the output notes, right-click on the appropriate note, then select the note you want from the pop-up menu. To fill-in the notes for Db through to B that correspond to the one for C, right-click on the note for C, and select Fill-in - >> from the pop-up menu.
AUTO-RIFF Each Auto-Riff phrase is displayed separately. To change any output note, right-click on the note, and select the one you want from the pop-up menu. You can also fill-in the sequence for notes Db to B by clicking on the Fill-in button. This copies the step sequence from C to Db to B, and saves you entering a lot of data for sequences that are the same for each note, but at a corresponding pitch (as in the picture above).
CUSTOM OD/DS This allows you to modify the Custom OD/DS settings. This is not available on the GT-3 or GT-10.
CUSTOM PREAMP This allows you to modify the Custom Preamp settings. For the GT-6, GT-8 and GT-10, Preamps 1 to 3 are selectable from the checkboxes. This is not available on the GT-3.
CUSTOM WAH This allows you to modify the Custom WAH settings. This is not available on the GT-3, GT-5 or GT-10.
INPUT This allows you to modify the input levels and global EQ. This is only available on the GT-10.
OUTPUT This allows you to modify the output levels and phrase loop settings. This is only available on the GT-10.
EXP This allows you to modify the EXP pedal settings. This is only available on the GT-10.
CTL This allows you to modify the CTL pedal settings. Click on the Edit CTL 3-4 box to show the settings for the external CTL pedals (3 and 4). This is only available on the GT-10.
A “IT DOESN’T WORK” Problems, and some answers. (Other parts of this document also cover a number of possible questions, so please also look through the relevant sections above). THE MIDI TRANSFER IS UNRELIABLE This problem is usually noticed when transferring patches to the PC, and the patch names seem to be garbled. If the patch data transferred into the PC seems to be corrupted, but seems ok sending out from the PC, then there is a problem with the MIDI interface.
B UN-INSTALL DETAILS This section is for information only. WHAT FILES ARE REMOVED? The uninstall program will remove the GT Manager program itself and various support files that were part of the installation. WHAT FILES ARE NOT REMOVED? The un-install will not remove any of your patch files or backup of the GT- system that you have on your PC. It will also not remove the files associated with the software registration.
C ADD-IN INTERFACE This section is for developers only. The capabilities of GT Manager can be added to using add-in modules. GT Manager currently has three standard modules - the EQ adjust add-in, the System editor add-in and a Webpage shortcut editor add-in. GT Manager automatically recognises valid add-ins placed in the PlugIns folder, and makes them available on the Tools menu.